17 Creative Clothing Hacks Every Girl Should Know
Dressing stylishly every single day does not require an overflowing walk-in closet or unlimited funds. Many women mistakenly assume that looking polished depends entirely on expensive designer purchases. However, knowing clever styling tricks easily transforms your existing wardrobe into endless chic outfits. Pinterest boards constantly celebrate viral fashion secrets that solve everyday clothing dilemmas effortlessly. You can effortlessly reinvent basic staples using simple household tools and smart styling techniques. Fast fashion tempts us to buy new clothes whenever minor wardrobe inconveniences arise. Instead, clever clothing adjustments extend the lifespan of your favorite daily garments. Learning practical styling methods instantly boosts your personal confidence before leaving the house. Smart fashion choices blend practical functionality, budget-conscious resourcefulness, and chic visual aesthetics.

Mastering High-End Styling Without Endless Shopping
Looking impeccably put-together depends primarily on garment fit, balanced silhouettes, and clean lines. Ill-fitting sleeves, sagging necklines, or awkward hems ruin even the most expensive clothing pieces. Fortunately, quick styling adjustments fix awkward proportions in mere seconds without tailoring. Basic household items like clear elastics, safety pins, and fabric tape work miracles. You can easily tuck, cinch, or secure tricky garments using everyday accessories. Furthermore, taking proper care of delicate fabrics immediately elevates your everyday personal presentation. Smoothing out lint and removing fuzz makes older sweaters look freshly purchased. Mindful styling choices turn humble budget basics into runway-worthy statement ensembles.
Why Smart Wardrobe Hacks Redefine Personal Style
Mastering simple fashion adjustments gives you complete creative authority over your daily closet. Mass-produced retail garments are designed for standardized body types, rarely fitting anyone perfectly. In contrast, personalized clothing tweaks ensure every top and skirt flatters your frame. You no longer have to pass up vintage thrift finds because of awkward cuts. Additionally, fixing unexpected fashion emergencies builds immense self-reliance during busy workdays. Conquering a stubborn zipper or hiding bra straps feels deeply satisfying and empowering. Custom fashion hacks allow you to experiment boldly without ruining your garments permanently. You become the innovative stylist of your own life, creating distinctive daily outfits effortlessly.
Smart Wardrobe Auditing for Practical Daily Dressing
A stress-free morning routine starts with a thoughtful, well-organized clothing inventory. First, pull out clothes that sit unworn due to minor fit or styling issues. Group together tops with gaping buttons, oversized t-shirts, and slipping shoe straps. Identifying specific clothing headaches prevents you from repeating uninspired outfit combinations all week. Next, create a small, dedicated fashion repair kit kept inside your vanity drawer. Stock it with clear bra strap clips, double-sided tape, and sharp scissors. Having these simple styling tools within reach makes getting dressed smooth and enjoyable. You will discover that many neglected pieces simply needed small styling adjustments.
Elevating Casual Outfits with Intentional Proportions
Styling modern outfits successfully requires balancing voluminous pieces with sleek, tailored focal points. Baggy knitwear looks best when front-tucked into crisp, structured high-rise trousers. Similarly, cinching loose oversized shirts highlights your natural waistline without causing bulkiness. Thoughtful styling tricks create harmonious visual proportions that flatter every body shape beautifully. Adding subtle rolled cuffs exposes delicate wrists, instantly lightening heavy winter layers. Moreover, controlling excess fabric prevents petite frames from looking completely swallowed by streetwear trends. Simple adjustments bring cohesive designer intention to your most casual everyday jeans-and-tee combinations. You will always appear effortlessly styled rather than hastily thrown together.
Assembling a Portable Wardrobe Emergency Kit
Unexpected fashion mishaps can easily disrupt an important workday or romantic evening date. Keeping a discreet styling emergency pouch in your handbag prevents embarrassing wardrobe disasters. Pack small safety pins, alcohol-free stain wipes, moleskin pads, and hair ties. Clear silicone earring backs rescue detached zipper pulls when you are on the go. These miniature essentials take up virtually no space inside your purse or tote. Knowing you are fully prepared for sudden hem rips eliminates daily outfit anxiety. Quick, confident wardrobe fixes keep you moving forward gracefully through any busy schedule.
1. Flawless Bra-Hiding Cross-Back Paperclip Hack
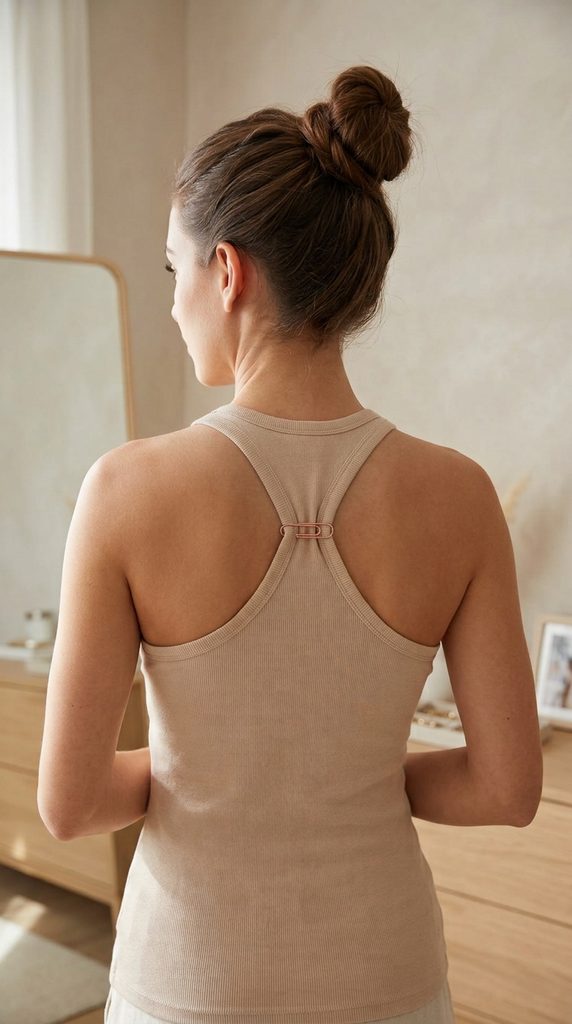
Racerback tank tops and summer sundresses often reveal distracting, unsightly bra straps. Buying expensive specialized convertible bras for every unique neckline quickly drains your clothing budget. A humble metal paperclip or small safety pin instantly solves this frustrating fashion issue. Linking your bra straps together behind your shoulder blades hides them completely beneath tops.
Concealing Bra Straps Beneath Summer Tops Instantly
Visible lingerie straps can make a chic, sophisticated backless dress appear messy and casual. Pulling both bra straps inward creates a smooth, hidden silhouette behind racerback fabric cuts. This quick, zero-cost adjustment provides extra bust support by gently lifting the chest. It lets you confidently wear trendy cut-out tops without buying specialized strapless undergarments.
Materials Needed for the Strap Hack
- Standard plastic-coated metal paperclip or small brass safety pin
- Your everyday favorite supportive underwire or wireless bra
- Racerback tank top, halter sundress, or cut-out fashion blouse
Step-by-Step Bra Strap Concealment Guide
- Put on your everyday bra as you normally would.
- Reach behind your back to locate both shoulder straps.
- Pull both bra straps gently toward your spine center.
- Slip one strap securely into the paperclip inner loop.
- Slide the second strap into the opposite clip side.
- Adjust the clip position higher or lower along your back.
- Check that the clip sits comfortably between your shoulder blades.
- Slip into your racerback tank top or summer sundress.
- Confirm in the mirror that the bra straps remain hidden.
- Enjoy all-day bust lift and smooth, strap-free shoulders.
2. Invisible Hair-Elastic Cropped Sweater Fold

Chunky winter sweaters often bunch up awkwardly when tucked into fitted skirts or trousers. Stuffing thick wool into waistbands creates uncomfortable bulk around your stomach and hips. Using a simple clear hair elastic creates an invisible, clean cropped sweater hem. This genius trick lets you crop bulky knits securely without cutting delicate yarn.
Shortening Bulky Knitwear Without Annoying Waistband Bulges
Thick knitted sweaters look incredibly cozy, but long hemlines can easily swallow your frame. Folding the fabric upward using internal elastics establishes a flattering, balanced silhouette. The gathered hem stays firmly in place all day without constant retucking. It allows you to style your coziest oversized sweaters with sleek, high-waisted bottoms.
Materials Needed for Sweater Cropping
- Bulky oversized knit sweater or heavy cotton crewneck sweatshirt
- One small clear elastic hair tie or thin scrunchie
- High-waisted denim jeans, tailored trousers, or pleated midi skirt
Step-by-Step Inverted Sweater Fold
- Put on your favorite oversized knit sweater and bottoms.
- Gather excess sweater fabric at the front natural waistline.
- Pull the gathered bunched fabric tightly toward your belly button.
- Secure the bunched fabric bundle firmly with your hair elastic.
- Invert the small fabric ponytail up underneath the sweater body.
- Smooth out the front knitted folds over the hidden gather.
- Adjust the folded sweater hem to your preferred cropped height.
- Tuck the rear sweater hem upward under itself if desired.
- Walk around to ensure the elastic holds tension comfortably.
- Step out with a perfectly cropped, bulk-free winter knit.
3. Viral Belted Front-Tuck Button-Down Trick

Button-down shirts often look boxy, corporate, and overly stiff when worn completely loose. Simply tucking the front hem into pants can cause unsightly rumpling beneath your belt. Feeding the shirt tails through your belt creates a sleek, modern drape. This viral Pinterest styling method creates effortless Parisian chic vibes in seconds.
Cinching Oversized Menswear Shirts for Sleek Silhouettes
Masculine button-downs offer incredible comfort, yet unstructured cuts can drown female curves. Guiding shirt tails across your belt pulls excess fabric flat across your midsection. The back hem drapes casually over hips, providing breezy coverage and flattering proportions. It instantly updates standard office workwear into relaxed, fashion-forward streetwear attire.
Materials Needed for the Belt Tuck
- Crisp oversized cotton or linen long-sleeve button-down shirt
- Fitted leather waist belt with sturdy metal buckle closure
- High-rise jeans, wide-leg linen pants, or tailored shorts
Step-by-Step Belt-Loop Tuck Tutorial
- Put on your pants and fasten your leather waist belt.
- Unbutton the bottom two buttons of your button-down shirt.
- Take the left lower shirt tail in your hand.
- Thread it downward behind the belt, exiting beneath the waistband.
- Take the right lower shirt tail with your other hand.
- Cross it over and thread it behind the opposite belt side.
- Pull both fabric tails taut to smooth the front button placket.
- Fold the pulled tails upward behind the draped front fabric.
- Blouse the front fabric slightly over the leather belt buckle.
- Check the back hem to ensure a relaxed, clean drape.
4. Genius Wax Paper Sticky Zipper Fix
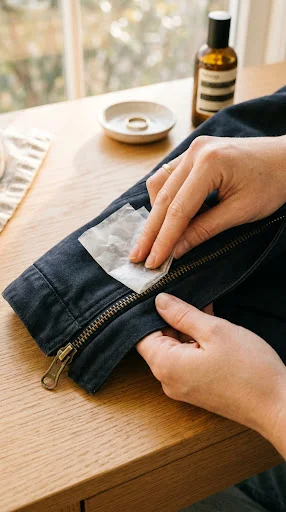
A jammed metal zipper on your favorite jacket or jeans can ruin your day. Forcing a stubborn, stuck slider risks tearing delicate garment fabric or breaking teeth. Running basic household wax paper along zipper teeth provides instant, smooth lubrication. The invisible paraffin wax coats metal surfaces, allowing sliders to glide smoothly.
Rescuing Stuck Metal Zippers with Pantry Wax Paper
Stubborn zippers often catch on pocket linings or freeze from dry friction. Chemical lubricating oils can permanently stain delicate denim and fine silks with grease. Pure wax paper delivers dry, clean lubrication without leaving greasy spots behind. This rapid two-minute hack rescues vintage jackets and favorite jeans from disposal.
Materials Needed for Zipper Lubrication
- Garment with stubborn, sticky, or stuck metal zipper teeth
- Sheet of standard household paraffin-coated kitchen wax paper
- Clean microfiber cleaning cloth or dry soft paper towel
Step-by-Step Zipper Restoration Method
- Lay the stuck garment flat on a clean table surface.
- Inspect the zipper tracks for pinched threads or trapped fabric.
- Gently pull away any snagged interior lining using small tweezers.
- Tear a four-inch square of household kitchen wax paper.
- Fold the wax paper sheet into a thick, firm square.
- Rub the folded wax edge vigorously along all zipper teeth.
- Coat both outer and inner metal edges with wax residue.
- Grasp the zipper slider pull tab firmly between your fingers.
- Slide the pull tab gently up and down several times.
- Wipe away loose, flaky wax crumbs with your dry cloth.
- Enjoy silky-smooth, effortless zipping on your favorite outerwear pieces.
5. Instant Waist-Cinching Button-Loop Jean Hack
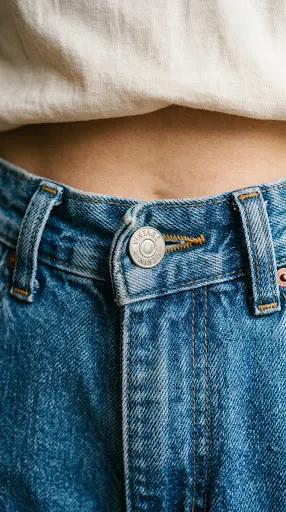
Finding jeans that fit your thighs while hugging your smaller waistline feels impossible. A gaping rear waistband often exposes undergarments whenever you bend over or sit. Looping the waistband button through the nearest belt loop cinches the gap immediately. This no-sew trick creates an hourglass fit without paying expensive tailoring fees.
Eliminating Annoying Waistband Gaps on Denim Pants
Standard off-the-rack denim sizing frequently leaves an annoying hollow gap at the back. Belts often cause unflattering bunched denim ridges around your lower spine. Cinching the side button loop pulls the waistline inward neatly across your hips. It provides an instant custom fit, keeping your favorite vintage jeans perfectly anchored.
Materials Needed for the Waist Hack
- Pair of loose-waisted denim jeans with gaping back waistbands
- The jean’s existing metal shank front waistband button
- The first sturdy belt loop located adjacent to the button
Step-by-Step Jean Cinching Instructions
- Put on your loose jeans and align the waistband comfortably.
- Locate the first belt loop to the left of the button.
- Push the metal shank button through that outer belt loop.
- Pull the button completely through until the waistband tightens.
- Fasten the button into its original buttonhole as normal.
- Pull up the zipper securely to finish fastening your jeans.
- Check that the side waistband folds flat against your hip.
- Notice that the rear waistband gap has completely disappeared.
- Smooth your shirt hem down over the cinched front waistband.
- Enjoy tailored, gap-free denim comfort through your entire busy day.
6. Easy Razor Shave Pill-Removing Sweater Refresher
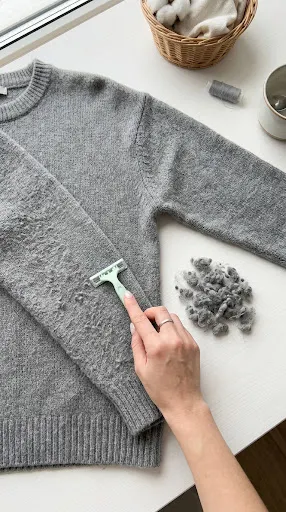
Cozy knitted sweaters quickly develop fuzzy, unsightly pills under arms and along sides. Friction from everyday movement causes loose fabric fibers to tangle into tiny balls. Shaving your knits gently with a disposable bathroom razor restores smooth textures. This simple maintenance ritual makes worn thrifted knitwear look brand new again.
Defuzzing Worn Wool Knitwear with Disposable Razors
Fabric fuzz and bobbles make luxurious cashmere and wool knits look old. Electric sweater shavers can easily snag threads and cut large holes in sweaters. A cheap, standard multi-blade disposable razor glides safely across taut knit surfaces. It gently slices away raised fuzz balls without damaging structural yarn fibers.
Materials Needed for Sweater Shaving
- Pilled wool, cashmere, acrylic, or cotton knitted sweater
- Clean, brand-new multi-blade disposable plastic bathroom razor
- Wide strip of sticky packaging tape or sticky lint roller
- Flat, hard table surface like a dining or ironing board
Step-by-Step Knit Defuzzing Guide
- Lay your pilled sweater completely flat on your hard table.
- Smooth out wrinkles with your hands to keep fabric flat.
- Pull one sweater sleeve taut with your non-dominant hand.
- Hold the new disposable razor at a low forty-five-degree angle.
- Glide the razor blades downward using short, light, gentle strokes.
- Shave only the raised pills, avoiding pressing into deep fibers.
- Work methodically across the underarms, sleeves, and chest areas.
- Gather the shaved fuzz balls using sticky clear packaging tape.
- Inspect the shaved knit surface under bright room lighting.
- Marvel at the renewed, boutique-fresh look of your favorite sweater.
7. No-Sew Double-Sided Tape Gaping Blouse Fix

Tailored button-up blouses often pull apart across the bust, creating embarrassing peekaboo gaps. This frustrating issue occurs when chest curves pull fabric buttons taut while sitting. High-strength double-sided fashion tape holds blouse plackets completely flat and closed. It guarantees professional modesty at work without needing awkward safety pins.
Banishing Button-Front Gaps on Tailored Office Blouses
Ill-fitting work blouses can cause immense self-consciousness during professional office meetings. Sewing extra snaps takes time and can ruin the sleek front drape of shirts. Transparent double-sided garment tape seals gap openings flush against your chest securely. It remains completely invisible under lights, keeping your outfit crisp and office-appropriate.
Materials Needed for the Blouse Fix
- Gaping button-up dress shirt, silk blouse, or tailored blazer
- Strip of double-sided clear garment tape or medical fabric tape
- Clean, dry skin free of body oils, lotions, or perfumes
Step-by-Step Gap Sealing Tutorial
- Put on your tailored blouse and button every button carefully.
- Stand before a mirror and locate the gaping chest area.
- Peel one protective paper liner off your double-sided tape strip.
- Apply the sticky tape directly between the two gaping buttons.
- Press the tape firmly onto the inner button placket fabric.
- Peel away the remaining paper liner to expose outer adhesive.
- Pull the overlapping top shirt placket flat over the tape.
- Press the two fabric placket layers together firmly for seconds.
- Check that the seam lies completely flat against your bust.
- Move your arms freely, confident that the gap stays sealed.
8. DIY Invisible Anti-Blister Deodorant Shoe Shield
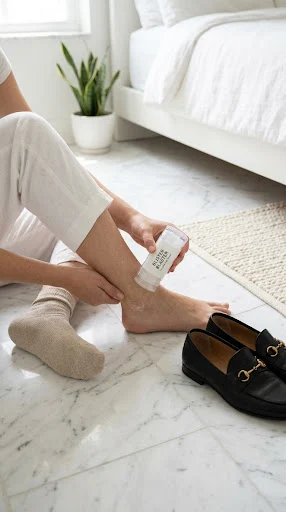
New leather loafers, stylish ballet flats, and summer sandals frequently rub painful blisters. Stiff heel counters and tight straps cause friction against delicate skin as you walk. Swiping clear stick deodorant over hot spots creates an invisible friction shield. It stops painful chafing instantly, making unbroken footwear remarkably comfortable to wear.
Breaking in Stiff Shoes Without Painful Heel Blisters
Exciting new shoes often sit unworn inside boxes due to painful breaking-in periods. Bulky fabric bandages easily slip off sweaty heels and look unsightly in flats. Clear solid deodorant creates an invisible, slick barrier that prevents skin friction. Your shoe collar glides effortlessly over heels without grabbing or pinching your skin.
Materials Needed for Blister Prevention
- New leather heels, stiff ballet flats, loafers, or strappy sandals
- Stick of clear solid anti-friction deodorant or body glide balm
- Clean, dry feet free from dust or existing open blisters
Step-by-Step Shoe Rubbing Prevention
- Ensure your feet and heels are clean and completely dry.
- Identify areas where stiff shoe edges press against your feet.
- Uncap your stick of clear, invisible solid underarm deodorant.
- Swipe the deodorant generously over your back heel and ankles.
- Rub deodorant along the tops of your outer pinky toes.
- Apply a thin layer along inside leather edges of shoes.
- Allow the invisible slick barrier to dry for one minute.
- Slide your feet smoothly into your stiff leather footwear.
- Notice how easily the shoes glide against your cushioned skin.
- Walk comfortably all day without developing hot spots or blisters.
9. Ingenious Straw Ribbon Hooded Drawstring Threader
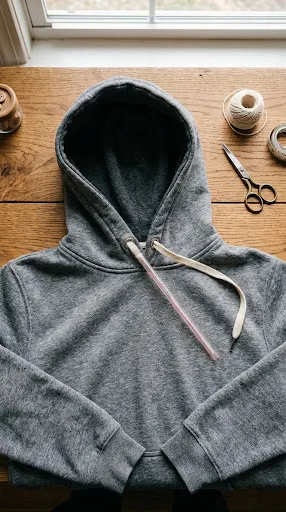
Pulling a hoodie or sweatpants from the dryer only to find the drawstring missing is infuriating. One loose cord end easily slides inside the fabric channel, becoming lost. Threading drawstrings through narrow waistbands using your bare fingers can take forever. Inserting the cord into a stiff drinking straw makes rethreading fast and easy.
Rescuing Lost Hoodie Strings with Kitchen Drinking Straws
Fish-hooking lost cords with bent wire hangers risks tearing delicate inner sweatshirt linings. Flexible drinking straws provide the perfect rigid guide to push cords through channels. The stiff plastic navigates waistband curves smoothly without bunching or twisting inside. This brilliant two-minute kitchen trick rescues your comfiest loungewear with zero frustration.
Materials Needed for the Threading Hack
- Sweatshirt, hoodie, or lounge pants missing its internal drawstring
- The loose fabric drawstring cord or replacement ribbon flat cord
- One standard plastic drinking straw or wide smoothie straw
- Sturdy safety pin or small piece of clear scotch tape
Step-by-Step Cord Rethreading Instructions
- Pull the escaped drawstring cord completely out of the garment.
- Push one end of the cord two inches into the straw.
- Staple, pin, or tape the cord end firmly to the straw tip.
- Insert the opposite end of the straw into the garment opening.
- Push the rigid straw forward through the narrow fabric casing.
- Scrunch the waistband fabric along the straw using your fingers.
- Pull the straw forward while holding the threaded cord firmly behind.
- Guide the straw smoothly around the hood or waist channel.
- Push the straw out through the opposite exit eyelet hole.
- Remove the tape or pin to release your cord from the straw.
- Tie neat knots at both drawstring ends to prevent future escapes.
10. Chic Hair-Tie Rolled Blazer Sleeve Trick
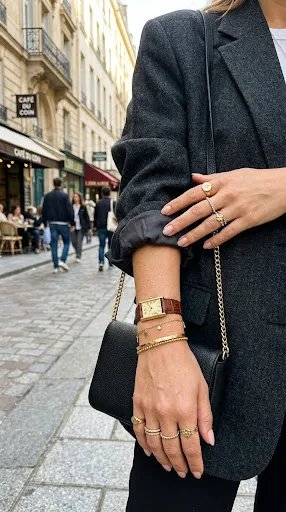
Oversized tailored blazers bring modern sophistication to casual daily jeans and t-shirts. However, overly long sleeves sliding down your wrists can look sloppy and unkempt. Pushing blazer sleeves up your forearms rarely works; they slide down constantly. Using a wide hair elastic hidden within the cuff holds sleeves up securely.
Keeping Pushed-Up Jacket Sleeves Securely in Place
Pushing your blazer sleeves up reveals your wrists, instantly making outfits look intentional. Constantly pulling falling fabric cuffs back up your arms disrupts your day. An elastic hair tie placed over the sleeve grips the fabric firmly. Folding the cuff back down hides the elastic completely from view.
Materials Needed for Sleeve Styling
- Tailored suit blazer, trench coat, or oversized menswear jacket
- Two soft, stretchy seamless hair elastics or fabric hair ties
- Fitted watch, bracelet, or stacked rings for chic wrist styling
Step-by-Step Sleeve Rolling Guide
- Put on your tailored blazer over your chosen base shirt.
- Slide one soft hair elastic over your hand and wrist.
- Pull the elastic up onto your forearm over the blazer sleeve.
- Position the elastic just below your natural elbow crease line.
- Scrunch the lower sleeve fabric upward, gathering it at the elastic.
- Fold the top sleeve fabric outward and downward over the tie.
- Ensure the folded fabric completely conceals the hidden hair elastic.
- Repeat the exact same steps on the opposite blazer sleeve.
- Adjust both sleeves so the cuff heights look perfectly symmetrical.
- Enjoy effortlessly pushed-up sleeves that stay in place all day.
11. Quick Hairspray Static-Cling Vanishing Spray
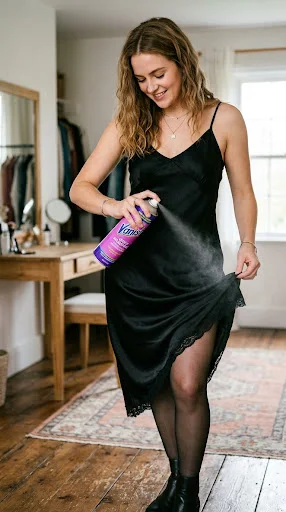
Dry indoor heating causes lightweight skirts, silk slips, and dresses to stick to legs. Static electricity makes flowing fabrics cling uncomfortably to tights and thighs. A light misting of everyday aerosol hairspray neutralizes static cling immediately. It breaks electrical charges, allowing delicate fabrics to drape naturally and float gracefully.
Stopping Clingy Skirt Fabrics with Everyday Hair Mist
Static cling ruins the silhouette of beautiful silk dresses and pleated midi skirts. Commercial anti-static sprays often smell intensely chemical and leave damp spots on clothing. Inexpensive aerosol hairspray provides a dry, ultra-fine mist that tames static instantly. It leaves no sticky residue behind while allowing skirts to swish freely.
Materials Needed for Static Neutralization
- Static-charged clinging dress, silk slip, pleated skirt, or trousers
- Regular household aerosol can of medium-hold hairspray
- Pair of sheer nylon tights or bare legs beneath your skirt
Step-by-Step Static Elimination Guide
- Stand upright in your clinging dress, skirt, or wide-leg trousers.
- Shake your can of regular aerosol hairspray for five seconds.
- Hold the spray can roughly twelve inches away from your clothing.
- Lift the hem of your skirt slightly to access inner linings.
- Spray a light, even mist across the inside fabric surface.
- Apply a quick mist directly over your nylon tights or legs.
- Drop the skirt hem down and shake the fabric gently.
- Watch as the fabric releases its cling, falling smoothly into place.
- Allow the fine mist to dry completely for fifteen seconds.
- Walk comfortably without embarrassing fabric static sticking to your skin.
12. Instant Emergency Hemming with Fabric Adhesive Strips
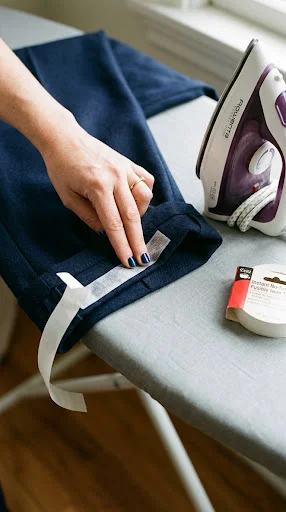
Stepping on a long trouser hem can tear the stitching, leaving threads trailing. Walking around with an unraveled, sagging pant leg looks messy and unprofessional. Heat-activated iron-on bonding tape or peel-and-stick hem strips fix hems instantly. You do not need a needle, thread, or any sewing experience whatsoever.
Fixing Unraveled Pants Hems in Minutes Without Sewing
A fallen hem can trip you up and make expensive trousers look ruined. Traditional hand stitching takes time and requires matching thread colors. No-sew adhesive hem tape fuses fabric layers together cleanly and securely. It creates an invisible, crisp hemline that holds up through washes and wears.
Materials Needed for Hem Repairs
- Trousers, jeans, or skirt with an unraveled or loose hemline
- Roll of peel-and-stick fabric tape or heat-activated fusible hem web
- Domestic clothing steam iron or flat hair-straightening iron tool
Step-by-Step No-Sew Hemming Tutorial
- Turn your trousers inside out to reveal the unraveled hem.
- Snip away any loose, dangling factory threads with sharp scissors.
- Fold the fabric upward to match the original pants hemline height.
- Measure a strip of fusible hem tape matching the tear width.
- Slide the adhesive tape strip inside the folded fabric cuff seam.
- Press the folded hem flat over the hidden adhesive strip.
- Heat your household clothes iron or hair straightener to medium.
- Press the iron firmly onto the hem fold for ten seconds.
- Allow the heated adhesive to cool completely so it bonds securely.
- Turn your trousers right-side out and inspect the clean, crisp hem.
13. High-End Silk Scarf Belt Upgrade for Denim

Standard leather belts can feel utilitarian, heavy, and boring when worn with summer outfits. Threading a colorful vintage silk scarf through your belt loops introduces luxurious flair. It cinches your waistline gently while injecting playful patterns into plain denim looks. This viral styling secret delivers effortless Mediterranean elegance to simple weekend outfits.
Elevating Casual Blue Jeans with Vibrant Woven Silk
Denim shorts and white linen trousers can look overly simple during sunny seasons. A vibrant silk scarf breaks up monochromatic neutral tones with rich color. Tying the scarf into a soft side bow adds graceful movement to your silhouette. It transforms basic denim into a curated, boutique-worthy outfit in seconds.
Materials Needed for the Scarf Belt
- Classic blue denim jeans, cutoff shorts, or white linen trousers
- Square or long rectangular printed silk, satin, or twill scarf
- Fitted tank top, bodysuit, or tucked linen shirt for styling
Step-by-Step Scarf Belting Instructions
- Lay your square silk scarf flat on a clean table surface.
- Fold the scarf diagonally into a long, slender two-inch ribbon.
- Put on your favorite pair of jeans or tailored summer trousers.
- Thread one scarf tip through the rear center back belt loop.
- Guide both scarf ends forward through the side belt loops.
- Pull the scarf ends forward evenly toward your front belly button.
- Cinch the scarf gently until your waistband fits comfortably snug.
- Tie the scarf ends together into a chic double knot at your hip.
- Let the silky fabric tails drape naturally down your upper thigh.
- Pair with clean leather sandals and sunglasses for effortless vacation vibes.
14. Winter Boot Jean-Cuffing Sock Anchor Hack
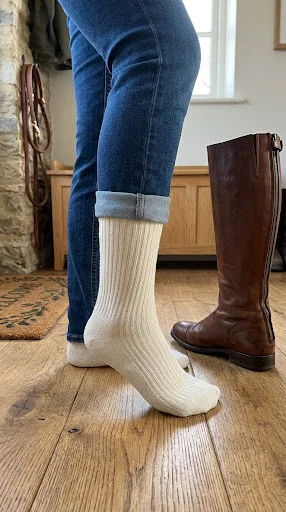
Tucking wide-leg or straight-cut denim jeans into tall winter boots can be frustrating. Fabric bunches up around your ankles, creating lumpy ridges inside stiff boot shafts. Pulling a snug mid-calf sock over folded pant cuffs anchors them securely. Your jeans slide smoothly into boots, staying sleek, flat, and comfortable all day.
Streamlining Bulky Denim Cuffs Inside Riding Boots
Wide jeans often ride up your calves inside boots, causing irritating rubbing and tightness. Constantly pulling off your boots to smooth down wrinkled pant legs is annoying. A stretchy crew sock holds the folded denim flush against your skin. It guarantees a sleek leg line while protecting your ankles from stiff leather seams.
Materials Needed for Boot Tucking
- Pair of straight-leg, mom-fit, or relaxed-cut denim jeans
- Pair of tall leather riding boots or structured mid-calf winter boots
- Pair of snug, stretchy cotton mid-calf crew socks or boot socks
Step-by-Step Sock Anchoring Guide
- Put on your straight-leg jeans, standing upright on the floor.
- Fold the bottom hem of one pant leg cleanly in half.
- Wrap the excess denim fabric tightly around your ankle bone.
- Hold the folded denim securely against your leg with one hand.
- Pull a stretchy cotton crew sock over your foot and ankle.
- Pull the sock upward so it completely covers the folded denim cuff.
- Smooth out any fabric lumps beneath the snug sock band.
- Repeat the exact same folding process on your other pant leg.
- Slide your sleek, anchored legs into your tall leather boots.
- Zip up boots smoothly without struggling against bunched, thick denim folds.
15. The Toothpaste Leather Sneaker Sole Brightener

White leather sneakers look amazing with dresses and jeans, but rubber soles scuff easily. Gray dirt streaks and yellowish discolorations make trendy street shoes look worn and tired. Scrubbing scuffed rubber edges with white paste toothpaste removes stubborn marks effortlessly. Mild abrasives in toothpaste lift deep stains without damaging delicate leather uppers.
Restoring Dingy White Sneaker Outsoles with Toothpaste
Dirty, scuffed sneaker outsoles drag down the fresh look of casual outfits. Expensive specialized shoe cleaning kits often contain harsh, smelly chemical solvents. Basic white fluoride toothpaste gently buffs away stubborn ground-in dirt and scuffs. This easy bathroom hack restores brilliant white edges in under five minutes.
Materials Needed for Sneaker Cleaning
- Pair of scuffed white leather sneakers with dingy rubber soles
- Tube of plain white paste toothpaste (avoid colored or gel formulas)
- Old, soft-bristle toothbrush or small nylon dish scrubbing brush
- Damp microfiber cleaning cloth or dry paper towels for wiping
Step-by-Step Sole Brightening Tutorial
- Knock your sneakers together outside to dislodge loose surface dirt.
- Squeeze a generous dollop of white toothpaste onto the toothbrush.
- Wet the toothbrush bristles lightly under running tap water.
- Scrub the toothpaste vigorously along the dirty rubber sneaker outsoles.
- Work in small circular motions, focusing on tough scuff marks.
- Watch as the foaming toothpaste lifts stubborn grime from the rubber.
- Let the paste sit on stubborn yellowish spots for two minutes.
- Wipe away the dirty foam completely with a damp microfiber cloth.
- Rinse the cloth and wipe the rubber soles clean of any residue.
- Admire your sparkling white sneakers, ready to complement any stylish outfit.
16. Fast Freezing Method for Scratchy Wool Sweaters

Cozy wool and mohair sweaters often feel scratchy, itchy, and prickly against bare skin. Stiff fiber ends poke outward from yarn twists, irritating your neck and arms. Soaking the sweater in hair conditioner and freezing it softens rough fibers. Freezing contracts and relaxes the coarse wool yarns, making them wonderfully soft to wear.
Softening Prickly Knitwear with Conditioner and Ice
Nothing ruins the joy of a vintage wool sweater faster than prickly, itchy fabric. Wearing thick base layers underneath can make you overheat in warm indoor rooms. Treating the knit with moisturizing hair conditioner softens rough, stiff wool cuticles. Chilling the sweater in the freezer locks in softness, ending scratchiness forever.
Materials Needed for Wool Softening
- Itchy, scratchy wool, mohair, or alpaca knitted sweater
- Gentle moisturizing hair conditioner or rich hair conditioning mask
- Large clean plastic zip-top freezer storage bag
- Large wash basin filled with cool, clean tap water
Step-by-Step Sweater Freezing Guide
- Fill a clean wash basin with lukewarm water and hair conditioner.
- Submerge the scratchy wool sweater completely in the water.
- Gently massage the conditioning water into the knitted yarn fibers.
- Let the sweater soak peacefully in the basin for twenty minutes.
- Drain the basin and press out excess water without wringing.
- Lay the damp sweater flat inside a clean zip-top freezer bag.
- Seal the plastic freezer bag tightly, pressing out all trapped air.
- Place the bagged sweater in your home freezer overnight for hours.
- Remove the bag the next morning and thaw the sweater at room temp.
- Lay it flat on clean dry towels to air-dry completely.
- Slip into your newly softened, cozy, completely itch-free wool knit.
17. The Clever Key Ring Zipper Slide Lock

Low-rise and vintage denim jeans often suffer from loose zippers that slide down unprompted. An unzipped pant fly is embarrassing and frustrating to pull up repeatedly. Attaching a small metal key ring to the zipper pull locks it securely. Hooking the ring over your waistband button keeps the zipper anchored completely hidden.
Securing Falling Pant Zippers with Small Key Rings
Worn-out zipper sliders lose their internal locking grip, constantly sliding open as you move. Replacing entire zipper units on denim jeans requires expensive, tedious alterations. A simple metal split key ring anchors the zipper tab to the button. The front denim waistband flap conceals the ring, keeping your fly secured.
Materials Needed for the Zipper Lock
- Pair of jeans with a loose, sliding, or broken zipper lock
- Small metal split key ring (half-inch diameter works best)
- The existing metal shank button on your jean waistband
Step-by-Step Zipper Locking Tutorial
- Thread the small metal key ring through the zipper pull hole.
- Ensure the key ring swings freely from the zipper pull tab.
- Pull the zipper slider all the way up to the top.
- Grasp the small metal key ring attached to the slider.
- Lift the ring upward over the open jean waistband button.
- Loop the metal ring securely around the base of the shank button.
- Fasten your jean button through the buttonhole as you normally do.
- Smooth down the outer denim fly flap to cover the zipper track.
- Notice that the key ring is now completely hidden from view.
- Move, bend, and sit freely, knowing your zipper will never slide down.