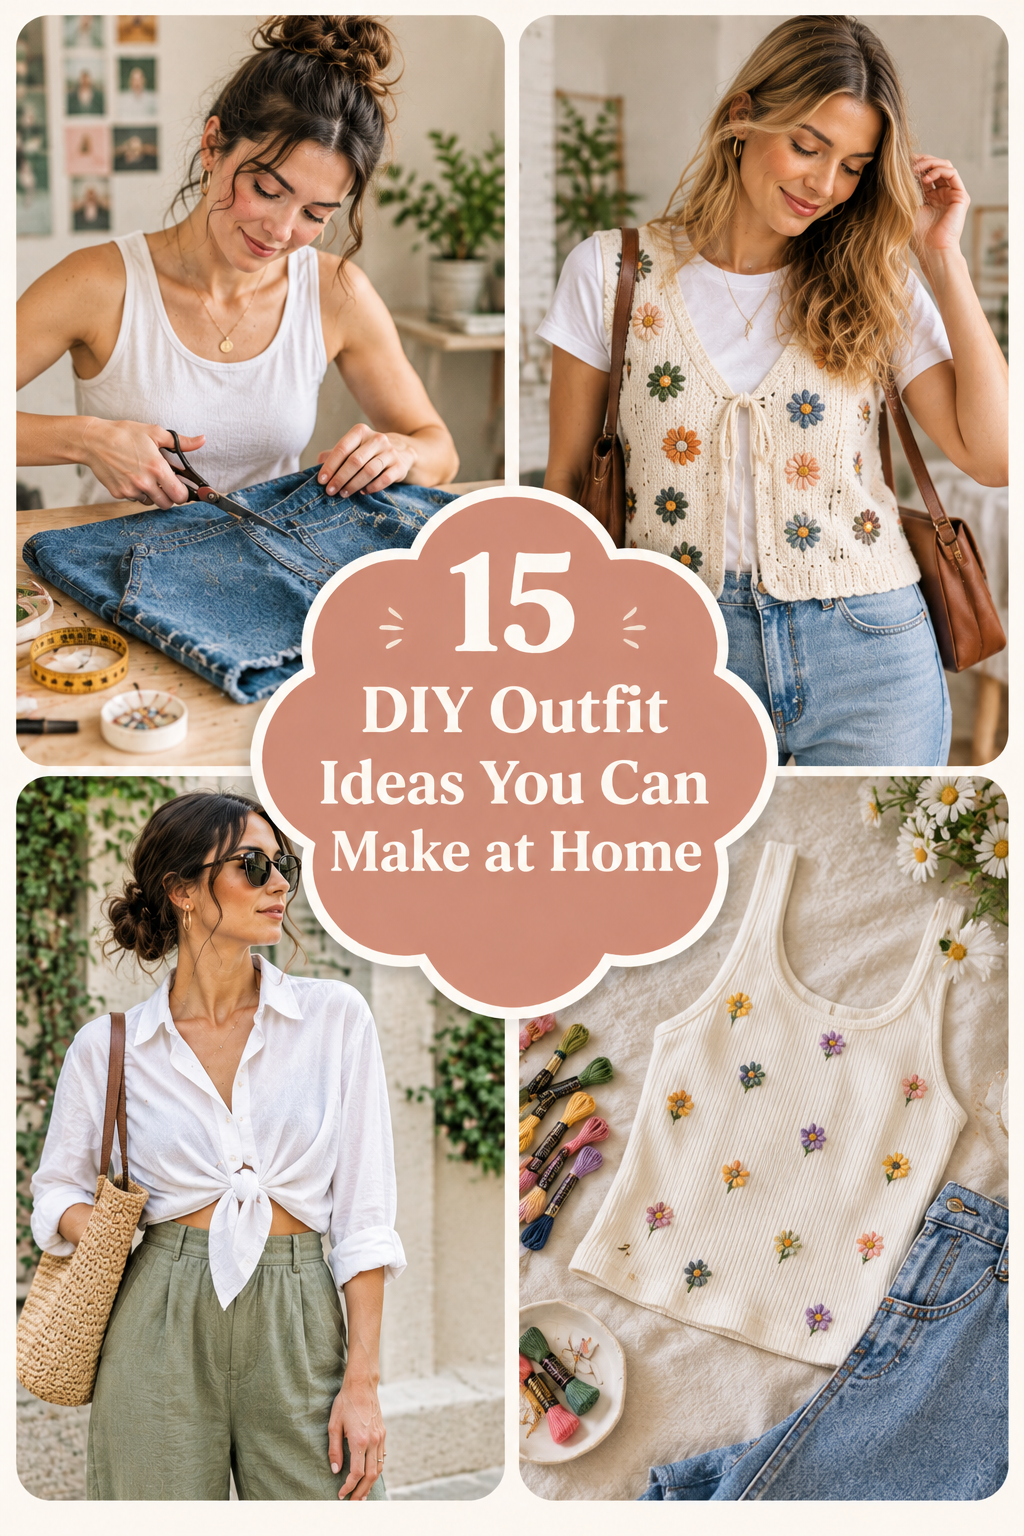
15 DIY Outfit Ideas You Can Make at Home
Revitalizing your everyday wardrobe does not require shopping sprees or exorbitant budgets. Modern fashion trends heavily favor distinct individuality, custom craftsmanship, and sustainable creativity. Many people assume constructing stylish garments demands couture tailoring experience or industrial machinery. In reality, stunning handmade ensembles come together using simple techniques and common textiles. Repurposing old garments and utilizing flat fabric cuts yields runway-worthy fashion pieces. Pinterest feeds continuously buzz with viral, accessible garment transformations made entirely at home. You can effortlessly recreate those high-end looks in your own bedroom. Engaging in DIY fashion allows your authentic personal style to shine brightly. Thoughtful wardrobe design merges affordable fabrics with intentional, flattering silhouettes for everyone.
Crafting High-End Aesthetics Without Overspending
Achieving a high-end designer look depends primarily on proportion, texture, and clean finishes. First, focus on cohesive neutral tones, balanced drape, and sturdy base materials. Linen, structured cotton, and heavy knits naturally look elevated and expensive. You can easily source these budget fabrics from discount textile shops or thrifted pieces. Secondhand stores also conceal oversized vintage garments that provide yards of premium cloth. Old oversized men’s shirts and maxi dresses quickly become striking modern sets. Furthermore, simple finishing touches like pressed hems instantly elevate your homemade garments. Clean, deliberate garment construction mimics high-end boutique clothing sold for hundreds of dollars. Focus on high-impact focal points like dramatic sleeves or cinched waists.
Why DIY Outfits Redefine Modern Personal Style
Handmade garments bring unmistakable individuality and bespoke fit into contemporary daily wardrobes. Mass-produced retail clothes often feature generic patterns, awkward proportions, and fragile synthetic blends. Handcrafted ensembles share genuine stories and celebrate personal creative resourcefulness through design. Additionally, crafting complete outfits provides deeply satisfying, mindful creative therapy after long weeks. Transforming basic bedsheets or forgotten clothes into functional, stylish matching sets feels wonderful. Every completed fashion project adds distinct, customized flair to your personal collection. Furthermore, custom garment making lets you match your exact body measurements seamlessly. You will never again struggle with gaping waistbands or awkward sleeve lengths. Inexpensive fabrics adapt smoothly to your personal lifestyle and daily comfort needs.
Simple Wardrobe Planning for Beginners
A triumphant garment making project always starts with clear, intentional planning before cutting. First, evaluate your existing closet before buying bolts of new craft fabric. You might already own unworn dresses, oversized shirts, or extra bed linens. Organizing your available supplies prevents unwanted, duplicate purchases at the fabric store. Next, establish a modest budget for sewing notions, elastics, and thread colors. Allocating fifteen dollars per project keeps home tailoring completely enjoyable and stress-free. Always inspect thrift store garments for durable seams and high-quality raw fiber content. Sturdy cotton tablecloths easily convert into gorgeous summer skirts and crop tops. Look at fabric silhouettes rather than outdated prints or missing buttons.
Maximizing Everyday Wearability with Versatile Outfits
Compact capsules benefit massively from modular two-piece sets and adaptable fashion separates. Coordinated two-piece outfits provide multiple styling options without crowding limited closet hangers. A handmade wrap top pairs just as beautifully with jeans as its matching skirt. Light-colored accessories brighten up dark handmade coordinates for effortless daytime café outings. Tailored accents like self-tie belts cinch excess volume, flattering your natural curves. Adding structural elements makes simple handmade loungewear feel suitable for casual outdoor events. Moreover, sticking to straightforward patterns keeps wardrobe construction projects completely manageable for solo crafters. You can finish chic summer dresses in under three hours flat.
Setting Up a Stress-Free Sewing Workspace
Having a designated crafting surface keeps your creative fashion design process enjoyable. Clear off a wide dining table or hardwood floor area for laying out fabric. This essential step keeps delicate yardage flat, preventing uneven cuts and jagged seam lines. Gather essential garment sewing tools like sharp fabric shears, tailor’s chalk, pins, and measuring tapes. Clear containers keep bobbins, safety pins, and spare needles remarkably tidy and accessible. Work in well-ventilated, bright rooms to avoid eye strain while threading fine needles. Turn on inspiring music to create an enjoyable weekend studio atmosphere at home. When your tools stay organized, clothing construction flows quickly and effortlessly. Confident, methodical cutting always produces far cleaner, professional handmade garment results.
1. Minimalist Linen Tie-Front Top and Wrap Skirt Set
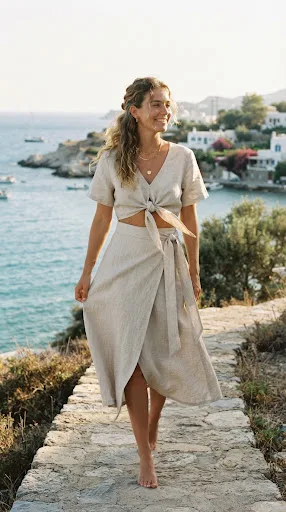
Two-piece coordinated sets dominate current street style feeds across Pinterest and social media. Designer brands charge astronomical prices for simple linen two-piece resort ensembles. You can craft this breezy summer outfit using an inexpensive thrifted linen tablecloth. The breathable woven fabric drapes gracefully while keeping you cool during warm sunny days.
Transforming Basic Linen Yardage into Coordinated Resortwear
Linen fabric radiates relaxed coastal elegance while looking effortlessly chic and expensive. A tie-front crop top pairs seamlessly with an adjustable high-waisted wrap skirt. The forgiving wrap silhouette ensures a comfortable, custom fit around your natural waist. This easy sewing project creates two versatile separates that transition from beach to dinner.
Materials and Notions Needed
- Two yards of medium-weight washed linen or cotton linen fabric
- Matching polyester sewing thread and universal machine needles (size 80/12)
- Ultra-sharp fabric shears or rotary cutter with cutting mat
- Flexible sewing tape measure and tailor’s chalk pencil
- Domestic steam iron and cotton pressing cloth for crisp hems
Step-by-Step Wrap Set Construction
- Wash and press your linen yardage thoroughly to eliminate fabric shrinkage.
- Cut two rectangular panels for the front bodice and one for the back.
- Extend the bottom inner edges of the front panels to form ties.
- Stitch the shoulder seams and side seams together using a straight stitch.
- Hem all raw outer bodice edges with a neat double-fold narrow hem.
- Cut a wide semi-circle panel for the flowy wrap skirt body.
- Cut a long three-inch-wide fabric strip to craft the skirt waistband tie.
- Sandwich the top skirt waist edge inside the folded waistband strip securely.
- Stitch the waistband along the edge, extending the ends into long ties.
- Finish the curved skirt hem using a delicate rolled hem stitch.
- Press all finished seams flat with a steam iron for polished edges.
2. Upcycled Men’s Oversized Shirt Dress with Corset Belt
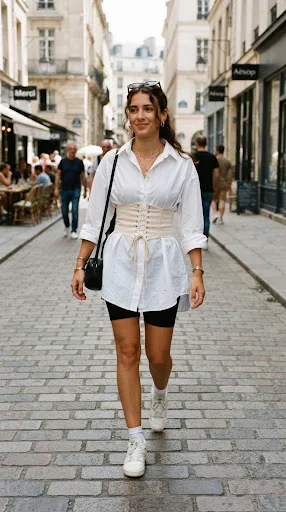
Massive button-down shirts found in thrift store menswear sections hold yards of fabric. Wearing an oversized shirt plain can often swallow your frame, looking shapeless and slouchy. Adding a coordinating handmade lace-up corset belt instantly cinches your waistline with modern style. It creates an hourglass silhouette while maintaining casual dropped-shoulder comfort for all-day wear.
Cinching Boxy Menswear into a Feminine Hourglass Silhouette
Crisp menswear poplin offers durability and structure that cheap fast-fashion shirts completely lack. Slicing off collar points softens the neckline into an elegant mandarin collar style. The contrasting fabric corset belt pulls in excess shirt volume, defining your waist gracefully. This project turns an inexpensive five-dollar thrift find into a runway-inspired street outfit.
Materials and Notions Needed
- Men’s XXL crisp cotton button-down long-sleeve dress shirt
- Half yard of sturdy cotton canvas or denim fabric for the belt
- Metal eyelets with an eyelet-setting tool and small hammer
- Two yards of satin cord, cotton rope, or ribbon for lacing
- Sharp fabric scissors, pins, thread, and an iron
Step-by-Step Shirt Dress and Belt Assembly
- Try on the oversized men’s shirt and mark the desired mini-dress hemline.
- Trim the bottom hem evenly, adding one inch for a neat hem allowance.
- Press the hem inward by half an inch twice, then topstitch flat.
- Cut two curved waist-cincher panels from your sturdy canvas belt fabric.
- Sew the panels right sides together, leaving a small opening for turning.
- Turn the belt right-side out and press the perimeter edges crisp and flat.
- Topstitch around the entire belt perimeter to close the turning gap neatly.
- Mark eyelet locations every inch along both front short belt edges.
- Punch small holes through markings and install metal eyelets with setting tools.
- Lace the cord crisscross through the installed eyelets like a sneaker lace.
- Slip into the shirt dress and cinch the canvas corset belt firmly.
3. Romantic Shirred Milkmaid Top and Tiered Ruffle Skirt
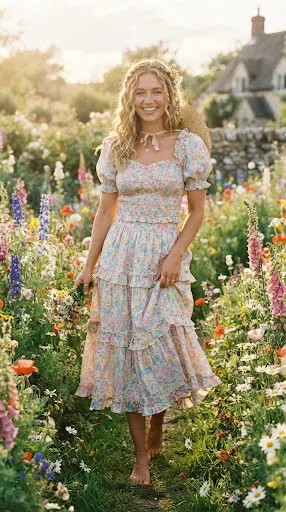
The romantic cottagecore aesthetic remains a viral fashion favorite across creative Pinterest boards. Dainty milkmaid tops with gathered bust details and tiered ruffle skirts look breathtakingly charming. Buying these intricate outfits at retail boutiques can cost a small fortune. Using elastic thread to create easy smocking makes this dreamy outfit accessible to beginner sewists.
Crafting Stretchy Smocked Coordinates with Elastic Thread
Elastic thread smocking creates stretchy, body-hugging gathers that adjust to your curves comfortably. You avoid the hassle of installing complex invisible zippers or sewing fussy buttonholes. The gathered tiered skirt flutters gently in warm breezes, adding graceful, romantic movement. Crafted from soft floral cotton, this matching set is ideal for weekend picnics.
Materials and Notions Needed
- Three yards of lightweight floral cotton lawn or rayon challis fabric
- Two spools of elastic thread for your sewing machine bobbin
- Spool of matching all-purpose polyester sewing thread
- Standard universal sewing machine needle and dressmaker pins
- Tailor’s chalk, fabric scissors, measuring tape, and steam iron
Step-by-Step Milkmaid Set Construction
- Wind the elastic thread onto your sewing machine bobbin smoothly by hand.
- Thread regular matching thread through the top needle of the sewing machine.
- Cut a wide rectangular chest panel for the milkmaid top bodice.
- Sew parallel horizontal lines spaced half an inch apart across the panel.
- Watch the flat fabric gather automatically into stretchy, textured elastic smocking.
- Cut and attach two gathered puff sleeve rectangles to the smocked bodice.
- Cut three progressively wider fabric tiers to construct the matching ruffle skirt.
- Gather the top edge of each skirt tier using loose basting stitches.
- Stitch the tiers together sequentially, distributing gathers evenly across the seams.
- Attach a simple elastic waistband casing to the top of the skirt.
- Steam the finished pieces to shrink the elastic thread into snug gathers.
4. Cozy Two-Piece Fleece Loungewear Shorts and Shrug Set
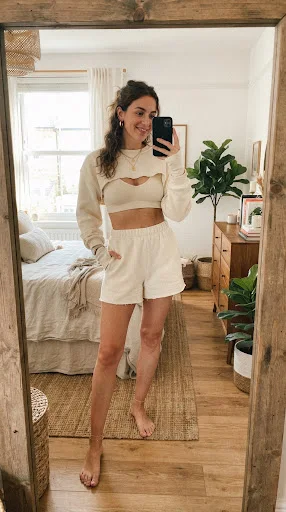
Elevated loungewear continues to dominate everyday casual style and aesthetic Pinterest inspiration boards. Monochromatic fleece sets look chic, cozy, and luxurious when cut with intentional modern proportions. Slicing up an oversized thrifted fleece blanket produces a trendy shrug sweater and shorts. This ultra-plush matching outfit delivers runway-level streetwear vibes while feeling as comfortable as pajamas.
Upcycling Warm Blankets into High-End Streetwear Loungewear
Store-bought fleece sets often feature thin synthetic knits that pill after a single wash. Thrifted plush fleece throws provide thick, cozy warmth at a fraction of fabric costs. The trendy ultra-cropped shrug sweater highlights high-waisted lounge shorts underneath for great balance. It is the ultimate weekend lounging outfit that still looks camera-ready for selfies.
Materials and Notions Needed
- Oversized plush fleece throw blanket or two yards of cotton fleece
- One yard of one-inch-wide soft knitted elastic for the shorts waistband
- Ballpoint jersey sewing machine needle (size 80/12) for stretch fabrics
- Heavy-duty fabric scissors, tailor’s chalk, and ballpoint pins
- Matching stretch polyester thread and flexible fabric measuring tape
Step-by-Step Fleece Set Tutorial
- Fold the fleece blanket flat on your cutting table, smoothing all wrinkles.
- Use a pair of your favorite lounge shorts as a tracing template.
- Trace the front and back shorts patterns with chalk, adding seam allowances.
- Cut the fleece pieces out carefully using sharp heavy-duty fabric shears.
- Stitch the front and back crotch seams using a flexible stretch stitch.
- Sew the inner leg inseam and outer side seams together cleanly.
- Fold the top waist edge over to form a casing for your elastic.
- Thread the wide elastic band through the casing, securing the ends tightly.
- Cut a long curved panel across the fleece to fashion the shrug.
- Stitch the underarm sleeve seams together, leaving the center chest area open.
- Hem all raw outer fleece edges with a wide, gentle zigzag stitch.
5. Chic Backless Halter Top and Wide-Leg Palazzo Pants

Flowy palazzo pants paired with a daring backless halter top create pure vacation elegance. Modern high-street stores often charge premium prices for dramatic, wide-leg draped evening coordinates. You can craft this breezy summer outfit using lightweight satin or silky rayon yardage. The sweeping pant legs billow gracefully as you walk, mimicking luxurious palazzo resortwear.
Draping Silky Fabrics into Effortless Vacation Resortwear
Fluid fabrics like satin and rayon drape against the body with luxurious, liquid softness. The backless halter top ties gently around your neck, leaving shoulders and back bare. Wide-leg palazzo pants feature a comfortable flat-front waistband that flatters every body type. This ensemble delivers glamorous evening sophistication while remaining surprisingly easy to sew at home.
Materials and Notions Needed
- Three and a half yards of silky rayon, viscose, or polyester satin
- One yard of three-quarter-inch elastic for the back waist panel
- Fine Microtex sewing machine needle (size 70/10) for slippery fabrics
- Rotary cutter, self-healing cutting mat, and fine satin pins
- Matching lightweight thread and an iron set to low heat
Step-by-Step Halter and Palazzo Assembly
- Cut a large triangle panel for the front halter top bodice piece.
- Sew narrow double-folded hems along both diagonal side edges of the triangle.
- Fold the top triangle point over to create a narrow horizontal neck casing.
- Thread a long satin cord through the casing to tie behind the neck.
- Cut two wide front pant leg panels and two wide back panels.
- Stitch the front and back pant crotch seams using your fine needle.
- Sew the long outer side seams and inner leg inseams together cleanly.
- Construct a flat waistband for the front and an elasticized back waistband.
- Attach the waistband to the pants, gathering the back panel with elastic.
- Try on the pants to mark an accurate, sweeping floor-skimming hemline.
- Press the finished wide hemlines flat using low heat and a pressing cloth.
6. Sustainable Denim Patchwork Vest and A-Line Mini Skirt
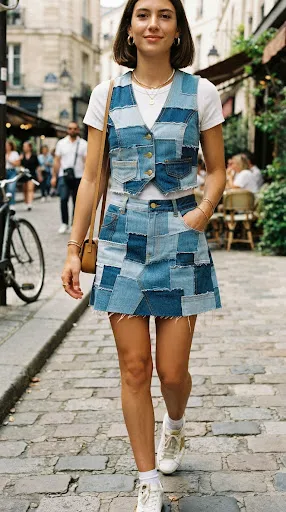
Discarded, torn blue jeans crowd thrift stores and often end up directly in landfills. Upcycling several pairs of old jeans creates a striking, high-fashion patchwork denim coordinate set. Contrasting washes of light, medium, and dark denim add bold geometric texture to garments. This structured outfit pairs a tailored cropped vest with a matching A-line mini skirt.
Rescuing Worn Jeans into Designer Geometric Denim Coordinates
Heavyweight vintage denim provides exceptional durability and structure that lasts for decades of wear. Piecing together different shades of denim creates an artistic mosaic across your clothing panels. The tailored cropped vest provides a sharp, structured silhouette over plain white t-shirts. The coordinated A-line skirt flatters your hips while showcasing creative upcycled craftsmanship.
Materials and Notions Needed
- Three to four pairs of old worn denim jeans in varying washes
- Heavy-duty jeans sewing machine needle (size 100/16) and denim pins
- Heavy-duty topstitching thread in contrasting gold or classic navy
- Pointed seam ripper tool, rotary cutter, cutting mat, and scissors
- Metal zipper for the skirt back and buttons for the vest front
Step-by-Step Denim Patchwork Tutorial
- Disassemble old jeans using seam rippers, cutting away worn pockets and knees.
- Cut the flat salvaged denim panels into uniform squares or geometric strips.
- Arrange your denim patches into an aesthetically balanced pattern of contrasting tones.
- Stitch the denim patches together using flat-felled seams with durable gold thread.
- Press the patched fabric sheets flat using a high-heat steam iron.
- Trace your cropped vest pattern pieces onto the patched denim sheet carefully.
- Trace your A-line mini skirt pattern pieces onto remaining patched fabric.
- Assemble the vest bodice pieces, topstitching all structural seams for durability.
- Sew the side seams and install a metal zipper into the skirt back.
- Add buttonholes and install sturdy metal tack buttons along the vest front.
- Sand the raw pocket edges slightly with fine sandpaper for a vintage vibe.
7. Retro 70s Ribbed Knit Bell-Bottoms and Bralette Set
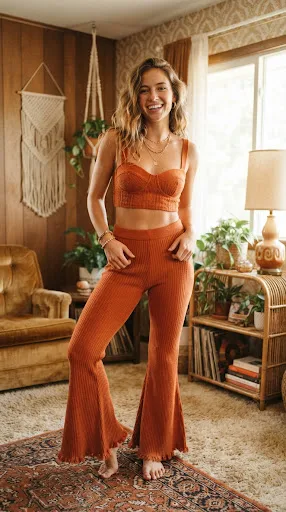
Retro seventies silhouettes continue to inspire trending fashion mood boards and streetwear aesthetics worldwide. Flared bell-bottom pants paired with a matching knit bralette create playful, flattering proportions. You do not need complex patterns to work with stretchy, ribbed sweater-knit fabric yardage. The pants hug your thighs snugly before flaring out dramatically from the knee down.
Bringing Groovy Vintage Flare to Comfortable Ribbed Knits
Ribbed knit fabrics offer incredible four-way stretch, conforming to your body without feeling restrictive. The dramatic flare at the lower hem balances your hips, creating an elongating effect. A simple sweetheart or square-neck bralette provides matching retro flair up top. This vibrant two-piece outfit transitions effortlessly from cozy lounging to lively outdoor music festivals.
Materials and Notions Needed
- Two and a half yards of medium-weight ribbed knit or sweater knit
- Ballpoint stretch sewing machine needle and matching polyester stretch thread
- One yard of one-and-a-half-inch knit elastic band for the waistband
- Tailor’s chalk, stretch sewing pins, fabric scissors, and measuring tape
- Clear stretch seam tape to stabilize the bralette shoulder straps
Step-by-Step Bell-Bottom Set Construction
- Lay the ribbed knit yardage flat without pulling or stretching the fibers.
- Trace an existing pair of fitted leggings down to the knee level.
- Extend the pattern outward from the knee to the ankle into flares.
- Cut out the two front and two back flared pant leg panels.
- Stitch the front and back crotch seams using a flexible stretch stitch.
- Sew the inner inseams and outer side seams together from waist to hem.
- Fold the top waistband over the wide elastic, stitching down with zigzags.
- Cut two lined triangle or bandeau panels to craft the knit bralette.
- Stitch the front bralette pieces together, reinforcing the bottom band with elastic.
- Construct thin shoulder straps from knit scraps and attach them to cups.
- Hem the wide flared bell-bottom hems with a flexible twin-needle stitch.
8. French-Girl Gingham Peplum Blouse and Cigarette Trousers

Timeless French-girl fashion relies on crisp tailoring, playful vintage prints, and flattering feminine waistlines. Black-and-white gingham fabric exudes classic vintage charm while remaining accessible and easy to sew. A gathered peplum blouse paired with ankle-length cigarette pants creates an effortlessly chic look. This polished outfit looks straight out of a Parisian boutique for minimal cost.
Recreating Parisian Vintage Tailoring with Classic Checkered Cotton
Woven gingham cotton is one of the easiest, most stable fabrics for beginner sewists. The structured peplum flare accentuates your natural waist while draping softly over your hips. Sleek cigarette trousers taper cleanly down to the ankle, showing off your favorite loafers. It is a sophisticated, versatile outfit that transitions seamlessly from office to dinner dates.
Materials and Notions Needed
- Three yards of woven cotton gingham fabric in classic black and white
- One seven-inch invisible zipper for the fitted cigarette trouser side
- Spool of matching black polyester sewing thread and standard machine needles
- Fusible iron-on interfacing to reinforce the peplum waistband and placket
- Fabric shears, measuring tape, pins, and a steam iron for pressing
Step-by-Step Gingham Set Assembly
- Cut the fitted bodice pieces and a wide rectangular peplum skirt strip.
- Assemble the front and back bodice darts to tailor the blouse snugly.
- Sew the shoulder and side seams, pressing all inner seams open flat.
- Gather the top edge of the peplum fabric strip using loose basting.
- Attach the gathered peplum ruffle along the bottom waist edge of the bodice.
- Hem the neckline and peplum edges using neat double-fold narrow hems.
- Cut four tapered trouser leg panels for the slim ankle-length cigarette pants.
- Stitch the inner leg seams and crotch seams cleanly using straight stitches.
- Install an invisible zipper into the left outer side seam of the pants.
- Attach a tailored interfaced waistband along the top waist edge of trousers.
- Hem the tapered pant legs to hit precisely at your ankle bone.
9. Bohemian Gauze Tiered Maxi Skirt and Tie-Shoulder Crop
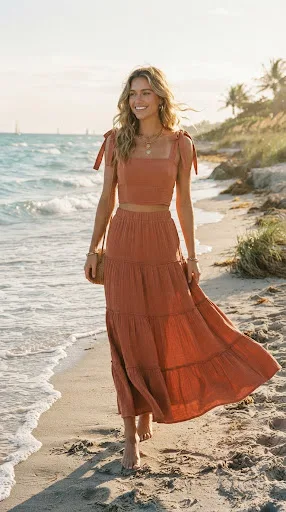
Crinkled cotton gauze fabric is unmatched when it comes to soft, breathable summer comfort. Free-spirited bohemian aesthetics rely heavily on sweeping silhouettes, airy textures, and delicate ribbon details. A tiered maxi skirt paired with a tie-shoulder crop top creates breezy vacation beauty. This voluminous handmade outfit flutters effortlessly around your ankles as you stroll in the sunshine.
Embracing Airy Crinkle Gauze for Effortless Summer Beauty
Double gauze fabric has a naturally crinkled texture that hides minor beginner sewing imperfections. The tiered maxi skirt catches summer breezes, keeping you remarkably cool and comfortable all day. Dainty tie-shoulder straps add charming, adjustable feminine detail to the simple square-neck crop top. This romantic matching set is a must-have piece for warm weekend market wanderings.
Materials and Notions Needed
- Three and a half yards of breathable double gauze or crinkle cotton
- One yard of one-inch-wide soft waistband elastic for the tiered skirt
- Spool of matching cotton sewing thread and fine universal machine needles
- Tailor’s chalk, safety pins for threading elastic, and sharp fabric shears
- Domestic steam clothes iron for gently pressing seams without crushing crinkles
Step-by-Step Gauze Set Construction
- Cut two identical rectangles to form the front and back crop top bodice.
- Sew the side seams together, pressing them open with a cool iron.
- Fold the top and bottom raw edges over twice to form neat hems.
- Cut four long matching fabric strips to fashion the dainty shoulder ties.
- Stitch the tie strips into tubes, turn right-side out, and press flat.
- Attach two ties to the front top corners and two to the back.
- Cut three wide rectangular tiers for the voluminous tiered maxi skirt.
- Gather the top edges of the two lower tiers using double basting threads.
- Sew the gathered tiers together, ensuring the ruffles distribute evenly across seams.
- Stitch a simple casing at the top waist and feed the elastic through.
- Hem the bottom tier with a delicate baby hem to preserve natural movement.
10. Modern Ribbed Knit Cut-Out Midi Dress and Duster Cardigan
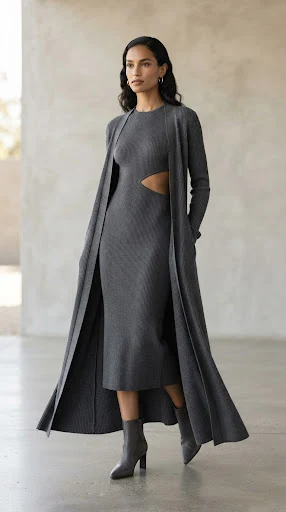
Sleek cut-out dresses combined with matching longline duster cardigans represent elevated, contemporary minimalism at its finest. High-end knitwear brands sell monochromatic ribbed knit coordinates for exorbitant luxury prices. You can assemble this striking outfit using medium-weight ribbed knit yardage with four-way stretch. The tasteful midriff cut-out adds modern edge, balanced by the floor-sweeping coverage of the cardigan.
Designing Contemporary Minimalist Knitwear with Tasteful Cut-Outs
Ribbed knit dresses mold to your curves smoothly, creating an elongated, streamlined body silhouette. A subtle keyhole or side waist cut-out introduces high-fashion visual intrigue to the clean lines. The matching open-front duster cardigan cascades down to your calves, creating dramatic, fluid movement. This elevated monochrome outfit takes you from chic art gallery openings to cocktails.
Materials and Notions Needed
- Four yards of medium-weight modal or viscose ribbed knit fabric
- Ballpoint stretch machine needle (size 75/11) and matching stretch polyester thread
- Clear silicone stretch stay-tape to reinforce the delicate cut-out openings
- Tailor’s chalk, sharp rotary cutter with mat, and stretch ballpoint pins
- Low-heat steam iron and damp cotton pressing cloth for knit seams
Step-by-Step Knit Dress and Duster Tutorial
- Lay the ribbed knit flat along the grainline without stretching the yardage.
- Cut the front and back body-skimming panels for the midi dress.
- Cut a stylish half-moon cut-out shape along one front waistline seam.
- Reinforce the raw cut-out edge with clear stay-tape before stitching down.
- Stitch the shoulder seams and side seams together using a narrow stretch stitch.
- Finish the neckline, cut-out, and midi hem with clean stretch twin-needle stitches.
- Cut the long back panel, two front panels, and sleeves for dusters.
- Sew the duster shoulder seams and insert the sleeves flat into armholes.
- Stitch the continuous underarm sleeve and side seams down to the bottom hem.
- Hem the long outer duster perimeter with a wide, flexible coverstitch or zigzag.
- Press all finished seams flat using a cool iron and damp pressing cloth.
11. Upcycled Cotton Bandana Patchwork Halter and Shorts Set
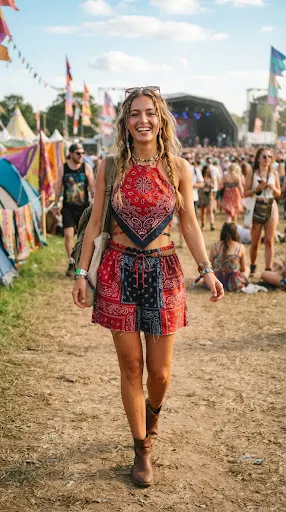
Vintage paisley cotton bandanas are readily available at flea markets and thrift stores everywhere. These affordable printed cotton squares hold incredible potential for crafting unique festival-ready outfits. Piecing together complementary bandanas yields a colorful, eye-catching halter top and matching lounge shorts. The lightweight breathable cotton weave is ideal for staying cool during hot outdoor events.
Transforming Classic Paisley Bandanas into Eye-Catching Festival Wear
Bandanas feature finished factory edges, which significantly cuts down on your hem-finishing time. The intricate paisley motifs create a visually captivating patchwork pattern with rich Americana charm. A classic handkerchief pointed hemline flatters your waistline while showing playful festival energy. Coordinated pull-on shorts offer maximum comfort, pocket functionality, and easy movement all day long.
Materials and Notions Needed
- Six to eight vintage or modern 100% cotton printed bandanas
- One yard of one-inch-wide braided elastic band for the shorts waistband
- Spool of matching cotton thread and universal machine needles (size 80/12)
- Fabric shears, tailor’s chalk, measuring tape, and basic dressmaker pins
- Steam iron and spray starch to keep slippery cotton bandanas crisp
Step-by-Step Bandana Outfit Assembly
- Wash and press all bandanas with spray starch to flatten wrinkles.
- Select one bandana and fold it diagonally to form the handkerchief halter.
- Fold the top corner over to create a channel for your halter tie.
- Thread a soft cord through the channel to secure around your neck.
- Sew two bandanas together edge-to-edge to create front panels for the shorts.
- Sew two more bandanas together to create matching back panels for shorts.
- Trace a loose-fitting pair of shorts onto the pieced bandana fabric sheets.
- Cut out the shorts pattern, preserving the finished bandana hem edges along legs.
- Stitch the front and back rise seams together cleanly using straight stitches.
- Sew the inner leg inseam and construct a simple top elastic waistband casing.
- Thread the elastic through the waistband, stitch ends closed, and enjoy your set.
12. Edgy Grunge Reconstructed Band Tee Dress and Corset Cinch

Vintage rock-and-roll band t-shirts often sit neglected inside dresser drawers due to boxy fits. Simply cutting up two oversized band shirts allows you to build an edgy graphic mini-dress. Splicing contrasting graphics and adding metal side-safety pin details introduces authentic nineties grunge. The deconstructed look delivers effortless rock-chic style that pairs perfectly with chunky combat boots.
Reconstructing Masculine Band Tees into Deconstructed Rock-Chic Dresses
Oversized jersey t-shirts offer ultra-soft, lived-in comfort that feels fantastic against bare skin. Splicing two contrasting band tees together creates an artistic, asymmetrical streetwear design across your chest. Raw rolled hemlines and exposed topstitching celebrate casual, distressed grunge style without meticulous tailoring. This edgy upcycled dress makes a bold statement at casual concerts and weekend gatherings.
Materials and Notions Needed
- Two oversized vintage rock graphic t-shirts in complementary faded tones
- Kit of heavy-duty silver metal safety pins or metal eyelet hardware
- Ballpoint jersey sewing machine needle and dark polyester sewing thread
- Ultra-sharp rotary fabric cutter, self-healing cutting mat, and clear ruler
- Steam iron and tailor’s chalk for marking asymmetrical cut lines
Step-by-Step Band Tee Dress Transformation
- Lay both oversized graphic t-shirts completely flat upon your cutting mat.
- Slice down the vertical front of both shirts at a dynamic asymmetrical angle.
- Swap the contrasting halves and pin the opposite graphic panels together cleanly.
- Stitch the center front seam with a flexible stretch stitch, leaving seams exposed.
- Try on the combined shirt dress to establish your desired mini length.
- Trim the bottom hem cleanly with rotary cutters, letting the jersey edge roll.
- Cut small horizontal slits down both side waist seams for edge details.
- Link the side slits together using rows of heavy-duty silver safety pins.
- Adjust the pin placement to cinch the waistline snugly around your figure.
- Cut the neckline into a relaxed, off-the-shoulder scooped collar shape.
- Layer your reconstructed rock dress over fishnet tights and leather combat boots.
13. Minimalist Cotton Canvas Utility Jumpsuit with Belt
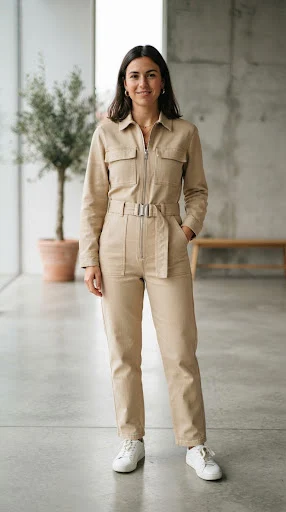
Workwear-inspired utility boiler suits and jumpsuits continue to trend across contemporary fashion runways worldwide. Clean lines, functional patch pockets, and structured neutral canvas create an undeniably confident daily look. Constructing your own utility jumpsuit allows you to achieve the perfect torso and inseam length. Cinched with a matching fabric belt, this monochrome outfit exudes modern industrial polish.
Tailoring Structured Utility Workwear for Sleek Modern Proportions
Heavyweight cotton canvas gives jumpsuits crisp architectural lines that hold shape all day. Large functional patch pockets on the chest and hips add practical utility style. The front zip closure provides effortless dressing while establishing a strong vertical design line. It is a striking, durable one-and-done ensemble that pairs effortlessly with retro sneakers.
Materials and Notions Needed
- Three and a half yards of medium-to-heavyweight cotton canvas or twill
- One twenty-four-inch heavy-duty metal front separating zipper
- Heavy-duty jeans sewing machine needle (size 90/14) and topstitching thread
- Metal slider buckle for constructing the matching fabric waist belt
- Fabric shears, tailor’s chalk, pins, measuring tape, and steam iron
Step-by-Step Utility Jumpsuit Guide
- Cut the structured front and back bodice panels, sleeves, and pants.
- Stitch the back bodice shoulder seams and sew the front chest patch pockets.
- Install the heavy-duty metal zipper down the center front bodice opening cleanly.
- Attach the collared neckline facing to encase the top zipper stop neatly.
- Stitch the pants front and back crotch seams, adding wide hip pockets.
- Join the assembled upper bodice to the pants waistline using straight stitches.
- Sew the continuous side seams from the sleeve cuffs down to pant hems.
- Topstitch all major structural seams with durable contrast thread for utility flair.
- Sew a long two-inch-wide canvas fabric strap and attach your slider buckle.
- Press all heavy seams flat using a hot steam iron and pressing cloth.
- Step into your custom jumpsuit, zip up the front, and buckle your belt.
14. Sweetheart Sundress and Matching Reversible Bucket Hat

A breezy sweetheart neckline sundress paired with a matching bucket hat captures sunny retro nostalgia. Department stores often sell matching festival accessory sets for unreasonable markups during the spring. Crafting this charming ensemble from colorful printed cotton ensures you stand out at warm gatherings. The flared A-line dress skirt spins gracefully while the bucket hat shields your face.
Combining Vintage Sun Silhouettes with Coordinated Accessories
Crisp cotton poplin holds vibrant floral prints and geometric patterns with brilliant, sharp clarity. The structured sweetheart neckline frames your collarbones, adding romantic vintage allure to your torso. Sewing a coordinating reversible bucket hat from fabric scraps ensures zero textile waste while matching. This darling two-piece outfit is the ultimate showstopper for sunny farmers market mornings.
Materials and Notions Needed
- Three yards of printed cotton poplin or cheerful gingham fabric
- Half yard of solid contrasting cotton fabric to line the bucket hat
- Lightweight fusible interfacing to give the bucket hat brim sturdy structure
- One fourteen-inch invisible zipper for the center back dress seam
- Spool of matching all-purpose thread, fabric shears, pins, and iron
Step-by-Step Sundress and Hat Tutorial
- Cut the sweetheart neckline bodice panels, lining pieces, and flared skirt.
- Assemble the curved sweetheart bust seams, pressing the internal curves open.
- Sew the outer bodice to the inner lining along the sweet neckline edge.
- Understitch the neckline lining to prevent it from rolling outward during wear.
- Attach the gathered A-line skirt to the bottom waist edge of the bodice.
- Install an invisible zipper down the center back seam for smooth closure.
- Hem the bottom skirt edge using a clean, double-folded half-inch hem.
- Cut the crown, side wall, and brim pieces for your matching bucket hat.
- Fuse lightweight interfacing to the brim panels to ensure sturdy sun protection.
- Stitch the outer hat and inner lining pieces together along the brim edge.
- Turn the hat right-side out, topstitch the brim, and pair with your dress.
15. Luxe Velvet Slip Dress and Matching Scrunchie Set

Rich velvet fabric instantly introduces opulent glamour, tactile softness, and rich multidimensional color depth. Boutique evening slip dresses often carry hefty designer price tags for relatively simple shapes. You can craft an ultra-luxurious bias-cut slip dress using plush stretch velvet yardage at home. Repurposing leftover fabric scraps into a matching oversized scrunchie completes this cohesive, glamorous look.
Draping Opulent Velvet into Timeless Minimalist Evening Elegance
Stretch velvet catches room lighting dynamically, shifting between deep shadows and luminous, shimmering highlights. Cutting the garment along the true fabric bias allows the textile to drape naturally. Dainty spaghetti straps add minimalist nineties elegance, letting the rich velvet texture take focus. This stunning evening outfit ensures you turn heads at formal dinner parties and celebrations.
Materials and Notions Needed
- Two yards of rich stretch velvet fabric in emerald green or midnight black
- Ballpoint stretch machine needle (size 75/11) and matching polyester thread
- One yard of thin rattail satin cord for crafting delicate spaghetti straps
- Eight inches of narrow elastic band to construct the matching velvet scrunchie
- Sharp fabric scissors, ballpoint sewing pins, measuring tape, and an iron
Step-by-Step Velvet Slip and Scrunchie Assembly
- Lay the stretch velvet fabric flat, ensuring the pile runs down smoothly.
- Cut the front and back dress panels on the bias for fluid movement.
- Stitch the side seams together slowly using a narrow stretch zigzag stitch.
- Hem the front cowl or V-neckline using a delicate hand slip-stitch technique.
- Cut two lengths of satin rattail cord to craft your thin shoulder straps.
- Pin the straps securely to the front neckline peaks and rear back edge.
- Try on the dress to adjust strap lengths for a comfortable, balanced fit.
- Stitch the shoulder straps down firmly using reinforced back-and-forth stitches.
- Hem the bottom skirt edge with a gentle blind hem or flexible coverstitch.
- Sew leftover velvet scraps into a small fabric tube, inserting the narrow elastic.
- Stitch the scrunchie ends closed and wear your hair up with your gown.