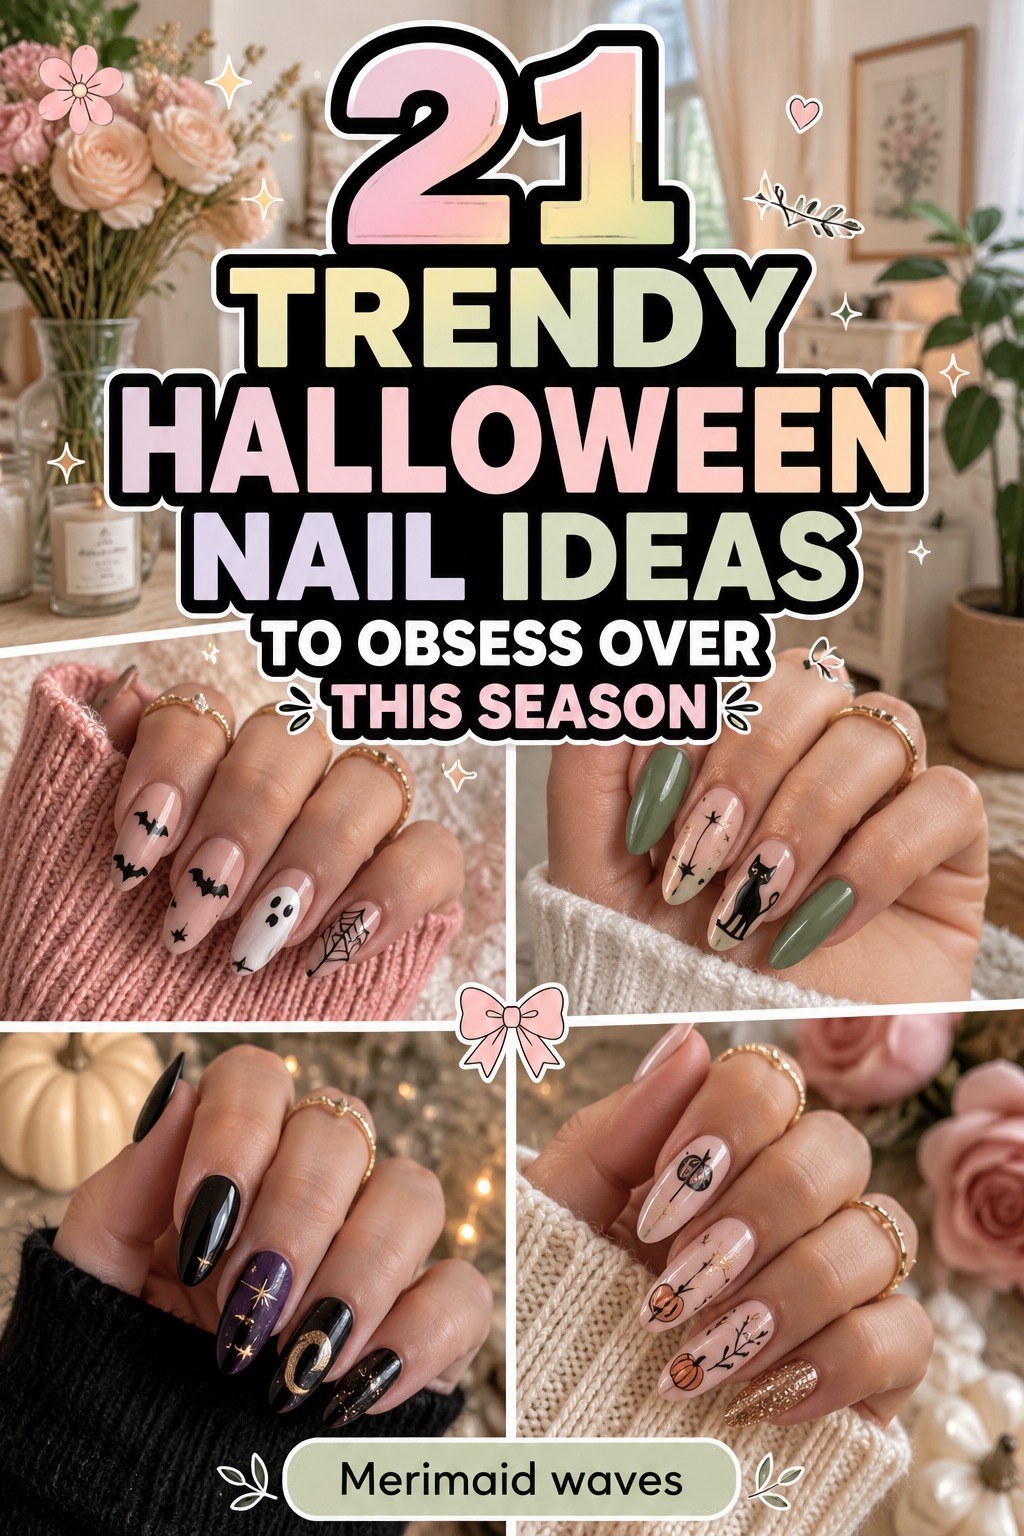
21 Trendy Halloween Nail Ideas to Obsess Over This Season
Halloween nail art has officially evolved from novelty cartoon stickers into one of the most sophisticated, design-forward categories in contemporary beauty. Modern spooky-season manicures balance high-fashion runway trends with seasonal intrigue. Instead of garish neon-orange shades or cluttered plastic motifs, current trends prioritize moody minimalism, antique Victorian gothic romance, optical illusion velvet chrome finishes, and refined micro-illustrations.

Whether your signature style leans toward chic neutral minimalism, dramatic dark academia, or bold celestial witchcraft, curating an intentional Halloween manicure allows you to celebrate the season with elegance. From glazed ghost French tips to dripping blood-red ombré, here are 21 stunning, trendsetting Halloween nail concepts to inspire your next salon appointment or DIY manicure.
Navigating Contemporary Halloween Nail Art Trends
The modern approach to seasonal nail design merges traditional Halloween imagery with high-end editorial nail artistry:
- Micro-Fine Line Work: Hand-painted, hyper-detailed micro ghosts, spiderwebs, and celestial starbursts create delicate visual interest without overpowering the nail plate.
- Textural Layering & 3D Gel: Clear builder gels and sculpting clays create raised water droplets, tactile chrome spiderweb filigree, and dimensional bone textures.
- Optical Illusion Magnetic Finishes: Cat-eye and magnetic velvet polishes create mesmerizing depth, mimicking swirling witch’s brews, starry midnight skies, and velvet textures.
- Neutral & Muted Palettes: Blended shades of milky oat, sheer jelly black, rich chocolate brown, and deep espresso allow festive themes to remain wearable for daily office and lifestyle settings.
- Hyper-Glossy Glazed Overlays: Layering translucent white and iridescent chrome powders over spooky motifs creates a soft, pearlescent glow reminiscent of the popular “glazed donut” trend.
1. Minimalist Glazed Ghost French Tips

A sheer milky-nude base, clean micro-French tips, and delicate floating white sheet ghosts with tiny black dot eyes define this minimalist aesthetic.
Sheer Ethereal Simplicity
The Glazed Ghost French manicure proves that festive nail art can remain clean, understated, and workplace-appropriate. A translucent milky-pink jelly foundation provides a healthy, polished nail bed. Floating gracefully along the smile line or accent cuticle, hand-painted micro ghosts add a charming seasonal touch. Finished with an all-over coat of pearlescent white chrome powder, the manicure captures the luminous, ethereal aesthetic of modern “clean girl” trends.
Recommended Nail Shape & Length
- Best Shape: Short square, soft squoval, or natural oval.
- Length: Short to medium.
Signature Palette & Texture Checklist
- Sheer milky-pink base gel
- Opaque crisp white gel liner
- Deep carbon-black gel for eyes
- Pearlized iridescent white chrome powder
- High-gloss non-wipe top coat
Step-by-Step Styling & Application
- Prep and Base: Apply a thin layer of translucent milky-pink jelly gel to even out natural nail tones and cure for 60 seconds.
- Paint French Smile Lines: Using an ultra-fine detail brush, paint crisp micro-French tips across four fingers using opaque white gel.
- Illustrate Micro Ghosts: On the accent nails, paint a small wavy bell shape near the tip to create the ghost’s floating sheet silhouette.
- Detail the Eyes: Dip a micro-dotting tool into carbon-black gel and place two tiny oblong dots near the head of the ghost.
- Apply the Pearl Glaze: Apply a non-wipe top coat, cure, and gently burnish iridescent white chrome powder across the entire nail before sealing with a final glossy top coat.
2. Velvet Cat-Eye Midnight Black Magic

Dimensional black and charcoal magnetic cat-eye polish shifting into deep emerald and midnight-blue undertones under direct light.
Seductive Magnetic Depth
Velvet magnetic nails represent the pinnacle of modern textural luxury. Using high-pigment magnetic iron powders suspended in rich blackened-emerald or charcoal jelly bases, this technique creates an optical illusion of shimmering crushed velvet fabric. When light hits the surface, the nails appear to glow from within, perfectly capturing the mysterious ambiance of midnight spellcraft.
Recommended Nail Shape & Length
- Best Shape: Almond or medium coffin.
- Length: Medium to long.
Signature Palette & Texture Checklist
- Opaque black gel base
- Charcoal or emerald magnetic cat-eye gel
- Heavy-duty cylindrical neodymium magnet
- High-shine glass-finish top coat
Step-by-Step Styling & Application
- Dark Foundation: Apply a single solid coat of jet-black gel polish as the light-absorbing backdrop and cure.
- Apply Magnetic Polish: Apply a generous layer of charcoal or dark emerald magnetic cat-eye gel.
- Choreograph the Velvet Shift: Hold the cylindrical magnet parallel to the edges of the nail plate, pushing the metallic particles upward toward the center to create an all-over velvet sheen rather than a single sharp line.
- Flash Cure: Immediately flash cure for 15 seconds per nail to lock the magnetic particles in place before they settle.
- Final Cure and Seal: Complete a full 60-second cure and lock in the optical depth with a plumping, glass-finish top coat.
3. Dark Romance Blood-Red Vampire Ombré
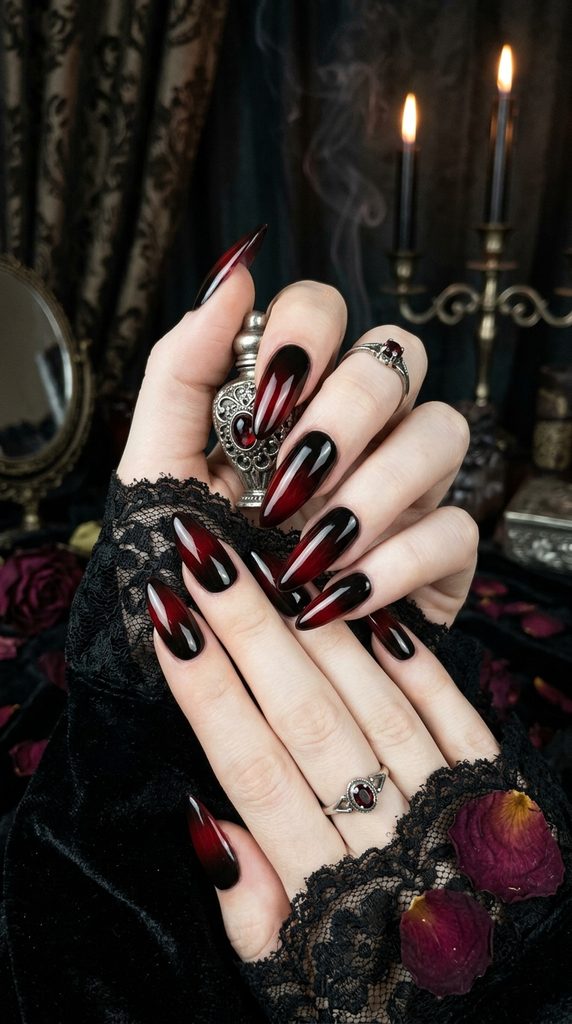
A seamless gradient blending from deep glossy black at the cuticles into a translucent, rich oxblood crimson at the tips.
Dramatic Gothic Allure
The Blood-Red Vampire Ombré captures the romantic, brooding drama of gothic literature. Blending rich black pigment into a deep ruby jelly creates the illusion of blood dripping through dark shadow. This seductive, high-contrast look is particularly flattering on elongated almond shapes, making fingers appear slender and elegant.
Recommended Nail Shape & Length
- Best Shape: Stiletto or long tapered almond.
- Length: Long.
Signature Palette & Texture Checklist
- Sheer jelly black gel
- Deep burgundy or oxblood jelly red
- Opaque jet-black gel liner
- Ombré blending sponge or silicone gradient tool
- High-gloss gel top coat
Step-by-Step Styling & Application
- Base Layer: Apply a sheer coat of deep burgundy jelly polish across the entire nail plate and cure.
- Apply Ombré Pigment: Place a stripe of opaque black gel near the cuticle and oxblood red along the center and free edge.
- Blend the Gradient: Using a dense cosmetic sponge or an ombré airbrush tool, gently tap the seam between the black and crimson until the transition is smooth.
- Layer Jelly Glaze: Apply a thin layer of sheer red jelly gel over the entire gradient to marry the colors seamlessly.
- High-Gloss Finish: Seal with a thick, self-leveling glossy top coat for a liquid, glass-like finish.
4. Vintage 3D Gilded Chrome Spiderweb Filigree

Raised, baroque-style antique gold chrome spiderwebs sculpted on top of an ultra-matte sheer espresso or nude base.
Victorian Gothic Craftsmanship
Moving away from flat, cartoonish webs, this design borrows heavily from Victorian jewelry and baroque metalwork. Using clear 3D sculpting gel, intricate spiderweb radial lines and spiral filigree are drawn with tactile, raised dimension. Burnished with antique gold or burnished silver chrome powder, the webs resemble delicate antique heirloom jewelry.
Recommended Nail Shape & Length
- Best Shape: Coffin, stiletto, or long almond.
- Length: Medium to long.
Signature Palette & Texture Checklist
- Sheer espresso or neutral nude base gel
- Velvet-finish matte top coat
- High-viscosity clear 3D sculpting gel or builder gel
- Antique gold or dark bronze chrome powder
- Ultra-fine 11mm striper brush
Step-by-Step Styling & Application
- Matte Background: Apply a neutral sheer espresso or nude base, top with a velvet matte top coat, and cure completely.
- Draw 3D Web Framework: Dip an 11mm striper brush into clear high-viscosity sculpting gel and paint thin, raised structural lines radiating outward from one corner of the nail.
- Connect the Filigree Arcs: Connect the radial lines using curved, drooping arcs to form the spiderweb pattern, ensuring the gel stays raised and dimensional.
- Cure for Chrome: Cure the 3D gel for 30 seconds (or per manufacturer’s chrome-curing time).
- Burnish Chrome: Gently rub antique gold chrome powder over the raised gel lines using a silicone applicator. Dust away excess powder from the matte base, which naturally resists the chrome.
5. Celestial Witch Moon Phase Stargazing
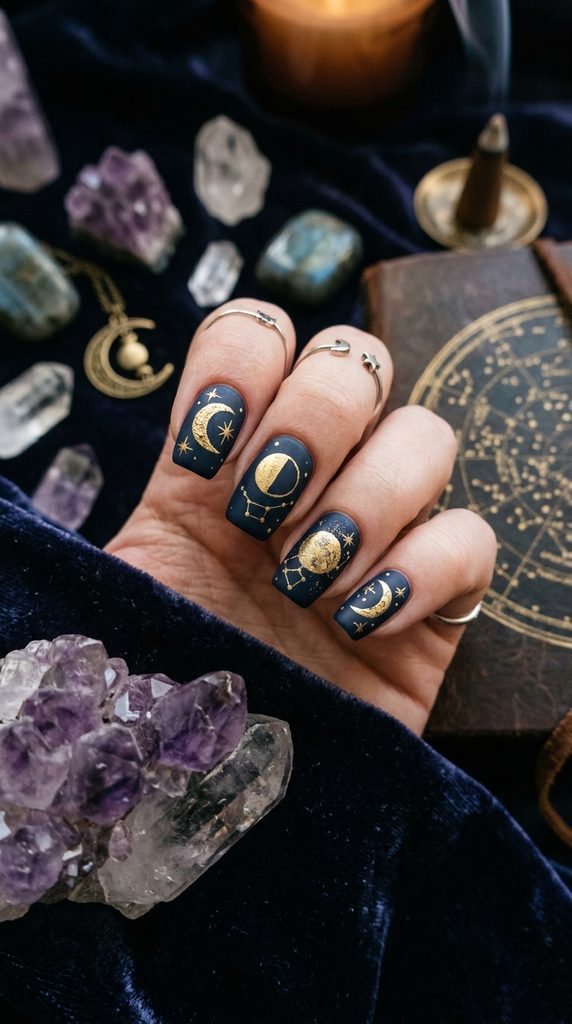
Matte midnight-navy bases detailed with hand-painted gold leaf crescent moons, shimmering constellations, and fine celestial starbursts.
Mystical Astrological Elegance
Celestial witchcraft nail art celebrates cosmic mystery with refined astrological iconography. A deep, velvety midnight-navy or matte black background sets the stage for hand-painted gold leaf moon phases, twinkling eight-point starbursts, and intricate constellation lines. It offers an enchanting seasonal vibe that feels sophisticated through Halloween and beyond.
Recommended Nail Shape & Length
- Best Shape: Oval, almond, or short square.
- Length: Any length.
Signature Palette & Texture Checklist
- Deep midnight-navy or black cream gel
- Metallic gold gel paint or transfer foil
- Genuine gold leaf flakes
- Ultra-fine detail liner brush
- Matte or satin top coat
Step-by-Step Styling & Application
- Midnight Foundation: Apply two coats of deep midnight-navy gel polish and cure each layer thoroughly.
- Paint Moon Phases: Using metallic gold gel, paint a progression of moon phases (waxing crescent, half moon, full moon, and waning crescent) across the center of each nail.
- Add Starbursts and Dots: With an ultra-fine detail brush, paint crisp eight-point starbursts and tiny dot clusters to represent distant constellations.
- Apply Gold Leaf Accents: Press tiny fragments of genuine gold leaf into the tacky layer for added organic metallic texture.
- Matte Seal: Seal with a soft velvet matte top coat to give the cosmic illustrations the look of an antique parchment celestial chart.
6. Tortoiseshell & Spooky Negative Space Half-Moons

Rich, warm amber tortoiseshell patterns layered alongside negative space half-moons and subtle matte black accents.
Modern Warm Autumn Fusion
Tortoiseshell remains one of autumn’s most luxurious patterns. Pairing warm, translucent amber layers with negative space cutouts and delicate black cat silhouettes or half-moons elevates traditional animal print into chic seasonal art. The high-gloss amber depths contrast against matte black elements for an editorial finish.
Recommended Nail Shape & Length
- Best Shape: Soft square or almond.
- Length: Short to medium.
Signature Palette & Texture Checklist
- Translucent jelly amber/mustard yellow gel
- Deep chocolate brown jelly gel
- Opaque jet-black gel
- Clear builder gel for layering
- High-gloss top coat
Step-by-Step Styling & Application
- Negative Space Prep: Apply base coat, leaving the cuticle lunula (half-moon) bare or masked with striping tape.
- First Amber Layer: Paint a coat of translucent yellow-amber jelly gel across the active nail area and cure.
- Add Dark Spots: Dab irregular spots of chocolate brown and black gel across the nail, feathering the edges softly with a clean brush.
- Layer for Depth: Apply a second layer of amber jelly over the spots and add a few smaller, darker spots to create a 3D glass effect.
- Seal and Detail: Outline the negative space half-moon boundary with a crisp black line, then seal with a high-shine top coat.
7. Chic Black French Tips with Chrome Spider Accents

Classic sheer nude bases with ultra-thin black French tips, adorned with a single metallic silver 3D spider charm on an accent finger.
Edgy French Redefinition
This concept transforms the classic French manicure into a sharp, edgy statement. Crisp, high-arch black French tips elongate the nail plate, while an accent nail features a delicate, dimensional chrome spider charm with crystal detailing. It is minimalist, sharp, and easy to style with any autumn wardrobe.
Recommended Nail Shape & Length
- Best Shape: Long square or modern tapered almond.
- Length: Medium to long.
Signature Palette & Texture Checklist
- Sheer neutral nude base gel
- Jet-black gel paint
- 3D silver metal spider charms or chrome sculpting gel
- Clear rhinestone adhesive resin
- High-gloss top coat
Step-by-Step Styling & Application
- Flawless Base: Apply a sheer neutral base that matches your skin tone and cure.
- Paint High-Arch Tips: Using black gel, paint deep, smiling French tips that extend high up the lateral sidewalls.
- Prep the Accent Nail: On the chosen accent nail (typically the ring or middle finger), apply top coat and cure.
- Adhere the 3D Spider: Place a bead of sturdy rhinestone glue in the center of the accent nail, press the silver spider charm firmly into place, and cure.
- Secure Charm Borders: Seal around the base of the metal charm with top coat to prevent hair snagging.
8. Sheer Smoke & Charcoal Marbled Witchcraft

Translucent milky-gray and black jelly polishes blended to resemble drifting billows of magical smoke across bare nails.
Mystical Translucent Atmosphere
Sheer smoky nails create an ethereal, floating illusion reminiscent of incense smoke rising from an alchemist’s cauldron. By layering sheer black jelly gel with swirling lines of milky white, the manicure achieves multidimensional depth while keeping the overall look soft and diffused.
Recommended Nail Shape & Length
- Best Shape: Long almond or stiletto.
- Length: Medium to long.
Signature Palette & Texture Checklist
- Sheer black jelly gel (“black tea” shade)
- Opaque white gel liner
- Flat blending brush or acetone-dampened brush
- Clear blooming gel or sheer builder gel
- High-gloss top coat
Step-by-Step Styling & Application
- Jelly Base: Apply a sheer coat of black jelly polish to create a translucent gray tint over the nail bed.
- Apply Blooming Gel: Brush a thin layer of clear blooming gel over the uncured jelly base without curing.
- Drop Smoke Ribbons: Swirl thin lines of opaque white gel down the nail using a fine brush, watching the blooming gel disperse the pigment into soft, billowy smoke plumes.
- Feather the Edges: Gently tap the edges of the white lines with a flat brush to create translucent wisps.
- Lock with Top Coat: Cure for 60 seconds, then apply a final coat of high-shine top coat to magnify the smoky depth.
9. Matte Pumpkin Spice & Plaid Accents

Warm terracotta, burnt orange, and cinnamon tones paired with hand-painted matte gingham and cozy flannel plaid accent nails.
Cozy Cottagecore Autumn
For those who prefer cozy harvest warmth over spooky gothic motifs, this design blends rich pumpkin spice shades with tactile flannel patterns. Muted burnt orange, cream, and deep chocolate brown combine in delicate cross-hatch lines, finished in a soft velvet matte that mimics warm autumn textiles.
Recommended Nail Shape & Length
- Best Shape: Short square or squoval.
- Length: Short to medium.
Signature Palette & Texture Checklist
- Burnt terracotta/pumpkin orange cream gel
- Warm cream/buff base gel
- Espresso brown and forest green gel liners
- Long striping brush
- Velvet matte top coat
Step-by-Step Styling & Application
- Color Blocking: Paint solid burnt orange on thumb, index, and pinky nails. Paint cream base on accent nails and cure.
- Paint Primary Stripes: Using a long striping brush and espresso gel, draw two vertical lines and two horizontal lines across the cream nails.
- Cross-Hatch Detailing: Paint thinner intersecting lines of burnt orange and forest green between the primary stripes.
- Fill Intersection Blocks: Darken the points where the dark lines cross with an extra dab of brown pigment to simulate woven flannel fabric.
- Matte Finish: Apply a velvet matte top coat over all nails to create a cozy, soft-touch fabric texture.
10. Pearlescent Glazed Skeleton Bone Art
Luminous pearl-white bases featuring detailed, hand-painted ivory skeleton hand bones resting across the nail plate.

Haute-Couture Anatomical Illustration
Anatomical bone art gets a high-fashion update when rendered in delicate ivory tones over a pearlescent glazed background. Instead of graphic white-and-black contrast, the skeletal phalanges are painted with subtle shading and finished with a soft iridescent chrome sheen for an understated, museum-quality finish.
Recommended Nail Shape & Length
- Best Shape: Long coffin or tapered almond.
- Length: Medium to long.
Signature Palette & Texture Checklist
- Sheer iridescent pearl base gel
- Ivory or creamy bone-white gel paint
- Soft taupe gel for shadow contouring
- Pearlescent chrome powder
- Glossy gel top coat
Step-by-Step Styling & Application
- Pearl Glaze Base: Apply a sheer neutral base, cure, burnish with soft pearl chrome powder, and seal with a base coat.
- Sketch the Bone Anatomy: Using ivory gel and a detail brush, paint the skeletal structure of a hand, starting with the carpals at the cuticle and extending phalanges toward the tip.
- Add Depth Shadows: Use diluted taupe gel to shade along the edges of each bone joint to create a realistic 3D appearance.
- Highlight Bone Ridges: Paint crisp white highlights along the center ridge of each bone segment.
- Final Top Coat: Seal with a thick, self-leveling glossy top coat.
11. 3D Dripping Metallic Chrome & Oozing Slime

Raised, liquid-metal chrome drips cascading from the cuticles down over a deep matte black or clear negative space background.
Liquid Sci-Fi Gothic Futurism
This high-impact design merges futuristic liquid metal trends with classic Halloween slime aesthetics. Using thick builder gel, tactile dripping droplets are sculpted to look like they are actively oozing down the nail plate, then coated in high-shine mirror silver chrome.
Recommended Nail Shape & Length
- Best Shape: Stiletto, almond, or coffin.
- Length: Long.
Signature Palette & Texture Checklist
- Matte black base gel
- High-viscosity 3D builder gel
- Liquid mirror silver chrome powder
- Silicone chrome applicator
- Non-wipe top coat
Step-by-Step Styling & Application
- Matte Canvas: Apply an opaque black base, coat with a matte top coat, and cure completely.
- Sculpt 3D Drips: Using a dotting tool and thick sculpting gel, place large beads of gel near the cuticle and drag them downward in organic, varied lengths, pooling the gel at the tips to mimic liquid drops.
- Cure Droplets: Cure the 3D gel under an LED lamp for 30 seconds until slightly tacky.
- Rub Mirror Chrome: Burnish mirror silver chrome powder exclusively onto the raised 3D drips using a silicone tool.
- Spot Seal: Carefully paint a glossy top coat over the chrome drips only, leaving the background matte.
12. Micro Bats & Starry Sky Ombré
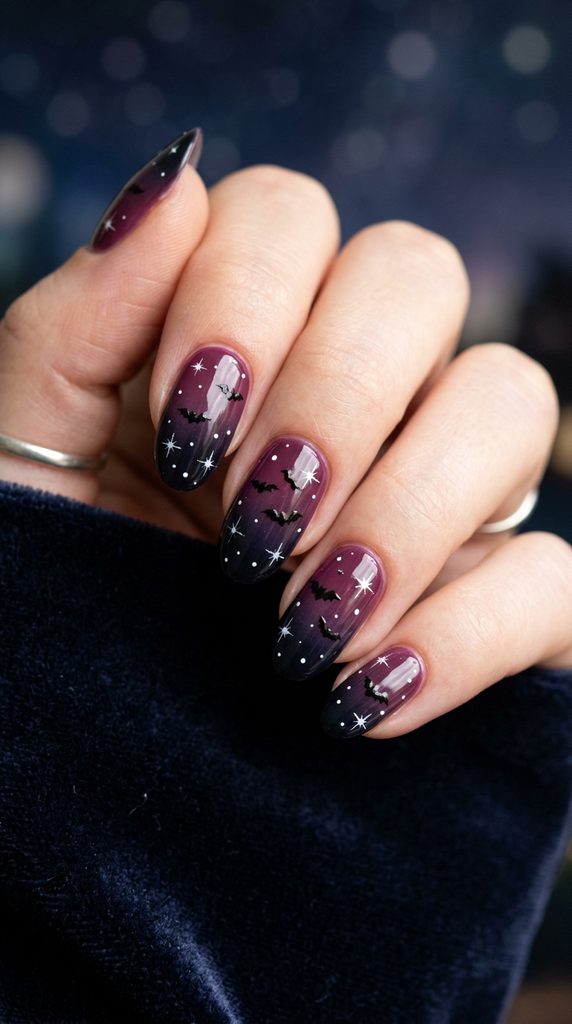
A dark plum-to-black vertical gradient base adorned with scattered, hand-painted micro-silhouette bats and tiny white twinkling stars.
Subtle Twilight Storytelling
This design creates the illusion of looking up into a twilight sky filled with fluttering bats. A soft gradient of deep plum fading into midnight black provides a rich, colorful backdrop for tiny, meticulously detailed flying bat silhouettes.
Recommended Nail Shape & Length
- Best Shape: Short squoval, oval, or almond.
- Length: Any length.
Signature Palette & Texture Checklist
- Deep berry plum gel
- Jet-black gel
- Crisp white gel liner
- Ultra-fine 7mm micro-detail brush
- High-gloss top coat
Step-by-Step Styling & Application
- Paint Twilight Gradient: Blend deep plum gel into jet-black gel using a sponge to create a smooth twilight sky background.
- Paint Micro Bat Bodies: With an ultra-fine 7mm brush, paint a tiny oblong black dot in the center of the nail for the bat’s torso.
- Flick Curved Wings: Extend two delicate curved wing arcs outward from the torso, adding tiny pointed scallops along the bottom edge of the wings.
- Add Distant Stars: Use a fine dotting tool and white gel to scatter micro-dots and four-point starbursts around the flying bats.
- Seal and Protect: Cure for 60 seconds and seal with an ultra-glossy top coat.
13. Deep Forest Green & Gilded Snake Alchemy

Rich hunter-green velvet bases featuring hand-painted antique gold serpentine coils and emerald crystal accents.
Mythological Earthy Alchemy
Snakes are a classic motif in witchcraft and dark academia styling. Pairing a rich forest-green background with hand-painted gold serpent scales and tiny emerald crystal eyes creates a luxurious, serpentine manicure that feels both regal and mystical.
Recommended Nail Shape & Length
- Best Shape: Long almond or stiletto.
- Length: Medium to long.
Signature Palette & Texture Checklist
- Deep forest/hunter green gel
- Metallic antique gold gel paint
- Micro-sized emerald green flatback crystals
- Detail liner brush
- Satin or high-gloss top coat
Step-by-Step Styling & Application
- Green Base: Apply two coats of deep forest-green gel and cure each layer completely.
- Draw Serpent Spine: Using metallic gold gel, paint an elegant S-shaped curving line coiling up the length of the nail.
- Flesh Out the Body: Thicken the central body of the snake, tapering smoothly toward the tail and forming a delicate triangular head.
- Add Scale Texture: Paint tiny cross-hatched lines or dots along the golden body to simulate reflective reptile scales.
- Set Crystal Eyes: Place a tiny drop of glue at the head to set a micro-emerald crystal before curing and sealing with top coat.

14. Retro 70s Spooky Groovy Ghost Swirls
Muted mustard, pumpkin orange, and chocolate brown groovy psychedelic swirl bands accented with smiling retro cartoon ghosts.
Nostalgic Autumn Playfulness
Drawing inspiration from 1970s warm retro color palettes, this design brings a playful, nostalgic energy to Halloween. Flowing psychedelic ribbons in warm mustard, avocado green, and pumpkin orange swirl across the nail, accompanied by cute smiling cartoon ghosts with flower crowns.
Recommended Nail Shape & Length
- Best Shape: Medium oval or squoval.
- Length: Short to medium.
Signature Palette & Texture Checklist
- Creamy mustard yellow gel
- Burnt pumpkin orange gel
- Milk chocolate brown gel
- Opaque white and black gel liners
- High-gloss top coat
Step-by-Step Styling & Application
- Neutral Base: Apply a sheer creamy-white base coat and cure.
- Paint Retro Swirls: Using a long striper brush, paint parallel curving waves of mustard, pumpkin, and chocolate brown across the nail.
- Illustrate Retro Ghost: On the accent nail, paint a simple bell-shaped cartoon ghost with rounded arms waving outward.
- Add Facial Expressions: Use a dotting tool to paint smiling cartoon eyes and a small curved smile with rosy pink cheeks.
- Seal: Finish with a plumping high-gloss gel top coat for a smooth, glassy retro finish.
15. Dark Academia Antique Book & Tarot Script

Matte parchment-colored bases layered with vintage gothic calligraphy script, torn paper borders, and miniature tarot card illustrations.
Scholarly Victorian Antiquity
This look channels the ambiance of an old gothic library filled with leather-bound spellbooks and antique botanical journals. A tea-stained parchment base is layered with micro-painted gothic script, dark roman numerals, and miniature vintage tarot symbols like the Moon, the Sun, and the Star.
Recommended Nail Shape & Length
- Best Shape: Square or medium coffin.
- Length: Medium to long.
Signature Palette & Texture Checklist
- Warm tea-stained buff/beige base gel
- Charcoal or espresso brown gel liner
- Burnt umber shading pigment
- Antique gold foil transfer sheets
- Velvet matte top coat
Step-by-Step Styling & Application
- Parchment Base: Apply a warm beige base coat, cure, and softly buff a touch of burnt umber pigment around the outer edges to create a weathered, aged-paper look.
- Paint Tarot Borders: Paint a thin rectangular frame in espresso gel to outline the mini tarot card boundary.
- Add Calligraphy & Icons: With an ultra-fine brush, paint tiny gothic lettering or classic tarot icons (a crescent moon and star) inside the frame.
- Foil Accents: Dab small specks of gold transfer foil around the card edges for a gilded manuscript appearance.
- Matte Finish: Apply a soft velvet matte top coat to eliminate glare and mimic genuine antique paper.
16. Black Matte Stiletto with Glossy Drip French
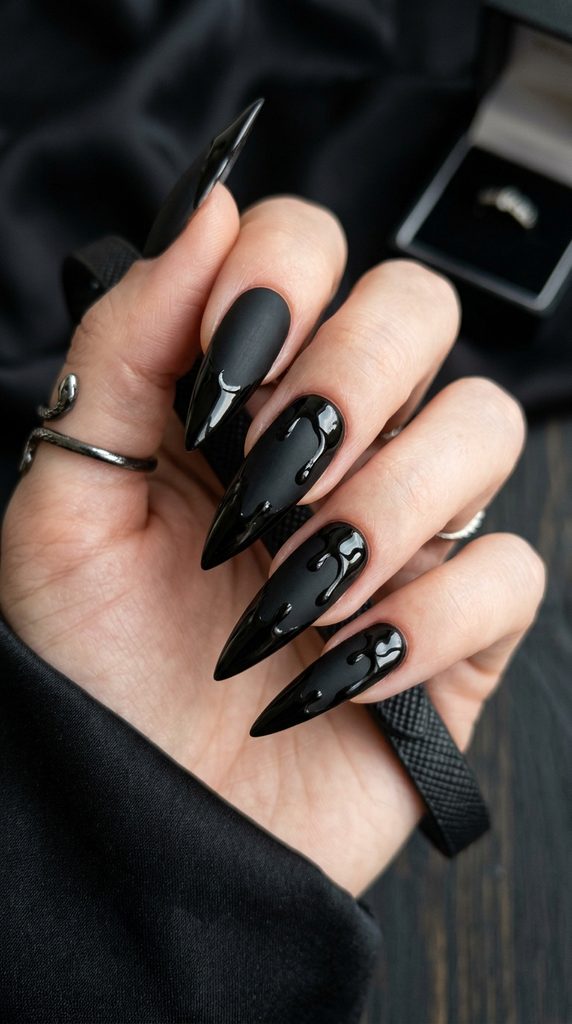
Full-coverage matte black stiletto nails featuring high-gloss jet-black dripping French tips that catch the light with movement.
Sleek Monochromatic Texture Contrast
Texture contrast can be just as impactful as color contrast. This monochromatic look uses jet-black polish on a sharp stiletto shape, pairing a velvety matte nail bed with wet-look high-gloss drips extending from the tip. The result is modern, sleek, and subtly dramatic.
Recommended Nail Shape & Length
- Best Shape: Sharp stiletto.
- Length: Long.
Signature Palette & Texture Checklist
- Jet-black cream gel polish
- Ultra-matte velvet top coat
- High-viscosity glossy gel top coat
- Dotting tool and fine liner brush
Step-by-Step Styling & Application
- Solid Black Base: Apply two coats of jet-black gel and cure thoroughly.
- Matte Coat: Cover the entire nail with a velvet-finish matte top coat, cure, and wipe away the inhibition layer.
- Map Glossy Drips: Dip a dotting tool into high-gloss top coat and place several beads of gloss across the center of the nail.
- Connect to Tips: Use a fine liner brush to drag lines from the glossy dots upward to the tip, filling in the entire free edge with high-gloss top coat.
- Precision Cure: Flash cure each nail immediately for 15 seconds to prevent the glossy drips from leveling out flat before the final full cure.
17. Gothic Stained Glass Cathedral Windows

Black structural window-mullion outlines filled with translucent stained-glass jewel tones in ruby red, sapphire blue, and deep amethyst purple.
Architecture-Inspired Jewel Tones
Inspired by the soaring stained-glass windows of Notre-Dame and gothic European cathedrals, this design uses sharp black geometric frames filled with translucent jelly jewel tones. When natural light shines through, the nails produce a vibrant, stained-glass glow.
Recommended Nail Shape & Length
- Best Shape: Coffin or tapered almond.
- Length: Medium to long.
Signature Palette & Texture Checklist
- Jet-black opaque gel liner
- Translucent jelly gels (ruby, sapphire, amethyst, emerald)
- Gold metallic liner gel
- Glossy gel top coat
Step-by-Step Styling & Application
- Clear Foundation: Apply a clear base coat or sheer neutral tint over clear gel extensions.
- Paint Window Arches: Using a fine liner brush and black gel, paint a pointed gothic arch framing the outer perimeter of the nail.
- Draw Geometric Mullions: Divide the interior of the arch into symmetrical diamond and triangular segments using thin black lines.
- Infill Jewel Jelly Colors: Using a clean detail brush, fill each segment with different translucent jewel-toned jelly gels (red, purple, blue).
- Highlight Ribs: Add tiny accents of gold metallic paint along the structural arch intersections, then seal with a high-shine top coat.
18. Cute Halloween Muted Pastel Candy Corn
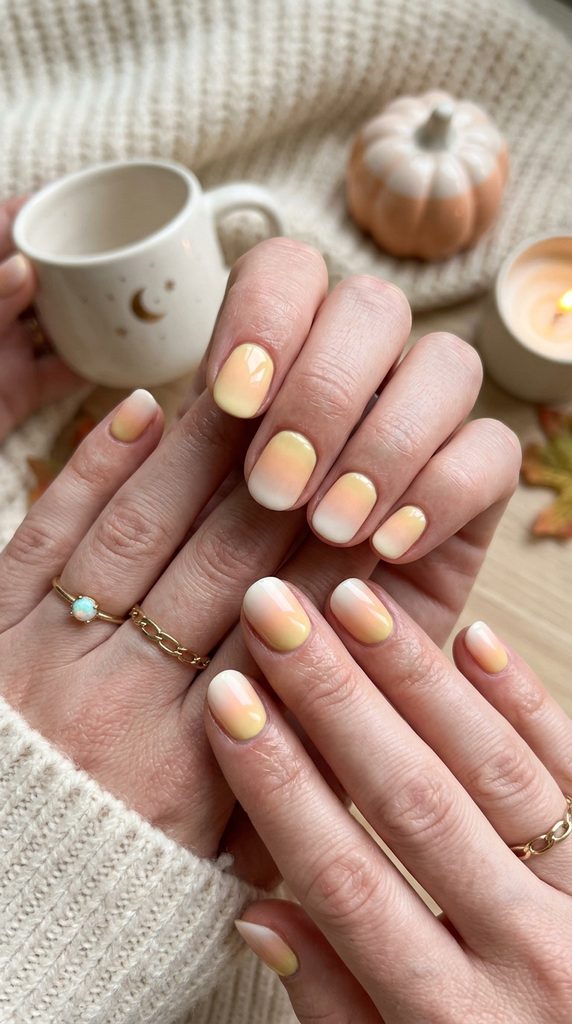
A modern revision of classic candy corn using chic pastel shades of peach, creamy buttercup yellow, and warm marshmallow white.
Softened Nostalgic Confectionery
Traditional candy corn can sometimes look bright and garish. This modern redesign softens the palette into muted, bakery-inspired pastel tones: soft peach, warm buttercup yellow, and whipped marshmallow white. Applied as minimalist horizontal ombré stripes or color-blocked geometric French tips, it offers a sweet, understated nod to seasonal treats.
Recommended Nail Shape & Length
- Best Shape: Short squoval or rounded oval.
- Length: Short to medium.
Signature Palette & Texture Checklist
- Muted pastel buttercup yellow gel
- Soft peach/creamsicle orange gel
- Warm marshmallow white gel
- Ombré blending sponge
- Glossy or satin top coat
Step-by-Step Styling & Application
- Base Foundation: Apply a coat of soft marshmallow white gel over the entire nail and cure.
- Sponge Yellow Base: Sponge pastel buttercup yellow onto the lower third of the nail near the cuticle.
- Sponge Peach Center: Sponge soft peach across the middle third, blending the transition lines smoothly between yellow and white.
- Refine the White Tip: Touch up the free edge with clean marshmallow white gel.
- Seal: Finish with a high-gloss top coat to give the pastel colors a smooth, candy-coated shine.
19. Bloodstone & Black Obsidian Crystal Marbling

Deep translucent black and crimson marbling with natural stone fractures accented with delicate veins of genuine metallic gold leaf.
Luxurious Earth Mineral Metaphysics
Inspired by dark healing crystals, obsidian, and red bloodstone, this organic marble design layers translucent black and deep wine-red jelly gels. Fine white and gold fracture veins simulate the natural crystalline structure of raw polished gemstones.
Recommended Nail Shape & Length
- Best Shape: Almond, coffin, or oval.
- Length: Medium to long.
Signature Palette & Texture Checklist
- Translucent black jelly gel
- Deep crimson/wine jelly gel
- Opaque white gel liner
- Metallic gold leaf flakes
- Flat marbling brush and acetone
- High-gloss top coat
Step-by-Step Styling & Application
- Jelly Base: Apply a coat of translucent black jelly gel and cure.
- Layer Crimson Smoke: Brush irregular patches of crimson jelly gel across the center of the nail, leaving it uncured.
- Vein the Stone: Draw fine, jagged white fracture lines across the wet crimson layer using a thin brush.
- Diffuse Veins: Lightly tap the white lines with a brush dampened with rubbing alcohol or acetone to blur the edges like natural mineral veins.
- Apply Gold Leaf: Press tiny flecks of gold leaf along the main fracture lines before curing and sealing with a thick, self-leveling top coat.
20. Beetlejuice Chic Black & White Stripe Minimalism

”””
Sharp, graphic black-and-white vertical stripes paired with lime green micro-French tips or purple accent elements.
High-Contrast Pop Gothic Runway
A stylish homage to iconic Tim Burton cinema, this design combines clean vertical monochrome stripes with unexpected neon accent pops. Crisp black-and-white lines lengthen the appearance of the fingers, while a micro-French smile line in radioactive slime-green or rich eggplant purple delivers playful, artistic contrast.
Recommended Nail Shape & Length
- Best Shape: Medium square or long coffin.
- Length: Medium.
Signature Palette & Texture Checklist
- Opaque bright white gel
- Jet-black gel paint
- Neon slime-green or vivid purple gel
- Long striping brush (15mm–20mm)
- High-gloss top coat
Step-by-Step Styling & Application
- White Canvas: Apply two coats of opaque white gel, curing each layer completely.
- Draw Center Stripe: Using a long striping brush and black gel, paint a single vertical line straight down the center of the nail from cuticle to tip.
- Add Parallel Stripes: Paint matching parallel black stripes on either side of the center line, keeping spacing uniform.
- Add Neon Accent: On accent nails, paint an ultra-thin micro-French tip using vivid slime-green or purple gel.
- Top Coat: Seal with a glossy top coat, checking under lighting to ensure a smooth, bump-free surface over the striping lines.
21. Haunted House Silhouette & Amber Sunset Ombré
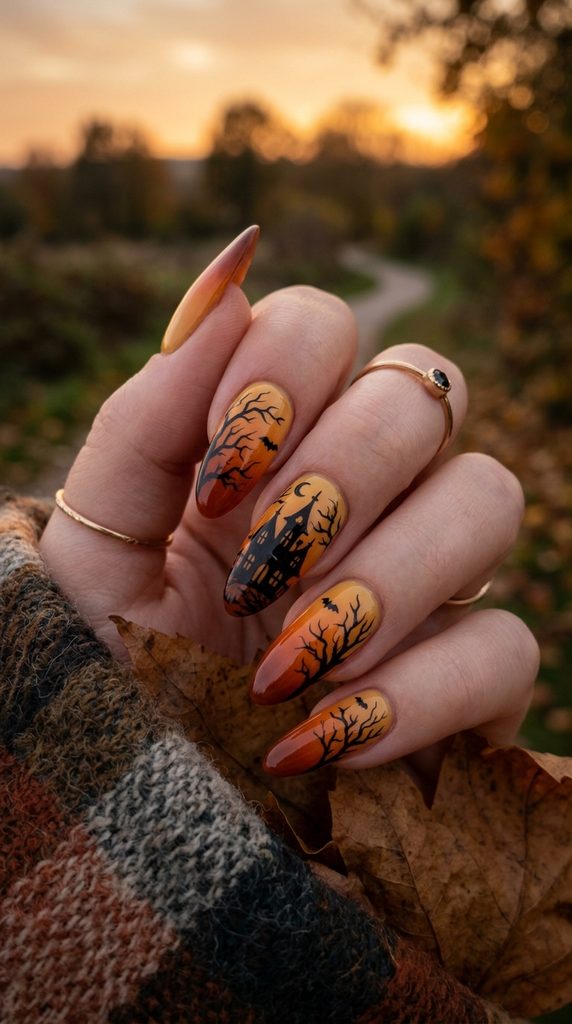
A warm glowing amber-to-terracotta sunset gradient backdrop featuring delicate black silhouette tree branches and a distant haunted manor.
Atmospheric Twilight Landscape Art
This design turns every nail into a miniature painted canvas depicting an autumn sunset. A warm, glowing gradient of golden honey fading into deep burnt terracotta sets the background for fine silhouette art: twisted bare tree branches, a soaring raven, or the sharp roofline of an old Victorian manor.
Recommended Nail Shape & Length
- Best Shape: Long almond or coffin.
- Length: Medium to long.
Signature Palette & Texture Checklist
- Honey gold yellow gel
- Warm burnt terracotta/amber gel
- Deep espresso/black gel paint
- Ombré blending sponge
- Ultra-fine 5mm detail brush
- Velvet matte or high-gloss top coat
Step-by-Step Styling & Application
- Sunset Gradient: Blend honey yellow at the base into rich terracotta at the tip using an ombré sponge, and cure.
- Paint Distant Silhouette: Using black gel and a fine 5mm brush, paint the miniature silhouette of a Victorian manor or sharp gothic gate near the cuticle.
- Branch Out Gnarled Trees: Extend twisting bare branches from the sidewalls across the warm gradient sky.
- Add Miniature Details: Place tiny flying silhouette bird V-shapes in the upper sky area.
- Choose Finish: Seal with a glossy top coat to enhance the sunset’s depth, or a matte top coat to create the look of an antique woodblock illustration.
Quick-Reference Guide: Matching Designs to Nail Length
| Nail Length | Recommended Designs | Why It Works |
| Short / Natural | Minimalist Glazed Ghost (1), Tortoiseshell (6), Matte Plaid (9), Pastel Candy Corn (18) | Clean, small-scale designs that do not overwhelm shorter nail plates. |
| Medium | Velvet Cat-Eye (2), Celestial Witch (5), Retro Groovy Ghost (14), Beetlejuice Stripe (20) | Provides ample surface area for balanced hand-painted artwork and magnetic depth. |
| Long / Extensions | Blood-Red Vampire Ombré (3), 3D Chrome Spiderweb (4), 3D Dripping Chrome (11), Cathedral Window (17) | Elongated shapes showcase complex vertical gradients and sculptural 3D elements. |
5 Professional Tips for Flawless Halloween Manicures
- Invest in Quality Detail Brushes: For micro-illustrations like bats, webs, and bones, use an 11mm or 7mm synthetic liner brush with pure acetone to keep strokes sharp and clean.
- Flash Cure Intricate Artwork: When painting detailed line work, flash cure each line or element for 10 to 15 seconds under an LED lamp to prevent the gel from bleeding or shifting.
- Master Chrome Dusting: Apply chrome powder over a non-wipe top coat cured for exactly 30 seconds (do not over-cure). Dust away loose particles with a soft fluffy brush before applying your final seal.
- Use Blooming Gel for Smoky Textures: For effortless smoke or watercolor effects, apply clear blooming gel and drop your pigment directly onto the wet layer without curing first.
- Prep the Nail Plate Thoroughly: Detailed nail art and 3D charms require a clean foundation. Dehydrate the nail plate with isopropyl alcohol, lightly buff away natural shine, and use a dedicated bonding primer to prevent lifting throughout October.