13 Thrift Flip Ideas to Transform Old Clothes
Revamping your personal wardrobe does not require excessive spending at luxury fashion boutiques. Many style lovers mistakenly believe that trendy outfits depend strictly on purchasing brand-new designer garments. However, creative thrift flip ideas unlock endless fashionable potential from inexpensive, forgotten secondhand clothing items. Pinterest feeds are continually buzzing with viral, innovative garment transformations that celebrate sustainable resourcefulness. You can effortlessly reinvent outdated thrift finds using basic sewing techniques and household craft tools. Simple weekend refashioning projects immediately breathe vibrant new life into tired fabrics while sharpening your creativity. Transforming thrifted clothing combines eco-friendly lifestyle choices with modern, runway-inspired personal aesthetics.

Unlocking High-End Aesthetics from Budget Secondhand Racks
Achieving high-end designer polish depends primarily on silhouette, tailored balance, and intentional design details. Oversized menswear, outdated dresses, and baggy denim jeans hide incredible raw potential across thrift aisles. You do not need professional fashion school training to execute stunning, boutique-worthy clothing flips. Inexpensive fabric shears, sewing elastics, needles, and basic domestic irons work absolute magic on old textiles. Local thrift stores also offer vintage natural fabrics like pure wool, linen, and silk for pennies. Furthermore, refashioning thrifted apparel allows you to customize proportions that fit your exact body curves. Intentional tailoring turns neglected vintage castoffs into head-turning, bespoke daily statement pieces.
Why Sustainable Wardrobe Flipping Outperforms Fast Fashion
Mass-produced fast fashion often relies on fragile synthetic blends, uninspired repetitive patterns, and poor stitching. In contrast, vintage garments found at secondhand shops feature heavy-duty fabrics, tight weaves, and lasting durability. Upcycling these durable textiles prevents heaps of viable discarded garments from rotting inside overflowing municipal landfills. You also gain complete creative ownership over your personal closet, dictating hem lengths, necklines, and fits. Additionally, completing your own DIY garment alterations provides a wonderfully mindful, deeply empowering creative weekend hobby. Slicing away bulky collar wings or cinching baggy waistbands delivers instant, deeply satisfying sartorial rewards. Custom thrift flips ensure you never encounter someone wearing your exact duplicate outfit on the street.
Smart Thrift Store Hunting Strategies for Beginners
A successful wardrobe flipping journey always begins with patient, strategic thrift store shopping trips. First, wander through departments beyond your standard sizing, especially the menswear and oversize racks. Look closely at raw fabric composition tags rather than current unflattering silhouettes or missing buttons. Pure cotton button-downs, heavyweight denim, and structured wool blazers provide exceptional foundational materials for easy alterations. Inspect prospective garments thoroughly under bright retail store lighting to check for permanent holes, moth damage, or stains. Keep a compact measuring tape tucked inside your pocket to measure flat garment widths quickly. Knowing baseline shoulder and chest measurements saves you from purchasing ill-fitting pieces beyond easy repair.
Mastering Flattering Proportions with Tailored Silhouettes
Creating modern outfits from vintage clothing requires balancing loose, voluminous elements with sleek structural anchors. An oversized men’s blazer looks dramatically chic when cropped cleanly across the natural waistline. Similarly, turning baggy thrifted jeans into high-rise cutoff shorts highlights curves while maintaining comfortable leg ease. Thoughtful alteration lines create crisp, harmonious visual proportions that flatter diverse heights and silhouettes effortlessly. Exposing subtle slivers of skin at wrists, necklines, or waists immediately modernizes dated vintage cuts. Moreover, adding cinched elastic details prevents boxy vintage shirts from visually swallowing your natural frame. Simple scissor adjustments bring sharp runway intention to otherwise baggy, awkward secondhand textile finds.
Organizing an Efficient Home Garment Refashioning Station
Establishing a clean, well-lit alteration area ensures your garment flipping projects remain smooth and enjoyable. Cover your workspace table with a wide, self-healing rotary cutting mat to protect tabletop surfaces. This sturdy cutting surface allows rotary blades to slice through heavy denim seams cleanly without jagged snags. Gather essential garment alteration tools like fabric shears, tailor’s chalk, seam rippers, and pearl-headed pins. Clear plastic organizer trays keep spare machine needles, elastic bands, and safety pins instantly accessible. Always set up your steam iron nearby, as pressing seams flat creates crisp, commercially manufactured finishes. Working in an orderly sewing corner keeps your creative energy focused toward polished, wearable fashion.
1. Cropped Boxy Blazer with Raw Hem
Thrift store blazer sections overflow with oversized, shoulder-padded menswear jackets in rich wool tweeds. While the boxy shoulders look editorial, the long awkward hemline can overwhelm everyday feminine outfits. Slicing an oversized blazer cleanly across the natural waistline creates an ultra-chic cropped silhouette. Leaving the bottom edge raw introduces cool, modern deconstructed streetwear edge to tailored corporate fabric.
Modernizing Vintage Menswear Tailoring with Cropped Lines
Long masculine blazers often hit at awkward mid-thigh lengths, shortening your perceived leg line dramatically. Cropping the hemline draws the eye immediately toward your narrowest waist point, elongating your legs. The contrasting sharp shoulder pads balance the abbreviated waist, creating an instant, powerful hourglass silhouette. It transitions effortlessly from casual coffee runs over crop tops to sleek evening bar nights.
Materials and Notions Needed
- Oversized vintage men’s wool, tweed, or polyester suit blazer
- Ultra-sharp fabric dressmaker shears or rotary fabric cutter
- Clear acrylic sewing ruler and tailor’s chalk or disappearing fabric pen
- High-strength liquid fabric fray sealant or clear fabric glue
- Heavy steam iron and damp cotton pressing cloth for clean creases
Step-by-Step Blazer Cropping Tutorial
- Put on your vintage blazer and button the front center button.
- Stand straight before a mirror and locate your natural waistline.
- Mark your target crop line carefully using soft tailor’s chalk.
- Lay the suit blazer completely flat upon your wide cutting mat.
- Smooth out the interior silk lining fabric to remove all wrinkles.
- Align your acrylic straight-edge ruler precisely along your chalked waist marking.
- Slice through both outer wool and interior lining with fabric shears.
- Apply a thin bead of liquid fray sealant along raw edges.
- Let the liquid seam sealant dry undisturbed for twenty full minutes.
- Press the sliced raw hem flat using a hot steam iron.
- Style your edgy cropped blazer over high-waisted denim jeans and sneakers.
2. Men’s Oversized Button-Down into Milkmaid Blouse

Massive thrifted men’s cotton dress shirts hold incredible yards of pristine, high-thread-count woven fabric. However, wearing them untucked often looks unkempt, baggy, and lacking feminine definition around the waist. Converting an oversized button-down into a smocked milkmaid crop top breathes romantic cottagecore charm into stiff tailoring. Using stretchy elastic thread creates comfortable, body-hugging gathers without requiring complex zippers or patterns.
Transforming Stiff Menswear Cotton into Romantic Smocked Tops
Crisp striped men’s dress shirts offer breathable, durable cotton that outperforms flimsy fast-fashion alternatives. Adding rows of gathered elastic across the bodice transforms rigid cotton into flexible, curve-flattering silhouettes. Removing the stiff pointed collar creates a dainty, scooped neckline trimmed with sweet gathered ruffles. It effortlessly updates a two-dollar thrift store staple into a viral, romantic summer date-night blouse.
Materials and Notions Needed
- Men’s large or extra-large 100% crisp cotton button-down shirt
- Spool of elastic sewing thread for hand-winding into your bobbin
- Spool of standard all-purpose cotton thread matching shirt colors
- Sewing machine fitted with standard universal size 80/12 needle
- Flexible sewing measuring tape, sharp tailor shears, and pins
Step-by-Step Milkmaid Blouse Transformation
- Cut straight across the shirt chest, slicing away collars and yokes.
- Cut the sleeves down to three-quarter lengths using sharp scissors.
- Wind your elastic sewing thread onto the machine bobbin by hand.
- Thread regular matching cotton thread into the top needle mechanism.
- Sew parallel horizontal lines spaced half an inch apart down bodices.
- Watch the flat cotton fabric gather automatically into stretchy smocked texture.
- Continue sewing parallel shirring lines until reaching your lower natural waist.
- Insert elastic bands into the sleeve cuffs to form puffy ruffles.
- Hem the raw top neckline fold neatly using standard straight stitches.
- Steam the shirred cotton fabric thoroughly with irons to maximize shrinkage.
- Slip into your custom milkmaid top and adjust shoulders comfortably.
3. Vintage Floral Maxi Dress into Matching Two-Piece Set
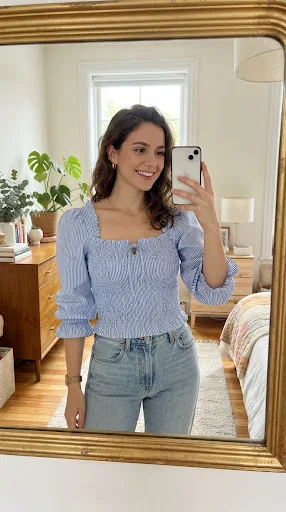
Thrift racks regularly feature dated, long-sleeved floral maxi dresses from past decades with unflattering drops. While the vintage floral patterns are enchanting, the dowdy full-length cuts can feel hopelessly frumpy. Slicing a tiered maxi dress in half creates an adorable matching crop top and skirt set. Coordinated two-piece sets dominate summer fashion feeds while offering unmatched versatility to mix and match.
Splitting Dated Modest Maxi Dresses into Playful Coordinates
Wearing a head-to-toe vintage dress can feel overly conservative and lacking youthful energy for modern outings. Separating the garment into two distinct pieces allows tiny glimpses of skin across your midriff. The matching fabric keeps your finished ensemble looking cohesive, intentional, and expensive like boutique resortwear. Furthermore, you can wear the floral crop top separately with jeans for effortless everyday styling.
Materials and Notions Needed
- Outdated vintage floral print maxi dress with a defined waist
- Length of one-inch-wide soft knitted elastic for the skirt waistband
- Spool of all-purpose polyester sewing thread matching the floral print
- Basic domestic sewing machine or needle with safety pin tool
- Tailor’s chalk, clear sewing ruler, fabric shears, and iron
Step-by-Step Two-Piece Set Instructions
- Try on the maxi dress and locate your exact natural waist.
- Mark a cut line two inches beneath your waist using chalk.
- Lay the dress flat and slice cleanly across the chalk line.
- Separate the bodice top section from the lower gathered skirt section.
- Fold the top raw hem upward half an inch, pressing flat.
- Fold once more and stitch along edges to hem the crop.
- Turn the raw skirt top inward by one and a half inches.
- Stitch around the skirt fold, leaving two-inch openings for elastic.
- Pin a safety pin to your elastic and thread through casings.
- Overlap elastic ends by one inch and stitch securely with zigzags.
- Close the casing opening with straight stitches and press seams flat.
4. Baggy 90s Mom Jeans into Asymmetrical Criss-Cross Denim
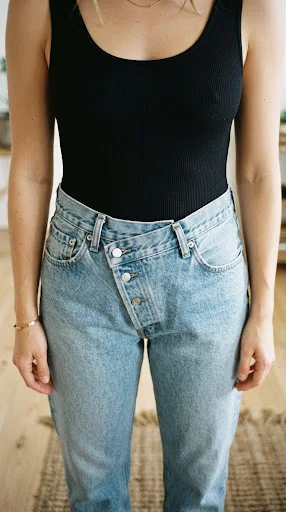
Baggy vintage denim jeans frequently suffer from awkward proportions, fitting thighs comfortably while leaving massive waist gaps. Belts often bunch excess denim into uncomfortable, lumpy folds along your lower spine and hip line. Creating an asymmetrical criss-cross front button fly solves the gaping waist while introducing designer edge. This trending street-style flip delivers custom-tailored waistlines without requiring complicated rear dart tailoring.
Eliminating Gaping Denim Waistbands with Asymmetrical Buttoning
Standard off-the-rack vintage jeans were rarely tailored to accommodate modern curves and proportions seamlessly. Shifting the button placement across the zipper creates a cool, diagonal overlap across your navel. The angled waistband visually narrows the waist while keeping the legs relaxed, slouchy, and comfortable. It mimics high-end luxury designer denim transformations that retail for hundreds of dollars online.
Materials and Notions Needed
- Pair of baggy vintage 100% cotton denim jeans with waist gaps
- Metal replacement hammer-on jean shank button with metal tack
- Pointed seam ripper tool and small metal hardware hammer
- Scrap piece of hardwood board to support hammering buttons
- Flexible sewing measuring tape and tailor’s marking chalk pencil
Step-by-Step Criss-Cross Denim Tutorial
- Put on your loose denim jeans and zip up the zipper.
- Pull the right waistband edge across the front button placket diagonally.
- Cinch the waistline until the rear waistband fits flush against hips.
- Mark the new target button location through the original buttonhole opening.
- Remove jeans and place them flat over your scrap wooden board.
- Pierce a small hole through the denim at your marked chalk spot.
- Push the sharp metal tack of the new button up through holes.
- Position the metal replacement button head over the exposed tack point.
- Hammer the button head firmly from above until tack seats securely.
- Hook the original jean buttonhole over your newly installed offset button.
- Enjoy your trendy, perfectly cinched asymmetrical denim jeans all day long.
5. Men’s Graphic Tee into Lace-Up Corset Top
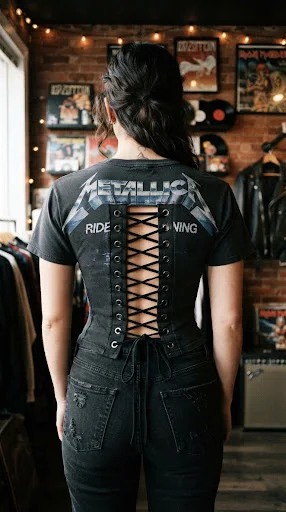
Oversized thrifted band t-shirts often sit neglected inside dresser drawers due to boxy, unflattering cuts. Simply trimming off sleeves or hemming tops rarely provides enough structural definition to flatter your torso. Constructing an adjustable lace-up corset back transforms soft cotton t-shirts into head-turning festival statement pieces. The flexible grommet ties cinch your waist smoothly while preserving cool, faded vintage graphic artwork.
Cinching Casual Band Shirts into Edgy Structured Tops
Graphic rock t-shirts offer incredible distressed aesthetics, but massive boxy fits can hide your figure. Adding metal eyelets and corded ties across the back creates an alluring, form-fitting silhouette. The adjustable lacing lets you customize how tightly the shirt hugs your torso on different days. It perfectly merges rugged rock-and-roll street style with romantic, waist-defining Renaissance corset design elements.
Materials and Notions Needed
- Oversized vintage cotton graphic band or sports t-shirt
- Kit of metal eyelets and grommets with manual hand-setting tool
- Three yards of faux suede cord, velvet ribbon, or cord
- Strip of lightweight fusible iron-on interfacing to reinforce eyelet edges
- Fabric scissors, tailor’s chalk, measuring tape, and clothes iron
Step-by-Step Lace-Up Corset Tutorial
- Try on your graphic t-shirt and pin sides until snug.
- Mark a new, close-fitting side seam line with tailor’s chalk.
- Cut straight up the vertical center of the rear shirt panel.
- Fuse two-inch strips of iron-on interfacing along raw back edges.
- Fold reinforced edges inward by one inch, pressing flat with irons.
- Stitch down the pressed folds to create sturdy, durable reinforced hems.
- Mark grommet hole locations every one inch down both back hems.
- Punch small holes through markings using pointed craft scissors carefully.
- Insert metal grommets into holes and clamp securely with setting tools.
- Lace your suede cord criss-cross through grommets like sneaker shoelaces.
- Slip into your custom corset top and cinch the back ties.
6. Thrifted Wool Trench Coat into Sleeveless Longline Vest
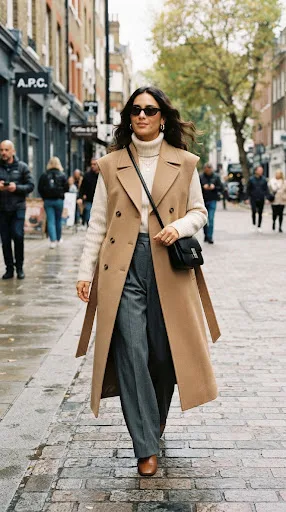
Heavy thrifted wool trench coats often feature dated, bulky sleeves that feel restrictive over modern knitwear. Outdated sleeve styles can make vintage outerwear look frumpy, tired, and overly formal for daily wear. Removing the sleeves completely transforms heavy trench coats into sleek, architectural longline tailored layering vests. The sleeveless silhouette drapes gracefully over chunky sweaters, creating effortless high-fashion layering potential during transitional seasons.
Converting Bulky Heavy Outerwear into Sleek Layering Pieces
Vintage coats boast exquisite tailoring, heavyweight wool fabrics, and timeless horn buttons that outshine fast fashion. Slicing away bulky sleeves instantly lightens the garment’s visual weight, showcasing long, fluid vertical lines. The open armholes allow you to layer thick knitwear comfortably without feeling constrained around shoulders. It brings chic Scandinavian minimalism to your wardrobe while giving durable vintage coats a second life.
Materials and Notions Needed
- Thrifted vintage double-breasted wool trench coat or tailored long overcoat
- Sharp pointed seam ripper tool and heavy-duty tailor shears
- Package of satin or cotton bias binding tape matching coat linings
- Hand-sewing needle and heavy-duty polyester all-purpose sewing thread
- Steam clothing iron with damp pressing cloth for finishing wool
Step-by-Step Sleeveless Vest Conversion
- Turn the vintage wool coat completely inside out on your table.
- Locate the interior armhole seams connecting sleeves to coat bodies.
- Slice through armhole seam stitches carefully using pointed seam rippers.
- Detach both sleeves entirely, taking care not to tear delicate linings.
- Try on the sleeveless coat to verify armhole comfort around underarms.
- Trim away any excess lining bulk along raw armhole edge perimeters.
- Pin folded bias binding tape encasing both raw wool armhole edges.
- Stitch the bias tape securely down using neat, small running stitches.
- Press finished armholes through damp cloths using hot steam clothing irons.
- Turn coat right-side out to inspect crisp, professionally bound armholes.
- Layer your tailored longline wool vest over fitted turtlenecks and trousers.
7. Plain Secondhand Knit Sweater into Cardigan with Ribbons
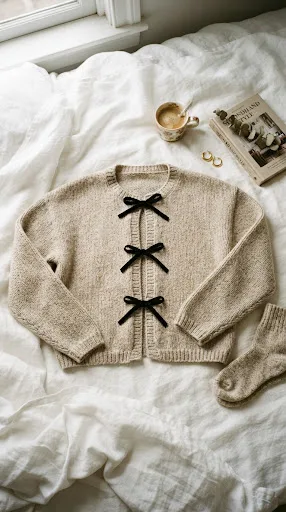
Secondhand crewneck knit sweaters are thrift store staples, but basic pullovers can feel repetitive in winter. Transforming a standard pullover into an open-front cardigan expands your daily layering and styling options massively. Slicing down the front and adding dainty velvet ribbon ties creates an ultra-trendy French-girl aesthetic. The sweet ribbon bows allow you to wear the cardigan tied loosely over lace camisoles.
Rescuing Basic Pullovers with Open Fronts and Bow Ties
Crewneck sweaters often feel stifling indoors when office temperatures fluctuate unpredictably during chilly months. Converting them into breezy cardigans allows dynamic temperature regulation while showcasing pretty under-layers. Soft velvet ribbon ties replace tedious buttonhole sewing with romantic, feminine bow-knot closures effortlessly. This simple twenty-minute upcycle turns an ordinary five-dollar thrifted knit into a viral Pinterest showstopper.
Materials and Notions Needed
- Secondhand wool, cotton, or acrylic crewneck knitted pullover sweater
- Two yards of rich velvet, satin, or grosgrain ribbon trim
- Package of fusible iron-on seam tape or liquid fabric fray check
- Sewing machine or hand-sewing needle with matching polyester thread
- Sharp dressmaker fabric shears, measuring tape, and steam clothes iron
Step-by-Step Cardigan Flip Guide
- Lay your crewneck knit sweater completely flat on clean tables.
- Fold the sweater precisely in half vertically to find center fronts.
- Press a light vertical fold crease down the center using irons.
- Cut straight up that vertical center crease through front knit layers.
- Apply iron-on fusible seam tape along both raw cut knit edges.
- The fusible tape prevents fragile knit yarns from unraveling or running.
- Fold taped knit edges inward by half an inch, pressing flat.
- Stitch folded edges down securely using medium-width zigzag stitches.
- Cut your velvet ribbon into six equal eight-inch tie lengths.
- Sew pairs of ribbon ties spaced evenly down the cardigan fronts.
- Tie the velvet ribbons into sweet bows and enjoy your cardigan.
8. Outdated Slip Dress into Ruched Asymmetrical Mini Skirt
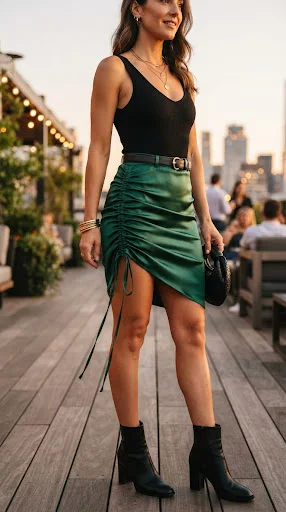
Thrift store lingerie and dress racks often feature calf-length satin slip dresses in awkward midi lengths. While the silky polyester fabric feels luxurious, the straight, unflattering drop can cling awkwardly across hips. Cropping the slip dress and adding an internal drawstring transforms it into a sexy, ruched mini skirt. You can adjust the side ruched gathering to customize the skirt’s asymmetry and length.
Turning Clingy Satin Slips into Trending Ruched Party Skirts
Silky slip dresses frequently suffer from loose, gaping necklines that make them impractical for casual daytime wear. Repurposing the gorgeous satin skirt portion eliminates awkward bodice fits while preserving luxurious fluid movement. Adding side ruching creates flattering diagonal folds that disguise underwear lines while accentuating hip curves. It transforms a dated nightgown into a versatile, high-end satin mini skirt for nights out.
Materials and Notions Needed
- Vintage satin, silk, or polyester midi-length slip dress
- Length of one-inch-wide soft knitted elastic for the new waistband
- Two yards of thin satin cord or narrow matching ribbon for ties
- Safety pins, tailor’s chalk, sharp fabric shears, and sewing machine
- Matching polyester thread and domestic iron with low-heat settings
Step-by-Step Ruched Skirt Tutorial
- Cut the bodice top off the slip dress, saving the skirt.
- Hem the top raw skirt edge inward to create elastic waistbands.
- Insert your wide elastic band through the casing, stitching ends together.
- Turn the satin skirt inside out and locate one side seam.
- Stitch a strip of narrow bias tape over that interior seam.
- This forms a hollow vertical fabric channel running up the skirt.
- Pin a small safety pin to your long satin drawstring cord.
- Thread the cord all the way up through the sewn channel.
- Loop cord over top seam and thread back down the casing.
- Stitch the top loop securely down inside the top waist seam.
- Pull the bottom cord ends to gather fabric into dramatic ruching.
9. Men’s Flannel Shirt into Shacket with Fringe Hem

Thrift store racks are packed with thick, high-quality flannel shirts in cozy autumn and winter plaids. However, extra-large menswear flannels often look shapeless, slouchy, and sloppy when worn over feminine base layers. Cropping the hemline and fraying the raw cotton edge converts old flannels into trendy western shackets. The textured fringe bottom adds rugged, relaxed movement that pairs beautifully with leather boots and jeans.
Crafting Western-Chic Shackets from Oversized Plaid Flannel
Long flannel shirts frequently bunch up awkwardly around hips when worn as outerwear layers over sweaters. Slicing off excess length creates a boxy, intentional jacket cut that flatters high-waisted denim trousers. Pulling loose weave threads outward creates authentic, fluffy raw fringe without paying boutique retail prices. It elevates humble lumberjack work shirts into stylish, Pinterest-worthy autumn layering jackets in minutes.
Materials and Notions Needed
- Men’s heavy 100% cotton plaid flannel long-sleeve button-down shirt
- Sharp dressmaker fabric shears or rotary cutting wheel with mat
- Coarse sewing seam ripper or blunt metal embroidery tweezers
- Clear acrylic straight-edge sewing ruler and tailor’s marking chalk
- Sewing machine or needle with matching polyester thread for stay-stitching
Step-by-Step Fringed Shacket Guide
- Try on the oversized flannel shirt over a basic white tee.
- Mark your desired jacket length at hip level with chalk.
- Lay the flannel flat on your table, aligning button plackets.
- Cut straight across marked lines with sharp fabric shears cleanly.
- Sew a straight stay-stitch line half an inch above cut edges.
- This stay-stitch line prevents the fringe from unraveling past target points.
- Use pointed tweezers to pull horizontal weave threads out along hems.
- Continue pulling loose cross-threads outward until reaching the stitched stay-line.
- Fluff the exposed vertical cotton fringe gently using clean dry fingertips.
- Run altered flannel through washing machines to boost fringe fluffiness naturally.
- Style your custom western shacket unbuttoned over ribbed bodysuits and denim.
10. Dated Leather Jacket into Distressed Vintage Moto Vest
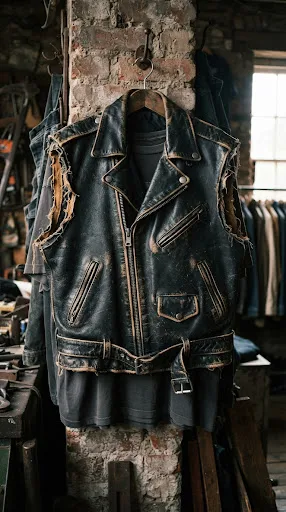
Thrifted faux or genuine leather jackets often suffer from peeling cuff linings, blown elbow seams, or bulky sleeves. Discarding an entire leather jacket due to damaged arms wastes incredible structural torso craftsmanship and heavy hardware. Slicing off the sleeves and distressing the edges yields an edgy, 90s grunge biker moto vest. The sleeveless leather cut layers effortlessly over oversized hoodies, giving mundane streetwear bold industrial attitude.
Repurposing Damaged Leather Outerwear into Grunge Biker Vests
Heavy leather sleeves can feel overly stiff, confining, and uncomfortably bulky during mild transitional weather seasons. Converting damaged jackets into vests showcases durable metal asymmetrical zippers and notched lapels with raw edge. Sanding the leather seams exposes vintage undertones, giving jackets that coveted, well-worn designer thrift patina. It allows you to rescue worn leather pieces that would otherwise end up discarded.
Materials and Notions Needed
- Vintage genuine or faux leather motorcycle jacket with damaged sleeves
- Heavy-duty utility craft knife or industrial-grade leather shears
- Block of coarse 80-grit sandpaper for distressing leather seams
- Bottle of dark leather edge coating or black permanent marker
- Safety cutting ruler and cutting mat to protect tabletop surfaces
Step-by-Step Leather Vest Transformation
- Lay the leather motorcycle jacket flat upon your heavy-duty cutting mat.
- Open armpit seams flat and locate factory shoulder attachment stitches.
- Slice along the shoulder seams carefully using sharp industrial leather shears.
- Cut close to main body seams, detaching both leather sleeves cleanly.
- Smooth out any jagged leather cutting edges with razor utility knives.
- Apply dark leather edge coat along raw edges to prevent peeling.
- Let the protective leather edge sealant cure undisturbed for two hours.
- Rub coarse 80-grit sandpaper vigorously along lapel edges and pocket seams.
- Sanding gently strips top coat layers to reveal rich vintage patina.
- Wipe away leather sanding dust completely using damp microfiber cloths.
- Rock your reconstructed moto vest over graphic hoodies and combat boots.
11. Stiff Denim Skirt into Patchwork Mini with Raw Hem

Long, rigid denim midi skirts from secondhand shops can feel conservative, stiff, and restrictive for walking. While the heavyweight vintage denim is incredibly durable, the pencil-straight shape lacks modern playful movement. Slicing the skirt into an abbreviated mini and sewing contrasting denim scrap pockets creates graphic patchwork interest. The frayed raw hem keeps the aesthetic casual, relaxed, and effortlessly cool for warm weekend outings.
Reconstructing Rigid Long Denim Skirts into Playful Minis
Secondhand denim midi skirts often bunch awkwardly across knees due to missing walking slits or rigid fabrics. Shortening the skirt to mid-thigh restores comfortable leg freedom while creating a fresh youthful silhouette. Adding contrasting dark-wash denim pockets crafted from the cut-off scrap fabric introduces high-end reconstructed runway vibes. This accessible refashioning project turns an uninspired ten-dollar thrift skirt into a custom designer showpiece.
Materials and Notions Needed
- Thrifted 100% cotton rigid denim midi or maxi pencil skirt
- Heavy-duty denim fabric shears or sharp rotary cutting wheel
- Pointed seam ripper tool and domestic sewing machine with denim needle
- Heavy-duty gold or navy topstitching thread matching original skirt seams
- Fine-grit sandpaper block and tweezers for fraying raw cut hems
Step-by-Step Patchwork Mini Tutorial
- Try on the long denim skirt, marking your target mini length.
- Add one extra inch beneath markings for natural fraying room.
- Slice across the skirt using heavy-duty shears, saving bottom scrap tubes.
- Cut two rectangular patch pocket shapes from the leftover cutoff fabric.
- Press the outer edges of both cut patch pockets inward neatly.
- Pin patch pockets onto the front of your newly shortened skirt.
- Topstitch pockets down using heavy-duty denim needle and contrast gold thread.
- Scrape the bottom raw skirt hem vigorously using coarse sandpaper blocks.
- Pull exposed white crosswise threads outward using tweezers to create fringe.
- Machine wash the finished skirt to enhance authentic distressed hem fraying.
- Pair your reconstructed patchwork denim mini with vintage tees and loafers.
12. Baggy Sweatpants into Matching Cropped Hoodie & Shorts

Oversized fleece sweatpants found in thrift store activewear aisles offer yards of plush, ultra-cozy cotton fabric. However, wearing them as baggy bottoms can easily look frumpy, unpolished, and shapeless around the ankles. Slicing the sweatpants at the knees yields comfortable lounge shorts while the cut-off legs become sleeves. You can assemble an adorable matching cropped lounge set that rivals expensive high-end streetwear brands.
Turning Oversized Fleece Loungewear into Viral Streetwear Sets
Secondhand fleece pants often feature stretched-out ankle cuffs and worn hems that look tired and unappealing. Repurposing the upper half into high-waisted sweat shorts salvages the comfy waistband and deep side pockets. Using the leftover lower leg tubes allows you to craft coordinating wrist warmers or cropped shrugs. It represents an ingenious, zero-waste loungewear flip that delivers maximum comfort with sleek aesthetic polish.
Materials and Notions Needed
- Oversized vintage cotton fleece sweatpants with a drawstring waistband
- Heavy-duty dressmaker fabric shears for clean cuts through thick fleece
- Tailor’s chalk pencil, clear sewing ruler, and sewing machine setup
- Ballpoint stretch sewing needle and matching polyester sewing thread
- Steam clothing iron with damp pressing cloth for crisp hems
Step-by-Step Sweatpant Set Instructions
- Try on the oversized sweatpants, pulling waistband up to natural waist.
- Mark your desired short length across thighs using tailor’s chalk.
- Remove sweatpants and cut across both legs at marked chalk lines.
- Set the severed lower leg fleece tubes aside for accessory projects.
- Fold raw shorts leg openings inward by one inch, pressing flat.
- Stitch the folded hem down using flexible stretch zigzag machine stitches.
- Take the two leftover leg tubes to fashion cozy coordinating arm warmers.
- Hem the raw cut ends of both leg tubes using matching stitches.
- Snip small one-inch vertical slits near cuffs to create thumbholes.
- Reinforce thumbhole slits with tight zigzag stitches to prevent fabric tearing.
- Lounge in style wearing your reconstructed matching cozy fleece loungewear set.
13. Silk Scarf into Halter Neck Backless Scarf Top

Thrift store accessory bins are treasure troves of genuine vintage printed silk and satin square scarves. While many people pass them by, these colorful printed squares hold incredible potential for chic warm-weather tops. Tying or sewing a simple neck loop turns a gorgeous printed scarf into a daring, backless halter. The draped handkerchief hem flutters gracefully in summer breezes while highlighting beautiful vintage prints.
Crafting Flirty Backless Resort Tops from Vintage Silk Squares
Vintage silk scarves boast breathtaking hand-rolled edges, vibrant baroque patterns, and unmatched fluid draping qualities. Buying silk designer halter tops at retail often costs astronomical prices for minimal fabric. Simply folding the square diagonally and securing dainty ties creates an effortless runway-ready summer crop top. It takes under fifteen minutes to construct, requiring zero complicated patterns or advanced tailoring expertise.
Materials and Notions Needed
- Large vintage square silk or polyester satin scarf (at least 30×30 inches)
- Two yards of thin satin cord, matching ribbon, or delicate chain
- Hand-sewing needle or domestic sewing machine with fine microtex needle
- Fine matching silk thread and sharp embroidery scissors
- Steam clothing iron with low silk heat setting for gentle pressing
Step-by-Step Scarf Halter Tutorial
- Lay your square silk scarf flat upon clean crafting table surfaces.
- Fold the top corner of the square downward by two inches.
- Press the folded corner down gently using low-heat steam clothing irons.
- Stitch across the folded corner to create a small horizontal casing.
- Pin a safety pin to your satin cord and thread through casing.
- This top cord loops comfortably around your neck to support tops.
- Fold the two side scarf corners inward slightly to reinforce corners.
- Sew two lengths of satin ribbon securely onto those reinforced side tips.
- These side ribbon ties will fasten securely across your lower back.
- Tie top cord around your neck, letting pointed handkerchief hem drop.
- Fasten the side ties behind your back for a stunning backless top.