13 Cute Bangs Hairstyles Ideas You Must Try
Hairstyles with fringe have always held a special place in the world of beauty and personal transformation. Among them, cute bangs hairstyles stand out as an absolute symbol of timeless, youthful charm and facial contouring. However, many people mistakenly believe that pulling off fringe is incredibly difficult or requires high-maintenance salon visits every week.

Modern cutting techniques have completely transformed these traditional haircuts into versatile, easily managed everyday styling solutions for all hair textures. Today, you can wear beautifully tailored bangs to the office, grocery store, or a formal dinner party with absolute confidence. This comprehensive guide will explore thirteen fresh, stunning, and beginner-friendly ways to style cute bangs for your next look.
The Basics of Modern Fringe Sculpting
Achieving the perfect fringe requires a systematic understanding of your face shape, natural hair cowlicks, and mechanical styling tools. Before you clip your hair or commit to a dramatic cut, you must prepare your strands correctly. Clean hair can often be too fluffy or split down the middle, causing bangs to separate awkwardly.
Using a small ceramic round brush gives your fringe the necessary directional guidance to lay flat and smooth across your forehead. Furthermore, choosing the right styling clips makes a massive difference in your daily morning hair routine. Modern flat, no-crease metal clips hold your fringe in place while you apply makeup without leaving harsh dents.
1. The Soft Wispy French Girl Fringe

Embracing Effortless Parisian Texture for Daily Wear
A soft, wispy French girl fringe breathes fresh life into traditional, heavy haircuts quite effortlessly. This style celebrates natural piecey gaps, soft lash-grazing lengths, and a beautifully relaxed, undone silhouette. It is perfect for busy mornings when you want to look instantly polished but completely effortless.
When you remove the pressure of achieving blunt mathematical perfection, wearing bangs becomes incredibly fun and easy. This relaxed version relies heavily on building a lightweight, airy foundation that lets your forehead peek through gently. It works beautifully on second-day hair textures that already possess natural, lived-in body and movement.
Selecting the Right Everyday Texturizers
The secret to keeping wispy bangs looking fresh is preventing natural forehead oils from flattening your strands. Without proper protection, your airy French fringe will simply clump together into greasy pieces within a few hours. Therefore, always avoid applying heavy face oils or thick moisturizing serums directly near your upper brow line.
Instead, opt for lightweight chalky powders, translucent dry shampoos, or matte texture sea salt volumizing mists. These products coat the hair lightly, keeping it airy, bouncy, and significantly easier to brush out. They give your fringe a beautiful matte finish that resists separation throughout long, active working days.
Essential Supplies for Wispy Styling
- Translucent dry shampoo spray
- Ceramic tourmaline mini flat iron
- Boar bristle small round brush
- Lightweight flexible working hairspray
- Fine-tooth carbon tail comb
Step-by-Step Implementation Guide
- Mist your fringe roots generously using a dry shampoo for instant oil absorption.
- Blow dry the bangs downward using a small boar bristle round brush carefully.
- Direct the airflow from above to seal the hair cuticles completely flat.
- Run a mini flat iron through the ends, curving slightly inward toward eyes.
- Use a tail comb to separate the strands into delicate, wispy pieces evenly.
- Pull out longer side pieces to blend the fringe into your length.
- Apply a tiny mist of flexible working hairspray to lock the shape.
- Fluff the roots gently with your fingertips for a natural look.
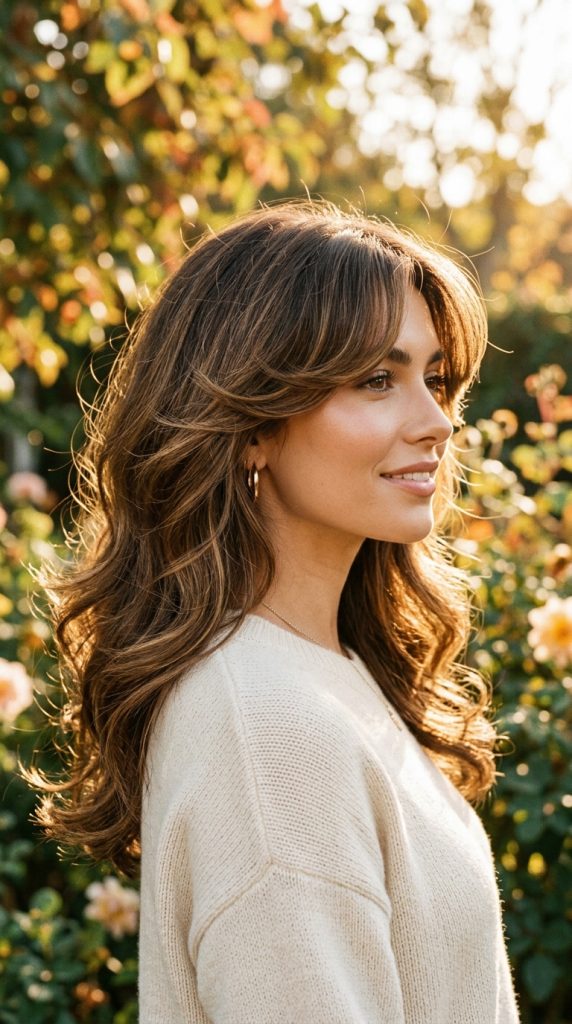
2. The Retro Voluminous Curtain Bangs
Cultivating Beautiful Face-Framing Waves and Dimension
Curtain bangs perfectly marry retro 1970s Hollywood glamour with modern, low-maintenance lifestyle needs for ultimate styling comfort. This style utilizes longer, middle-parted swoops that curve outward to frame your cheekbones beautifully. It creates a gorgeous contouring effect that softens sharp angles and highlights your eyes instantly.
The philosophy of effortless framing is central to this specific retro curtain layout style. It focuses on movement, flow, and soft volume within your daily indoor and outdoor environments. By flipping the ends away from your face, you create a beautiful opening that accentuates your features.
Mastering the Ultimate Inward Blowout Technique
Positioning and brush direction are everything when you want to achieve a true voluminous retro curtain aesthetic. You must maximize the lift at your roots while rolling the ends backward away from your eyes. This prevents the longer layers from falling flat into your vision during long working hours.
Avoid using heavy, sticky gels that weigh down the bounce and make the hair look stiff. Instead, opt for lightweight volumizing mousses applied to damp roots before you begin styling with heat. This keeps the atmosphere of your hair fresh, bouncy, and connected to classic retro vibes seamlessly.
Materials Required for Retro Curtain Volume
- Volumizing root lifting foam mousse
- Two-inch ionic ceramic round brush
- Professional ionic hair dryer with concentrator
- Velcro roller clamps in extra-large size
- Shine-enhancing lightweight finishing mist
Step-by-Step Implementation Guide
- Apply a dollop of volumizing mousse through your damp root sections evenly.
- Comb the curtain sections forward together using a wide-tooth styling comb.
- Place your large round brush on top of the bangs section carefully.
- Blow dry the hair forward and up, creating immediate root elevation.
- Roll the dry hair immediately into an extra-large Velcro roller tightly.
- Let the roller sit for ten minutes to set the bounce.
- Remove the roller gently and part the fringe down the center.
- Swoop the wings outward and apply a light shine mist spray.
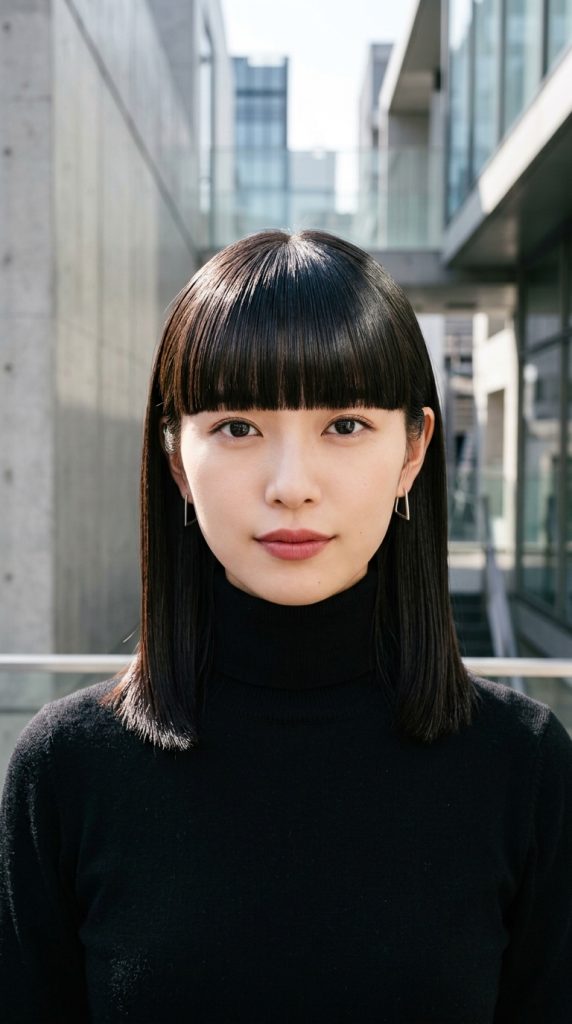
3. The Classic Japanese Kawaii Blunt Bangs
Achieving Flawless Precision for Structured Contemporary Looks
When you need to project a bold, high-fashion, and adorable statement, a precise blunt finish is necessary. This variation eliminates all uneven lines, creating a solid, smooth horizontal frame right above your eyelashes. It works exceptionally well for straight hair types, anime-inspired aesthetics, or sharp graphic haircuts.
This structured look requires a completely different preparation method than our previous soft, flowing curtain style. Here, you want maximum alignment of every single hair strand from the roots down to the tips. Any hidden waves or stubborn cowlicks will ruin the clean, aerodynamic edge of this classic cut.
Mastering the High-Gloss Straightening Process
To achieve a mirror-like, solid blunt finish, you must lock out all environmental humidity completely. Using a high-quality tourmaline flat iron on medium heat helps straighten out stubborn kinks safely. Make sure to apply a premium thermal protectant spray before using any hot styling tools.
Once straight, a tiny drop of anti-frizz argan serum adds that expensive, high-gloss editorial finish. Apply the product using your fingertips, combing it smoothly through the fringe tips carefully. This forms a protective shield that blocks moisture and keeps your blunt line perfectly straight.
Tools for the Precision Blunt Look
- Argan oil anti-frizz smoothing serum
- Professional titanium precision flat iron
- Fine-tooth rat tail styling comb
- Strong hold high-shine aerosol hairspray
- Flat metal no-crease hair clips
Step-by-Step Implementation Guide
- Comb your damp fringe completely straight using a fine-tooth comb.
- Secure the side layers away using flat, no-crease metal hair clips.
- Blow dry the bangs flat against your forehead using downward motions.
- Sweep the brush left and right alternately to neutralize any cowlicks.
- Clamp your precision flat iron close to the roots very carefully.
- Pull the iron straight down without curling the ends inward at all.
- Apply a drop of argan serum to lock in glass-like shine.
- Spray a fine mist of strong-hold hairspray onto your comb.
- Run the damp comb through the bangs to set the line.
4. The Wispy Airy See-Through K-Beauty Fringe

Incorporating Delicate Softness and Modern Minimalist Charm
Korean see-through bangs focus on ultimate minimalism, delicate facial framing, and soft, youthful expressions. This version incorporates very few hair strands, allowing your forehead skin to remain highly visible underneath. It is a gorgeous option for clean girl aesthetics, casual school days, or low-profile weekend styles.
The K-beauty fringe looks best when it possesses a barely-there, cloud-like airy texture across the brow line. It should look like a gentle breeze just swept your hair into perfect, delicate place. This style pairs exquisitely with glowy makeup looks, simple outfits, and modern minimalist jewelry pieces.
Creating Lasting All-Day Lift Safely
Keeping a see-through fringe from looking flat or stringy does not require heavy styling products. The key to lasting K-beauty volume is utilizing a small, convenient Velcro hair roller during downtimes. This method shapes the strands into a gentle, natural arch without causing heat damage.
Carry a mini Velcro roller inside your everyday makeup bag for quick touch-ups at your desk. Simply roll your see-through bangs upward for five minutes during your midday work break. This instantly refreshes the airy lift, keeping your fringe looking cute, bouncy, and perfectly spaced.
See-Through Styling Elements Needed
- Mini Velcro hair roller accessory
- Lightweight water-based volumizing mist
- Nylon paddle brush with flexible bristles
- Matte finish dry texture powder dust
- Small hair scissors for tiny trims
Step-by-Step Implementation Guide
- Lightly spritz your see-through strands with a water-based volumizing mist.
- Brush the sparse fringe forward using your flexible nylon paddle brush.
- Wrap the hair ends around a mini Velcro roller tightly.
- Slide the roller up until it sits flat against your roots.
- Apply warm air from your blow dryer for thirty seconds flat.
- Allow the hair to cool completely on the roller surface safely.
- Unroll the fringe gently, letting the strands scatter across forehead.
- Tap a tiny amount of texture powder at roots for separation.
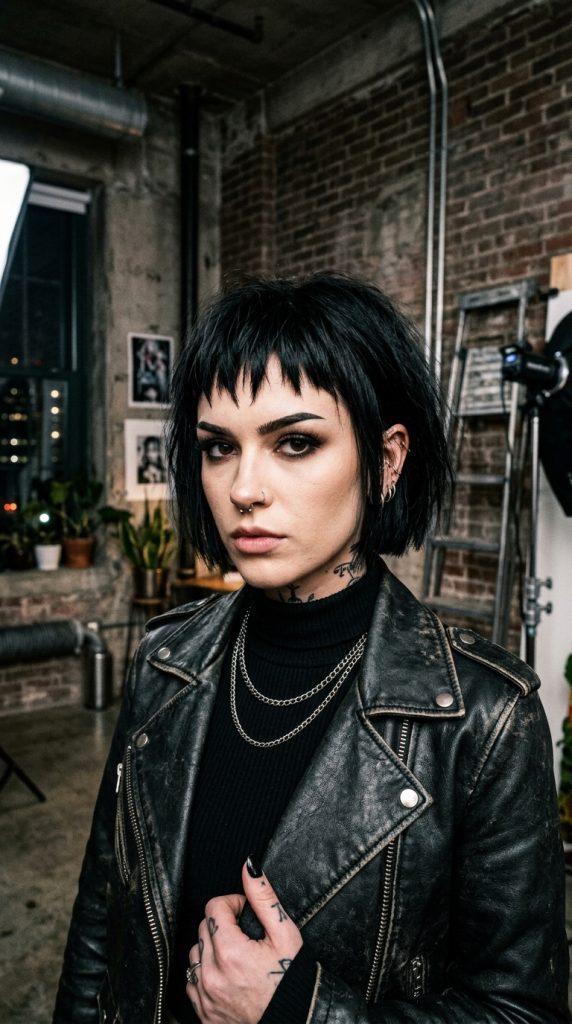
5. The Edgy Textured Micro Baby Bangs
Embracing Bold Architectural Statements with Shorter Lengths
If you want a style that embraces high-fashion artistic energy and bold lines, micro baby bangs are amazing. This design features a short fringe line that sits at least an inch above your eyebrows. It opens up your entire face beautifully, highlighting your eyes and brow structure with immense contrast.
Baby bangs look incredible when paired with modern alternative fashion styles, vintage clothing, or sharp bob haircuts. They offer an instantly recognizable, cool-girl edge that requires very little daily brushing once properly set. It is a brilliant option for creative individuals who love statement styles.
Controlling Short Layers with Styling Waxes
Short hair layers are naturally prone to standing straight up or bending into unwanted directions overnight. To combat this, you need a product that adds immediate weight, flexible control, and rich texture. A high-quality matte styling paste, clay, or pomade is ideal for this specific task.
Rub a dime-sized amount of texture paste between your fingertips to warm up the product. Piece out the tips of your micro bangs to create a cool, jagged texture. This prevents the short cut from looking like a solid, uneven block across your forehead.
Components for Edgy Baby Bangs
- Matte finish texturizing fiber paste pomade
- Miniature sizing ceramic straightening iron
- Boar bristle smoothing edge brush
- Anti-humidity flexible styling shield spray
- Sectioning alligator clips for hair control
Step-by-Step Implementation Guide
- Dampen your micro bangs completely to reset the root direction perfectly.
- Apply a tiny smear of texturizing paste through the wet strands.
- Blow dry the short hair flat using an edge brush downwards.
- Press the blow dryer nozzle close to the hair to seal direction.
- Use a mini flat iron to smooth out any stubborn side kinks.
- Piece out individual hair tips using your fingertips and extra paste.
- Mist with an anti-humidity shield spray to prevent midday frizz halos.
- Secure your side layers with clips while the styling spray dries.
6. The Dreamy Romantic Wavy Tendril Fringe
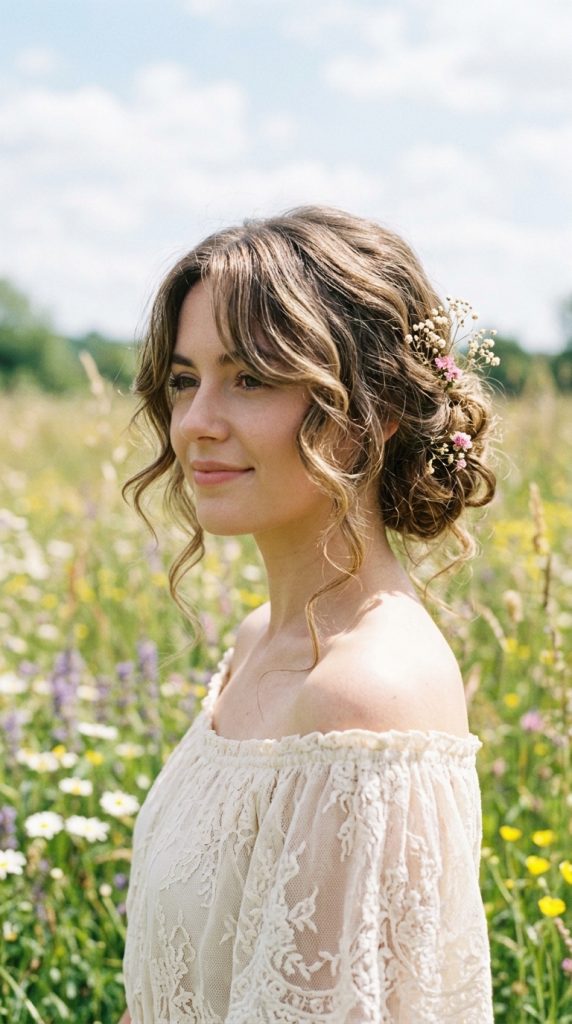
Honoring Natural Textures with Soft Boho Movement
Natural waves and soft textures offer incredible built-in volume that makes fringe look completely magical. You do not need to straighten your hair to achieve a beautiful, cute bangs hairstyle look. This method embraces your natural wave pattern while creating a romantic, fairytale aesthetic around your face.
Wavy bangs actually hold their shape significantly better than fine, silky straight hair does over time. The natural bends and curves of your tendrils create an interlocking structure that resists flattening down. This means you need far fewer styling products to keep the look bouncy all day.
Retaining Crucial Moisture During Hot Styling
Wavy and curly hair types are naturally prone to dryness, making moisture protection an absolute priority. Before manipulating your soft tendril fringe, you must prep the strands with a light leave-in cream. This keeps your waves soft, defined, and completely free from frizzy friction damage.
Avoid using fine-tooth plastic combs, as they break up your beautiful natural wave sections into frizz. Instead, use only your fingers to scrunch and guide your tendrils into position gently. This preserves the organic texture while forming a gorgeous, face-cradling frame.
Wavy Fringe Essential Products
- Moisturizing leave-in conditioner cream treatment
- Diffuser attachment nozzle for hair dryer
- Alcohol-free curl defining soft gel mist
- Microfiber hair drying wrap towel cloth
- Satin scrunchie for sleeping protection
Step-by-Step Implementation Guide
- Apply a dot of leave-in conditioner to damp fringe strands.
- Spritz lightly with an alcohol-free curl defining soft gel mist.
- Scrunch the bangs upward toward your hairline using your fingers.
- Attach a diffuser nozzle to your professional hair dryer unit.
- Cup the wavy fringe inside the diffuser bowl gently on low heat.
- Hold the dryer still without moving it around frantically at all.
- Allow the waves to dry completely to prevent frizz creation.
- Mist with a lightweight gloss spray for a healthy finish.
7. The Chic Asymmetrical Side-Swept Bangs

Adapting Classic Side Parts for Elegant Facial Elongation
People with round face shapes often worry that straight bangs will make their faces appear shorter. A chic, asymmetrical side-swept fringe solves this problem beautifully by creating an elegant diagonal line across the forehead. This clever placement draws the eye upward, elongating your facial silhouette seamlessly.
Side-swept bangs bring an air of corporate sophistication, mystery, and polished elegance to any basic haircut. They blend beautifully into long layers, layered shags, or classic professional shoulder-length bobs. It is a timeless choice that looks incredibly intentional and neat.
Securing the Deep Side Part Flawlessly
The success of this hairstyle relies entirely on building a strong, stable side part line. A weak part will cause your bangs to fall back across your eyes constantly throughout the day. Therefore, you must train the hair roots to lay toward one specific side using heat.
Trace a clean diagonal part line starting from above the arch of your eyebrow. Use a boar bristle styling brush to pull the hair taut while blow drying. This locks the deep side direction into the root memory perfectly for all-day security.
Side-Swept Accessories Checklist
- Deep-cleaning root lifting styling spray
- Boar bristle smoothing polishing brush
- Thermal heat protectant styling spray
- Sleek metal minimalist barrette slide clip
- Fine-tooth carbon smoothing comb
Step-by-Step Implementation Guide
- Spritz your damp hair roots with a root-lifting styling spray.
- Create a deep side part line using your carbon comb cleanly.
- Brush the fringe section diagonally across your forehead surface area.
- Blow dry the hair following the diagonal brush path firmly.
- Keep the blow dryer nozzle pointed downward to prevent flyaways.
- Smooth the hair ends using a flat iron if needed.
- Slide a minimalist barrette clip behind your ear to secure.
- Mist the swept surface with hairspray to lock the line.
8. The Textured Shaggy Wolf Cut Bangs

Merging Rock-and-Roll Attitude with Soft Layered Definition
The modern wolf cut combines the texture of a vintage shag with the soft framing of a mullet. This style features heavily layered, textured bangs that blend into choppy side pieces effortlessly. It creates an incredibly cool, dynamic, and voluminous look that screams confidence and style.
Shaggy bangs are perfect for girls who love messy textures and effortless bedhead vibes. They look best when they are slightly undone, piecey, and full of natural movement. This style pairs beautifully with casual streetwear, graphic tees, and bold eyeliner looks.
Creating High-Contrast Separation with Texturizers
To prevent your shaggy bangs from looking like a solid wall of hair, you must create separation. You want the layers to chunk together slightly, showing off the choppy, razored ends clearly. Utilizing a high-quality dry texturizing spray is the easiest way to achieve this look.
Shake the spray can well and spritz your layers from mid-lengths to ends. Scrunch the hair firmly with your hands to activate the messy texture. This creates a gritty, rock-and-roll finish that stays voluminous all day long.
Shaggy Cut Supplies List
- Dry texturizing volumizing styling spray
- Matte finish texturizing sea salt mist
- Flexible hold styling paste clay compound
- Wide-tooth styling comb for wave definition
- Professional hair sectioning duckbill clips
Step-by-Step Implementation Guide
- Spritz your dry layers generously with texturizing styling spray.
- Use a wide-tooth comb to untangle the ends loosely.
- Rub a tiny pinch of styling paste between your fingertips.
- Pinch the ends of your layers to create piecey separation.
- Shake your head out wildly to let the hair fall naturally.
- Use duckbill clips to hold the side pieces flat temporarily.
- Blow dry on cool for one minute to set texture.
- Remove the clips and fluff the crown for ultimate volume.
9. The Elegant Braided Headband and Bangs Mix

Elevating Casual Fringe with Intricate Woven Accents
Combining clean, face-framing bangs with an intricate braided headband creates a truly unique visual masterpiece. This design features a delicate crown braid that sits directly behind your fringe line. It separates your bangs from the rest of your hair beautifully, creating a regal look.
This hybrid style is an absolute favorite for formal spring weddings, outdoor festivals, or romantic dates. It keeps the back of your hair neatly controlled while letting your cute fringe frame your eyes. It offers an incredibly feminine, high-end look that turns heads easily.
Perfecting the Braid and Fringe Boundary Line
The secret to this look is creating a perfectly clean parting line behind your bangs. You do not want any fringe hairs accidentally getting pulled into your structural braid strands. This keeps the two sections distinctly separate and perfectly defined from the front view.
Use your rat-tail comb to trace a neat arch right behind your fringe section. Clip the bangs forward securely before you begin weaving the back hair strands. This preparation ensures your braid stays clean and your bangs stay full.
Braided Mix Materials List
- Moisture-rich smoothing styling cream pomade
- Clear silicone mini elastic hair ties
- Small matte finish blonde or black bobby pins
- Shine-enhancing lightweight finishing spray
- Rat-tail metal parting comb tool
Step-by-Step Implementation Guide
- Part your bangs forward cleanly using your rat-tail comb.
- Clip the fringe section away to keep it completely separate.
- Take a three-inch section of hair directly behind your left ear.
- Braid this section tightly into a classic three-strand pattern.
- Secure the braid end using a clear silicone mini elastic tie.
- Pull the braid across your head like a headband structure.
- Pin the braid end securely behind your right ear with bobby pins.
- Unclip your bangs and style them flat to complete the look.
10. The Wispy Bottleneck Celebrity Fringe

Blending Narrow Roots with Flared Cheekbone Wings
Bottleneck bangs are the ultimate celebrity-inspired hybrid fringe trend taking over modern fashion. This design mimics the shape of a classic glass bottle, starting narrow right at the center of your forehead. It then curves outward dynamically, widening into long wings that hug your cheekbones.
This clever shape offers the ultimate versatility for girls who cannot commit to full blunt bangs. It gives you the soft forehead coverage of a light fringe in the middle area. However, it retains the gorgeous, face-elongating benefits of long curtain wings on the sides.
Controlling the Dynamic Bottle Silhouette Properly
Achieving a beautiful bottleneck shape requires careful styling direction during your morning routine. You want the middle section to fall straight down smoothly without splitting open. Meanwhile, the outer wings must flare away from your face elegantly to create that bottle curve.
Use a small round brush on the center strands, pulling them straight down with tension. Then, switch to a larger round brush for the long side wings, rolling them backward. This dual-brush technique sculpts the perfect iconic bottleneck silhouette effortlessly.
Bottleneck Styling Tools Checklist
- One-inch mini ceramic round styling brush
- Oversized two-inch ceramic volumizing round brush
- Flexible hold lightweight mousse hair primer
- Dimmable white matte metal LED desk lamp
- Fine-tooth carbon styling comb accessory
Step-by-Step Implementation Guide
- Apply a small amount of mousse primer to your damp bangs.
- Separate the narrow middle section from the long side wings.
- Blow dry the middle strands straight down using the mini brush.
- Keep the blow dryer nozzle pointed downward for smoothness.
- Switch to the oversized brush for the left side wing layer.
- Roll the left wing backward away from your eye while heating.
- Repeat the backward rolling motion on the right side wing.
- Comb the sections together lightly to blend the bottle shape.
11. The Colorful Two-Tone Highlighted Fringe

Injecting Bold Personality with Vibrant Pop Accents
If you want a style that embraces alternative aesthetics, punk energy, and bold colors, try this. A two-tone highlighted fringe colors your bangs completely different from the rest of your head. It creates a striking visual frame that instantly draws all attention to your eyes.
You can choose high-contrast combinations like bleached blonde bangs against pitch-black hair strands. Alternatively, soft pastel pink or neon blue bangs look incredibly fun, playful, and creative. It is a stunning way to express your unique personal style loudly.
Protecting Bleached Strands from Intense Heat Damage
Coloring your fringe requires bleaching the hair strands to a very light blonde base first. This chemical process can leave your bangs feeling delicate, dry, and prone to breaking easily. Therefore, you must upgrade your hair care routine with deeply nourishing treatment products.
Always apply a high-quality bond-building oil to your colored bangs before using flat irons. Keep your hot styling tools on the lowest temperature setting possible to prevent singeing. This keeps your vibrant colors looking bright, healthy, and completely soft to touch.
Colored Fringe Care Materials List
- Bond-building deep repair hair treatment oil
- Sulfate-free color-safe moisturizing shampoo cream
- Miniature sizing low-heat ceramic flat iron tool
- Vibrant semi-permanent creative hair color cream
- Plastic hair coloring tint brush applicator
Step-by-Step Implementation Guide
- Apply your chosen vibrant color cream onto your bleached bangs.
- Let the color process according to the package instructions carefully.
- Rinse out the cream thoroughly using cool, clean water only.
- Apply a few drops of bond-building repair oil to damp strands.
- Blow dry the colored fringe gently on a low heat setting.
- Use a low-heat ceramic flat iron to smooth the colorful lines.
- Style the bangs flat or wispy depending on your daily mood.
- Mist with a UV-protectant shine spray to prevent color fading.
12. The Wispy Curly Girl Afro Bangs

Celebrating Tight Natural Ringlets with Majestic Volume
Natural curls and beautiful afro textures look absolutely magnificent when styled into a cute fringe. You do not need straight hair to experience the gorgeous framing benefits of a beautiful updo. This style celebrates your natural volume, ringlet patterns, and glorious structural cloud shapes.
Afro-textured bangs provide a stunning, bouncy crown effect that instantly elevates any basic puff hairstyle. They add high-end editorial drama and youthful energy to your everyday protective hairstyles. It is a majestic choice that looks incredibly chic, healthy, and proud.
Maintaining Perfect Ringlet Shape and Definition
The key to gorgeous curly bangs is ensuring individual ringlets stay tightly clumped together beautifully. You want to avoid any rough brushing actions that can explode the curls into a frizzy halo. Utilizing a heavy-duty curl defining gel cream helps lock each ringlet pattern down.
Apply your curl styling products while your hair is still soaking wet for best results. Use your fingers to coil individual fringe pieces around your hand smoothly. Let the hair air dry completely without touching it to lock in definition.
Curly Afro Supplies Checklist
- Heavy-duty curl defining moisturizing gel cream
- Plastic afro hair pick tool with long metal prongs
- Satin lined protective sleeping bonnet cap nightwear
- Nourishing coconut oil lightweight shine spray mist
- Microfiber hair drying wrap towel cloth accessory
Step-by-Step Implementation Guide
- Wash your curls using a sulfate-free moisturizing shampoo cream.
- Apply a generous amount of curl defining gel to soaking wet bangs.
- Coil individual ringlets around your finger to define the shape.
- Blot excess water gently using a soft microfiber towel cloth.
- Let your curly fringe air dry completely without touching it.
- Use a long-prong afro pick to lift the roots for volume.
- Spritz with a lightweight coconut oil mist for healthy shine.
- Wear a satin bonnet at night to keep curls perfect overnight.
13. The Half-Up High Ponytail with Bangs

Crafting a Playful and Energetic Casual Aesthetic
Combining a high half-up ponytail with a cute fringe creates an incredibly fun style. This design pulls the top half of your hair into a high ponytail right at your crown. The remaining hair drapes down your back, while your bangs frame your face perfectly.
This style draws inspiration from iconic pop star looks and trendy modern urban fashion circles. It gives you a temporary facelift effect by pulling your side layers tautly backward away from eyes. It looks incredibly youthful, dynamic, and perfect for active weekend adventures.
Securing the High Ponytail Without Sagging Over Time
A high ponytail can easily sag and slide down your head if it is too heavy. To keep your half-up look bouncy and elevated all day, you must use strong elastics. Utilizing a double-wrap elastic method keeps the ponytail locked tightly at your crown.
Smooth the top side layers back smoothly using a little styling cream pomade before tying. This ensures the sides look clean and sleek, creating a beautiful contrast against your bouncy fringe. It keeps your overall style looking crisp, professional, and completely put-together.
Half-Up Ponytail Supplies Checklist
- Heavy-duty elastic hair bands with high stretch retention
- Moisture-rich smoothing styling cream pomade accessory
- Boar bristle smoothing polishing edge brush tool
- Wide-tooth styling comb for long length definition
- Glossy finish texturizing fiber paste compound
Step-by-Step Implementation Guide
- Style your bangs forward using your chosen routine from above.
- Section off the top half of your hair starting from your ears.
- Apply a small dab of smoothing pomade along the side sections.
- Brush the top hair smooth toward your upper crown area tightly.
- Secure this half-up ponytail firmly using a heavy-duty elastic band.
- Tug the ponytail split gently to tighten the lift instantly.
- Let your remaining lower back hair drape over your shoulders freely.
- Fluff your fringe with your fingers to complete the playful style.