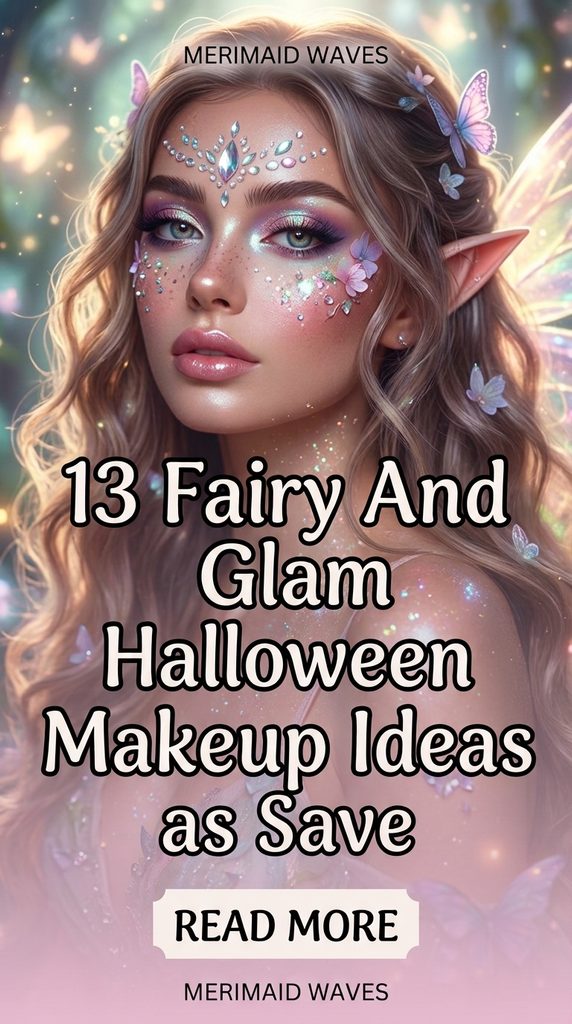
13 Fairy And Glam Halloween Makeup Ideas to Save
Transforming into an ethereal creature brings pure enchantment to Halloween night. Furthermore, fairy makeup merges whimsical storybook charm with glamorous red-carpet radiance. Traditional spooky costumes often lean heavily toward gruesome effects and dark blood. In contrast, fairy glam emphasizes luminous skin, delicate pastels, and sparkling crystals. Modern beauty lovers adore capturing this celestial aesthetic across social media feeds. Therefore, creating a fairy look guarantees stunning, memorable holiday photographs.
The Rise of Whimsical Beauty Trends
Ethereal aesthetics continue to dominate modern fashion runways and digital platforms. Additionally, beauty enthusiasts constantly seek soft, enchanting alternatives to gory Halloween makeup. Fairycore trends celebrate organic elements like wildflowers, dew drops, and iridescent shimmer. Consequently, blending fantasy folklore with modern contouring techniques creates showstopping visual magic. You can easily adapt these concepts for beginner applications or advanced artistry.
Crafting Luminous Glass Skin Foundations
Every breathtaking fairy makeup application begins with an ultra-hydrated, radiant base. Furthermore, matte foundations often look too heavy and dull under bright party lights. Mixing liquid highlighter directly into your hydrating foundation yields dewy, youthful skin. In addition, sweeping translucent setting powders only across the T-zone preserves natural glow. Proper skin preparation ensures delicate rhinestones and cosmetic glitters adhere smoothly all evening.
Strategic Placement of Facial Gems and Glitter
Dimensional embellishments instantly elevate ordinary eyeshadow applications into couture fantasy statements. Moreover, self-adhesive pearls and multi-faceted crystals catch low ambient candlelight brilliantly. Placing sparkling gems along cheekbones creates the illusion of lifted, otherworldly bone structure. Similarly, dusting biodegradable cosmetic glitter across collarbones extends the magical illusion outward. Always use skin-safe lash adhesive to lock heavy gems firmly into place.
Enhancing Eyes with Fluttery Pastel Lashes
Eyes serve as the primary focal point of every fairy beauty transformation. Therefore, sweeping pastel pigments across lids creates a dreamy, soft-focus visual halo. Pairing lilac, rose, or mint eyeshadows with white liquid eyeliner defines shapes crisply. Furthermore, adding wispy, flared faux eyelashes gives your eyes an authentic doe-like flutter. Delicate lower-lash liner pens help sketch tiny botanical vines extending toward temples.
Sculpting Cheekbones with Radiant Iridescent Highlighters
Highlighters sculpt the face while imparting a magical, moonlit sheen to skin. Additionally, selecting duo-chrome powders that shift between violet and gold adds mystery. Sweeping these pigments across brow bones, cupid’s bows, and temples builds multidimensional depth. In contrast, heavy contour powders should remain soft, blended, and warm-toned. The final result looks effortlessly sculpted, ethereal, and bathed in celestial starlight.
Perfecting Pearlescent and Glossy Lip Finishes
Lip applications should harmonize effortlessly with luminous cheekbones and sparkling eye details. Furthermore, high-shine lip oils infused with golden flecks create luscious, dimensional pouts. Outlining lips with muted nude pencils prevents glossy formulas from feathering outward. In addition, dabbing iridescent cosmetic pigment onto the lip center creates a plumping effect. Your finished smile will look youthful, hydrated, and ready for midnight dancing.
Prolonging Your Magical Glamour All Night
Halloween festivities demand durable makeup applications that withstand dancing, heat, and humidity. Consequently, misting your finished canvas with continuous hydrating setting spray locks pigments down. Avoid touching your face directly once delicate rhinestones and glitters are set. Furthermore, carrying a compact travel powder and extra lip oil ensures fast touch-ups. With proper application techniques, your enchanting fairy glamour stays flawless until dawn breaks.
1. Celestial Moonlit Starlight Fairy
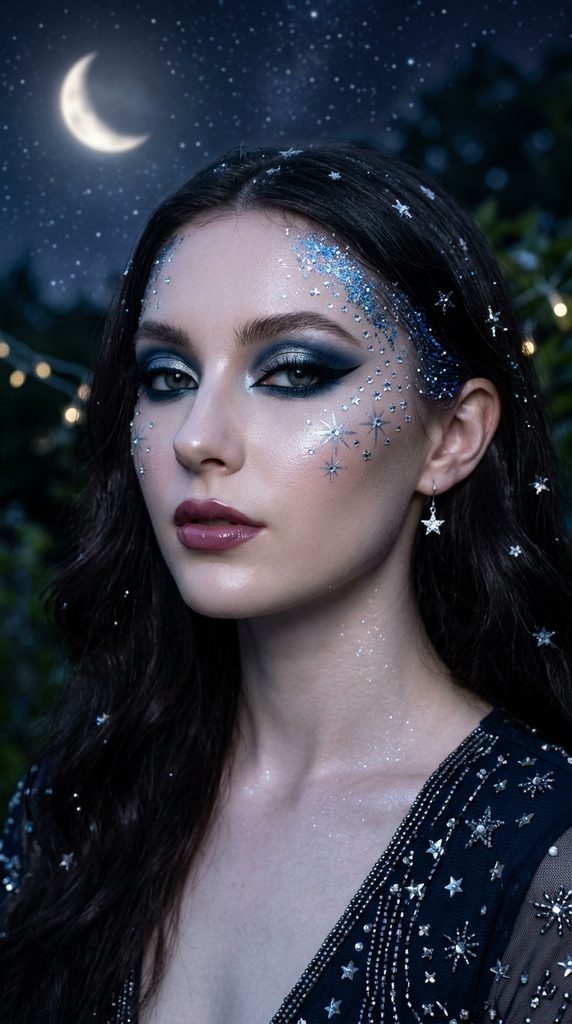
Deep midnight blues paired with glowing silver stars create breathtaking celestial drama. Furthermore, this look captures the serene majesty of a cool midnight sky. Shimmering duo-chrome eyeshadows reflect ambient light like distant constellations across open water. Delicate hand-drawn silver starbursts trail gracefully down cheekbones toward the jawline. This aesthetic delivers high-fashion mystery while maintaining an unmistakably magical fairy silhouette.
Designing the Midnight Starlight Aesthetic
This concept blends deep indigo tones with brilliant, high-shine silver foil accents. Consequently, the eyes command complete attention with intense, multi-dimensional depth. Fine cosmetic glitter mimics stardust scattered naturally across the temples and cheekbones. Meanwhile, cool-toned silver highlighters illuminate the bridge of the nose and forehead. It provides a striking, moody alternative to traditional sunny meadow fairy styles.
Step-by-Step Starlight Application Guide
- Prep eyelids with an oil-free eye primer to prevent creasing.
- Blend deep navy blue eyeshadow into the outer crease using soft brushes.
- Pat shimmering silver metallic pigment across the inner two-thirds of eyelids.
- Draw sharp winged lines along upper lash lines with black liquid eyeliner.
- Sketch delicate four-pointed starbursts across high cheekbones using silver metallic ink.
- Press self-adhesive silver star rhinestones centrally inside each painted star.
- Apply multi-dimensional silver glitter gel along temples using a dense silicone brush.
- Coat lips in cool-toned mauve lipstick topped with holographic silver gloss.
Materials and Embellishments List
- Deep navy, midnight blue, and metallic silver eyeshadow palette
- Waterproof silver metallic liquid eyeliner pen
- Self-adhesive multi-sized silver star rhinestones
- Holographic cosmetic-grade face glitter gel
- Wispy flared faux eyelashes with clear flexible bands
- Cool-toned silver powder highlighter with violet shift
- Mauve satin lipstick and clear high-shine lip gloss
2. Gilded Golden Honeycomb Nymph

Warm amber tones and dripping golden accents evoke rich, sun-drenched enchanted forests. Furthermore, this look channels the regal majesty of queen bees and honey nymphs. Glossy golden highlights reflect candlelight brilliantly across high facial contours. Intricate honeycomb lace stencils create delicate, textured patterns across the temples. Consequently, this radiant aesthetic exudes warmth, luxury, and mesmerizing mythical charm.
Sculpting Warm Honey and Amber Tones
Rich bronze contours ground this look in earthy, sun-kissed royal warmth. Additionally, layering liquid gold foils over matte ochre eyeshadows builds remarkable dimension. Amber crystal rhinestones replicate crystallized droplets of sweet forest honey along brows. In contrast, soft peach blushes keep the complexion fresh, youthful, and vibrant. This glowing design flatters warm undertones and catches evening flash photography beautifully.
Step-by-Step Honeycomb Nymph Tutorial
- Smooth hydrating primer across the face to create a dewy, glowing base.
- Apply warm golden-undertone foundation, buffing thoroughly with a damp beauty sponge.
- Hold honeycomb-patterned fishnet fabric firmly against temples and upper cheekbones.
- Dust shimmering amber and bronze eyeshadow through the stencil with dense brushes.
- Wash metallic gold pigment smoothly over the entire mobile eyelid surface.
- Line waterlines with a creamy warm bronze waterproof gel pencil.
- Adhere amber crystal gems along brow bones using clear eyelash adhesive.
- Paint lips with warm terracotta liquid lipstick and glossy gold lip oil.
Materials and Embellishments List
- Metallic gold, warm amber, and bronze eyeshadow palette
- Liquid gold metallic pigment drops or cosmetic mixing medium
- Hexagonal mesh fabric or honeycomb makeup stencil
- Faceted amber and topaz self-adhesive craft crystals
- Warm peach cream blush and radiant golden powder highlighter
- Terracotta long-wear liquid lipstick
- High-shine nourishing lip oil infused with fine gold shimmer
3. Ethereal Amethyst Crystal Pixie
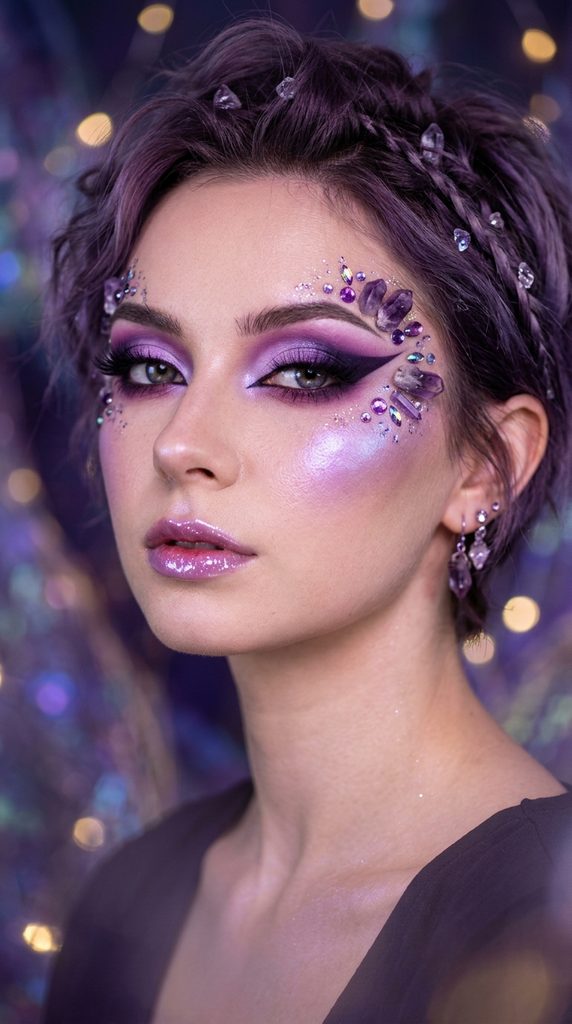
Vibrant violet hues paired with raw crystal textures create mystical cavern glamour. Furthermore, purple tones bring flattering, dramatic contrast to all natural eye colors. Sweeping lilac pigments outward creates an elongated, feline fairy eye shape effortlessly. Clusters of crushed cosmetic crystals catch surrounding light along the outer temples. This design merges dark fantasy mystery with ultra-glamorous red-carpet beauty techniques.
Harmonizing Rich Purple and Lavender Tones
Layering varied purple depths ensures the finished makeup looks dimensional, not bruised. Specifically, pale lilac acts as an ethereal transition shade across brow bones. Meanwhile, deep royal plum sculpts the outer corners and lower lashlines crisply. Iridescent purple rhinestones frame the eyes, enhancing natural facial bone symmetry. A glossy lavender lip completes this royal, subterranean fairy transformation with grace.
Step-by-Step Crystal Pixie Guide
- Apply full-coverage luminous foundation to even out natural skin tones completely.
- Sweep soft lilac eyeshadow into the crease as a smooth transition shade.
- Pack deep royal purple pigment into the outer V for dramatic depth.
- Highlight inner eye corners using an intense iridescent violet duo-chrome powder.
- Trace winged lines using black gel liner, extending points into inner corners.
- Apply lash glue along temples in a gentle crescent moon curve.
- Press varying sizes of purple rhinestones and faux amethyst chips onto glue.
- Swatch sheer berry lip tint across lips, finishing with lavender lip gloss.
Materials and Embellishments List
- Eyeshadow palette featuring lilac, royal purple, and deep eggplant shades
- Iridescent violet duo-chrome powder highlighter
- Mixed pack of purple, lavender, and clear faceted rhinestones
- Cosmetic-grade crushed crystal flakes or chunky glitter
- Waterproof black gel eyeliner pot and angled liner brush
- Sheer berry lip stain
- Shimmering purple-tinted high-shine lip gloss
4. Frosted Winter Blossom Fairy
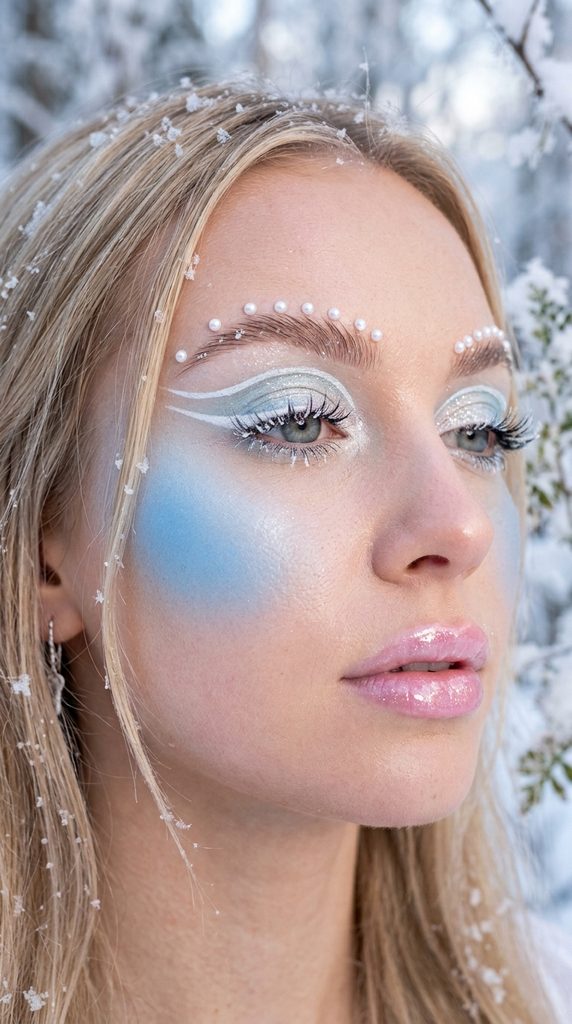
Crisp icy blues and pale crystalline whites capture silent, frozen forest landscapes. Furthermore, white eyelash tips resemble delicate snowflakes resting gently on winter flora. Shimmering pale cyan eyeshadow washes create cool, magnetic allure across the eyes. Tiny pearl accents frame the brow arches like frozen morning dew drops. This breath-taking look transforms you into a mythical queen of winter woodland realms.
Creating Chilled Pearlescent Complexions
Cool-toned alabaster foundations establish the frozen foundation needed for this winter concept. Additionally, soft baby-blue blushes replace traditional pinks along high cheekbone ridges. Layering pure white liquid eyeliner over frosty blue lids creates clean contrast. Delicate faux pearls simulate tiny frozen snowballs scattered naturally across the face. This striking, icy palette feels aristocratic, pristine, and wonderfully theatrical for parties.
Step-by-Step Frosted Fairy Tutorial
- Blend cool-toned porcelain foundation smoothly over face and down the neck.
- Dust pastel baby-blue powder blush high onto cheekbones and temples softly.
- Pat frosty white shimmer shadow across lids from lashlines to brows.
- Blend pale icy-blue shadow along lower lashlines using a small smudger.
- Draw crisp graphic floating creases using opaque white liquid eyeliner pens.
- Dip mascara wand tips into white liquid liner, coating lash tips lightly.
- Affix miniature flat-back white pearls along the upper brow bone curves.
- Apply frosted baby-pink satin lipstick, topping with clear crystalline lip gloss.
Materials and Embellishments List
- Frosty white, ice blue, and pale silver shimmer eyeshadows
- Pastel baby-blue powder blush
- High-opacity matte white liquid eyeliner pen
- Flat-back miniature white craft pearls in assorted diameters
- Lengthening black mascara and false lash applicator tool
- Frosted baby-pink lipstick
- Ultra-glossy clear glass-shine lip topper
5. Enchanted Rose Garden Dryad
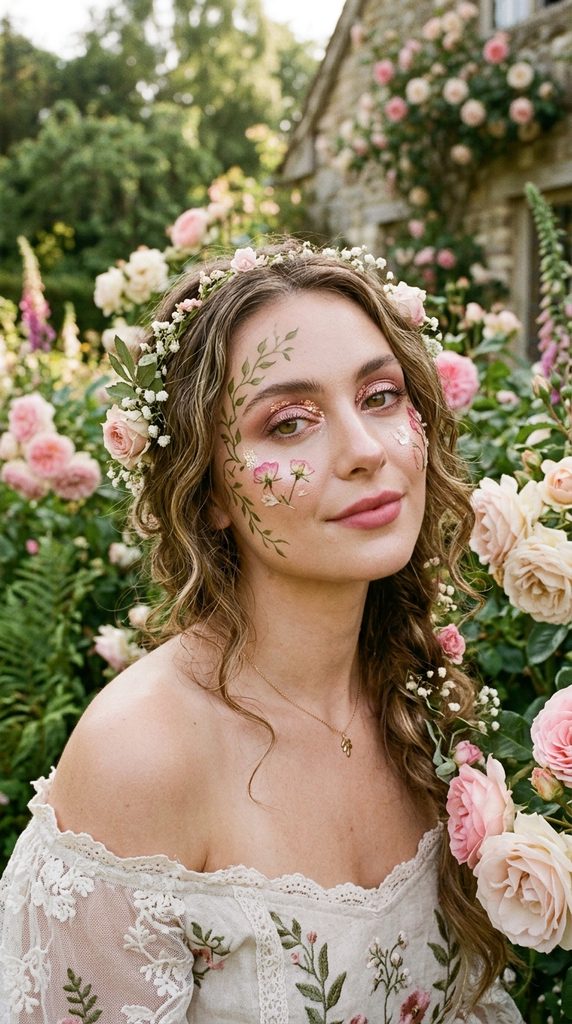
Romantic petal pinks, deep moss greens, and rose gold accents evoke blooming gardens. Furthermore, this look celebrates the timeless beauty of ancient botanical woodland dryads. Soft pink eyeshadow halos make eyes look wide, romantic, and delightfully youthful. Delicate hand-painted green leafy vines trail down the temples and cheek areas. This concept balances charming organic cottagecore elements with sophisticated, modern evening glamour.
Blending Soft Petals with Woodland Greens
Rose gold metallics bridge the visual gap between delicate florals and earthy leaves. Moreover, pairing dusty rose blushes with forest green accents feels remarkably natural. Tiny pressed dried flowers adhere to cheekbones, creating authentic garden texture. Soft champagne highlighters illuminate the face without competing with intricate painted vines. The overall design feels poetic, sweet, and deeply connected to living nature.
Step-by-Step Rose Garden Tutorial
- Apply medium-coverage radiant foundation, letting natural freckles peek through softly.
- Wash dusty rose eyeshadow across lids, blending edges into soft clouds.
- Press metallic rose gold foil pigment centrally onto the upper eyelids.
- Sketch delicate winding vine stems down temples using olive green liquid eyeliner.
- Paint tiny leaves along vine stems using vibrant emerald green face paint.
- Adhere tiny dried pink flowers along painted vines using gentle lash adhesive.
- Sweep warm champagne highlighter across cheekbones, nose tip, and forehead center.
- Blot velvet rose-tinted matte lipstick onto lips, blurring outer edges softly.
Materials and Embellishments List
- Dusty rose, deep burgundy, and metallic rose gold eyeshadow palette
- Olive green and emerald green precision liquid liner pens
- Real miniature pressed dried flowers for cosmetic face application
- Clear gentle eyelash adhesive tube
- Warm champagne powder highlighter with golden undertones
- Velvet matte rose lipstick
- Hydrating rosewater face setting mist
6. Iridescent Opal Pearl Sprite

Multi-dimensional opal sheens shift colors mesmerizingly with every single head turn. Furthermore, this look mimics the milky, rainbow luminescence found in precious opals. Soft pastel pinks, lavenders, and greens blend seamlessly across the eye area. Clusters of gleaming white half-pearls frame the eyes with architectural elegance. This opulent design screams luxury, high-fashion editorial styling, and pristine fairy elegance.
Mastering Prismatic Opal Skin Transitions
Seamless color transitions create the authentic illusion of light-refracting natural opal gemstones. Additionally, using sheer watercolor eyeshadow techniques prevents colors from becoming muddy. Layering rainbow iridescent pigments over white eyeshadow bases intensifies their color shifts. Flat-back half-pearls placed along inner and outer corners enhance facial symmetry cleanly. This aesthetic looks breathtakingly clean, modern, and undeniably expensive under evening lighting.
Step-by-Step Opal Sprite Tutorial
- Prep eyelids with white cream eyeshadow base to maximize pastel brightness.
- Blend pastel pink softly onto inner eyelid thirds using fluffy blending brushes.
- Apply soft mint green shadow centrally, overlapping the pink border gently.
- Dust pale lavender shadow onto outer corners, smoking edges outward smoothly.
- Pat iridescent translucent shifting pigment over the entire lid with fingers.
- Line upper lash lines with thin, delicate metallic white liquid eyeliner.
- Press iridescent half-pearls along brow bones and underneath lower lash lines.
- Coat lips in milky pink gloss packed with rainbow iridescent micro-shimmer.
Materials and Embellishments List
- White cream eyeshadow base primer
- Pastel rainbow eyeshadow palette featuring mint, lavender, and pink
- Multi-chrome translucent pigment powder with pink-green-gold shift
- Assorted sizes of flat-back iridescent craft half-pearls
- Fine-tip metallic white liquid eyeliner pen
- Fluffy natural-hair eye blending brushes
- Milky iridescent lip gloss with prismatic micro-glitters
7. Dark Woodland Mushroom Faerie
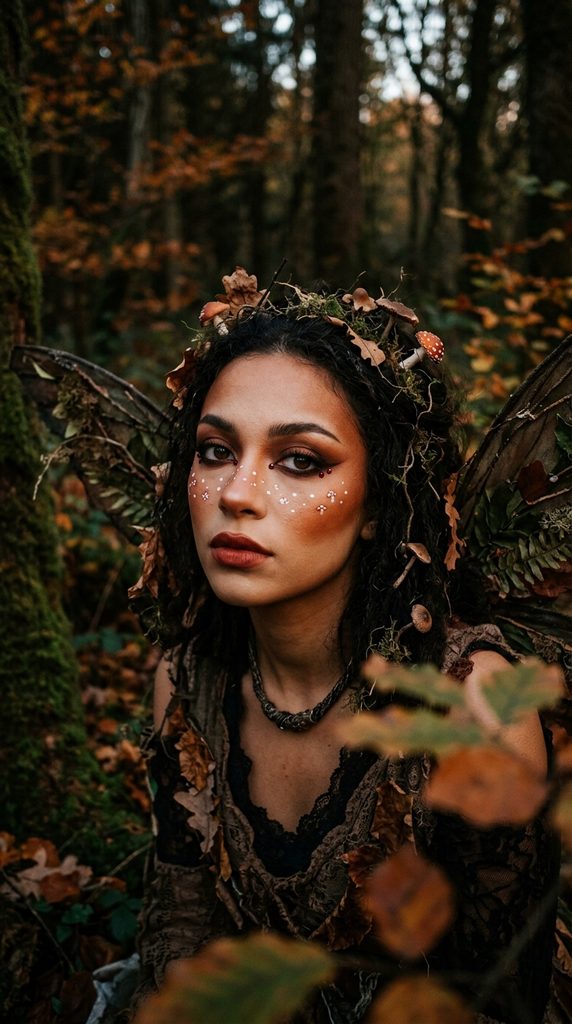
Earthy terracotta tones, moody burgundies, and spotted white details mimic forest toadstools. Furthermore, this look appeals to lovers of darker, slightly eerie autumn aesthetics. Warm burnt-orange contours create dramatic, high-fashion hollows along natural cheekbones. Miniature hand-painted white dots replicate the charming caps of fly agaric mushrooms. Consequently, this design delivers quirky woodland character wrapped in smoldering, moody glamour.
Sculpting Forest Floor Earthiness
Deep forest tones create striking contrast against pale, matte porcelain skin complexions. In addition, smoky brown eyeshadows wing outward aggressively, creating fierce feline shapes. Clusters of dark red crystals mimic juicy autumn forest berries along temples. Deep terracotta lip colors ground the whimsical details in mature, runway-ready elegance. It offers a delightfully unconventional, cozy approach to autumn fairy makeup artistry.
Step-by-Step Mushroom Faerie Guide
- Apply matte porcelain foundation, setting fully with translucent loose setting powder.
- Contour cheekbones deeply using warm terracotta and burnt-orange powder pigments.
- Blend warm cinnamon brown eyeshadow across lids, winging outer corners sharply.
- Smudge dark chocolate liner along lower waterlines for intense, smoky depth.
- Dot opaque white liquid eyeliner across bridge of nose like freckles.
- Paint larger white mushroom dots across upper cheekbones using detail brushes.
- Adhere deep crimson rhinestones near outer eye corners with lash glue.
- Apply matte brick-red lipstick, blotting edges with fingers for stained finishes.
Materials and Embellishments List
- Matte terracotta, cinnamon brown, and chocolate eyeshadow palette
- Burnt-orange contour and powder blush duo
- High-coverage matte porcelain liquid foundation
- Opaque matte white face paint or liquid liner pen
- Deep crimson and ruby-red craft rhinestones
- Long-wearing matte brick-red liquid lipstick
- Precision fine-tip detail nail art brushes for dotting
8. Sun-Drenched Sunset Meadow Fairy

Radiant coral pinks, fiery oranges, and golden yellows mimic glowing autumn sunsets. Furthermore, this warm color harmony brings healthy, sun-kissed vitality to evening celebrations. Sweeping warm gradients across eyes and cheeks creates unified, breathtaking visual warmth. Sparkling gold glitter stars scattered over nose bridges mimic magical golden-hour freckles. This cheerful, luminous concept feels undeniably glamorous, flattering, and joyfully energetic.
Blending Radiant Sunset Color Gradients
Warm sunset tones blend effortlessly into one another across open eyelid space. Specifically, vibrant yellow highlights inner eye corners, blooming outwards into rich orange. The outer corners deepen into rich magenta, creating elongated, sunset-inspired wings. Sweeping vibrant coral blush high onto cheekbones connects eyes to the face. The finished application glows like the last warm rays of October sunlight.
Step-by-Step Sunset Fairy Tutorial
- Apply luminous foundation, concealing imperfections while maintaining natural skin textures.
- Pack matte bright yellow eyeshadow firmly into both inner eye corners.
- Blend vibrant tangerine orange eyeshadow across the centers of both lids.
- Diffuse deep sunset magenta shadow into the outer corners and creases.
- Drape vibrant coral powder blush across high cheekbones and nose bridges.
- Adhere metallic gold star sequins across cheeks using clear setting gel.
- Dust golden highlighter across temples, collarbones, and inner eye corners generously.
- Coat lips in juicy coral lip oil topped with golden shimmer.
Materials and Embellishments List
- Vibrant warm eyeshadow palette featuring yellow, orange, and magenta
- Pigmented coral powder blush with satin sheen
- Loose metallic gold star-shaped craft sequins
- Clear cosmetic glitter primer or peel-off adhesive
- Radiant warm gold powder highlighter
- Fluffy angled blush application brush
- Hydrating coral-tinted high-shine lip oil
9. Seafoam Siren Aquatic Nixie
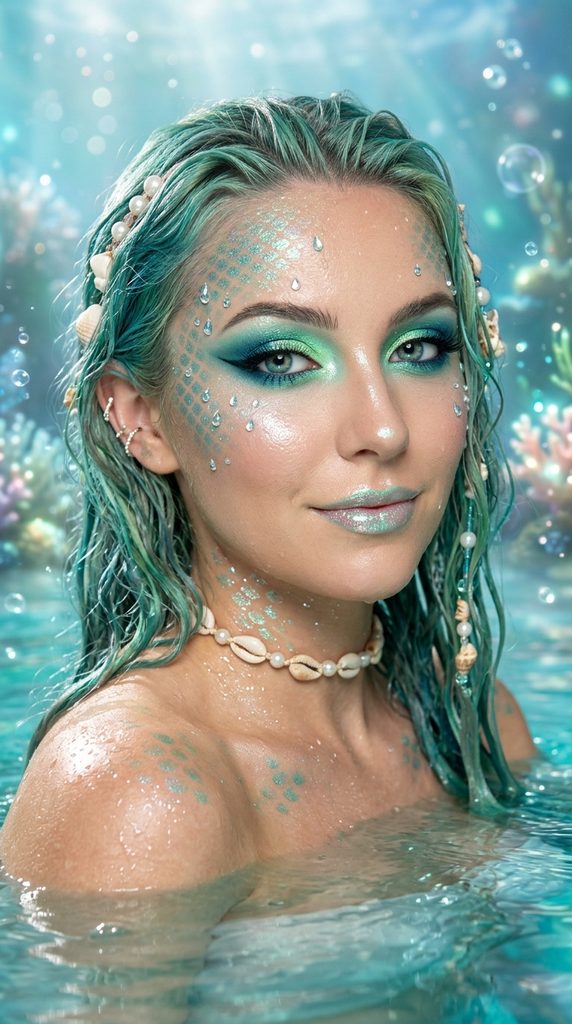
Cool aquatic mint greens, teal undertones, and pearl accents channel mythical water nymphs. Furthermore, this look captures the sparkling tranquility of sunlit ocean waves and springs. Shimmering teal eyeshadow gradients make brown and hazel eyes pop with intensity. Fishnet stencils pressed against temples create delicate, shimmering mermaid scale textures effortlessly. This refreshing, oceanic aesthetic feels mysteriously alluring, ethereal, and beautifully unique for Halloween.
Creating Glistening Water-Droplet Textures
Liquid gloss finishes simulate the appearance of emerging fresh from enchanted springs. Additionally, iridescent turquoise glitters replicate sparkling ocean foam catching bright midday sun. Stenciled scales along temples provide subtle, reptilian mythical texture without looking grotesque. Delicate clear glass rhinestones resemble clinging water droplets resting on high cheekbones. This aquatic fantasy design turns you into an enchanting ruler of lakes.
Step-by-Step Aquatic Nixie Tutorial
- Smooth hydrating face primer over skin to encourage a fresh, wet sheen.
- Apply lightweight radiant foundation, evening skin tones with sheer, luminous coverage.
- Hold clean fishnet stockings against temples, dusting shimmering teal shadow through.
- Sweep seafoam green eyeshadow across lids, blending edges with pale mint.
- Deepen outer lashlines using rich oceanic teal gel liner winged outward.
- Glue clear teardrop rhinestones along cheekbones to mimic glistening water beads.
- Pat clear face gloss over high cheekbones for intense wet-look shine.
- Swipe lips with sheer nude lipstick, layering mint-tinted shimmering gloss overtop.
Materials and Embellishments List
- Shimmering seafoam green, mint, and deep teal eyeshadow palette
- Oceanic teal waterproof gel eyeliner pencil
- Clean section of fishnet stocking to use as stencil
- Clear faceted teardrop and circular craft rhinestones
- Multi-use clear face and eye gloss tube
- Sheer nude satin lipstick
- Mint-tinted plumping lip gloss with aqua sparkles
10. Midnight Nebula Galaxy Faerie

Cosmic indigo, electric violet, and magenta tones evoke deep space nebula clouds. Furthermore, this cosmic aesthetic blends sci-fi fantasy elements with traditional fairy folklore. Intricate white constellations painted across temples tell personalized astrological stories across the skin. Splattering white face paint creates hundreds of microscopic, glowing distant galaxies effortlessly. This dramatic design looks intensely creative, mysterious, and undeniably striking in flash photography.
Mapping Starlight Across Deep Shadows
High-contrast white markings stand out vividly against deep, galaxy-toned smoky eye bases. Moreover, blending magenta into deep navy mimics swirling interstellar dust clouds realistically. Chunky holographic star glitters catch direct lighting, creating brilliant bursts of color. A bold, dark plum lip anchors the cosmic eyes with sophisticated weight. This otherworldly concept transforms you into a powerful cosmic entity from the stars.
Step-by-Step Galaxy Faerie Tutorial
- Apply full-coverage foundation, creating a completely even, flawless canvas for colors.
- Pack intense indigo shadow across lids, buffing edges into deep violet.
- Diffuse vibrant magenta eyeshadow around the outer perimeter of the purple.
- Load a toothbrush with diluted white face paint, flicking bristles over temples.
- Connect white splatter dots with fine brushes to form astrological constellations.
- Press holographic star glitters onto select constellation nodes using lash adhesive.
- Apply dramatic winged eyeliner and voluminous false lashes along upper lids.
- Coat lips with deep blackberry liquid lipstick, patting purple shimmer centrally.
Materials and Embellishments List
- Deep indigo, electric violet, and bright magenta eyeshadow palette
- Water-activated opaque white cake face paint
- Clean toothbrush or stiff stippling brush for paint splattering
- Fine 00-gauge nail art liner brush for constellation lines
- Holographic star cosmetic glitters and clear adhesive
- Voluminous faux mink eyelashes with dramatic length
- Deep blackberry matte liquid lipstick
11. Pastel Twilight Butterfly Pixie

Whimsical monarch butterfly wing patterns frame the outer eyes with breathtaking symmetry. Furthermore, replacing traditional orange wings with pastel lilac and pink modernizes the look. Crisp black liner outlines define delicate wing veins with sharp graphic precision. Small white dots lining wing borders add authentic, delicate entomological realism to faces. This charming design showcases serious artistic talent while looking delightfully soft and feminine.
Painting Graphic Butterfly Wing Linework
Steady brush control allows the creation of elegant, symmetrical butterfly wing curves. Additionally, blending pastel ombre bases before applying black lines ensures clean color separation. Wing veins should taper naturally outward, mimicking real butterfly wings found in meadows. Placing tiny white highlight dots along borders creates that classic monarch butterfly signature. The resulting makeup turns your face into an exquisite, fluttering work of art.
Step-by-Step Butterfly Pixie Tutorial
- Apply glowing foundation, setting the eye area lightly with translucent powder.
- Blend pastel pink eyeshadow across lids, transitioning outward into soft lavender.
- Extend the pink and purple shadows outward into sweeping wing silhouettes.
- Outline wing perimeters using a precision black liquid eyeliner felt-tip pen.
- Draw delicate interior vein lines connecting the outer border to eyes.
- Dot opaque white liquid liner along outer black wing edges cleanly.
- Sweep soft pink blush across apples of cheeks toward the temples.
- Finish with baby-pink tinted lip balm and sparkling pink lip oil.
Materials and Embellishments List
- Pastel baby-pink and soft lavender matte eyeshadows
- Ultra-precise waterproof black liquid eyeliner pen with felt tip
- Opaque white liquid eyeliner pen with brush tip
- Soft baby-pink powder blush
- Natural wispy half-lashes applied to outer eye corners
- Hydrating baby-pink tinted lip balm
- Nourishing pink lip oil infused with fine silver micro-shimmer
12. Gilded Autumn Amber Wood Nymph
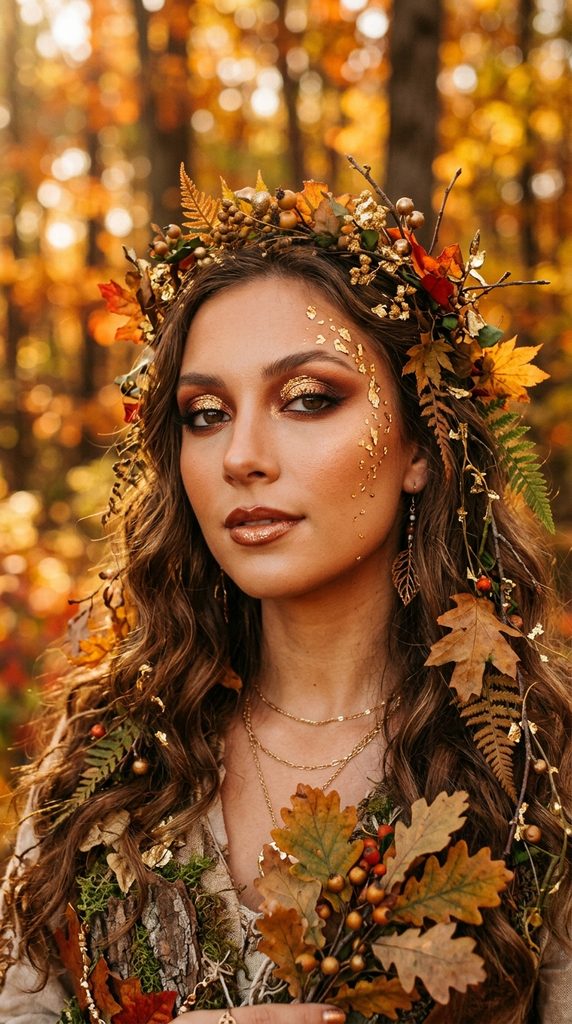
Rich bronze, burnt copper, and shimmering gold reflect changing autumn forest leaves. Furthermore, this warm, glowing look celebrates the cozy transition into late October. Metallic copper foils pressed onto eyelids glow like crackling hearth fires at night. Delicate miniature gold foil maple leaves trail down cheekbones with natural grace. This cozy yet luxurious design captures the warm, comforting essence of harvest season.
Framing Warm Metallic Autumn Complexions
Monochromatic warm metals create an undeniably cohesive, expensive-looking beauty aesthetic across faces. Moreover, copper tones flatter blue and green eyes with incredible visual intensity. Layering leaf gilding flakes onto the skin creates luxurious, touchable metallic textures. Warm terracotta bronzers warm the face, contouring features with gentle, sun-kissed warmth. It provides a mature, elegant fairy option that feels deeply rooted in autumn.
Step-by-Step Autumn Nymph Tutorial
- Apply radiant warm-toned foundation, blending down the neck for seamless transitions.
- Warm the forehead, cheekbones, and jawline using luminous terracotta bronzing powder.
- Wash warm metallic copper cream eyeshadow across the entire eyelid area.
- Press loose metallic gold eyeshadow pigment onto the center of eyelids.
- Trace upper lashlines with rich espresso brown gel eyeliner, smoking edges.
- Apply cosmetic glitter glue onto temples in a sweeping diagonal direction.
- Press delicate cosmetic gold foil flakes onto glue using dry brushes.
- Paint lips with warm cinnamon-brown satin lipstick and golden gloss.
Materials and Embellishments List
- Metallic copper, warm bronze, and rich gold eyeshadow palette
- Cream copper metallic eyeshadow pot base
- Warm terracotta powder bronzer with golden sheen
- Loose cosmetic gold leaf foil flakes
- Quick-drying cosmetic glitter adhesive primer
- Rich espresso brown waterproof gel eyeliner pencil
- Warm cinnamon-brown moisturizing satin lipstick
13. Holographic Diamond Prism Fairy

High-voltage holographic shimmers split light into radiant rainbows across the face continuously. Furthermore, this modern futuristic design pushes glam fairy concepts into contemporary fashion territory. Chunky diamond-shaped holographic glitters encrust cheekbones like real crushed diamond gemstones. Mirrored silver chrome eyeliners give the eyes an ultra-sharp, reflective, and striking shape. This show-stopping aesthetic looks breathtaking under strobe lights, flash photography, and dance floors.
Achieving High-Reflectivity Prismatic Shine
Creating an ultra-reflective prism effect requires layering multiple chrome and holographic formulas. Additionally, starting with a glass-skin skincare base allows highlighters to melt seamlessly. Geometric diamond glitter flakes placed symmetrically reflect dazzling rainbows whenever your head turns. Keeping eyebrows softly groomed and feathered balances the intense, reflective metallic face accents. This look ensures you remain the radiant, glowing center of every room.
Step-by-Step Prism Fairy Tutorial
- Prep skin with illuminating face serum, applying lightweight dewy foundation overtop.
- Brush eyebrow hairs upward with clear brow soap for feathered, natural arches.
- Wash sheer silver chrome pigment across eyelids from lashlines to brows.
- Draw sharp, dramatic winged lines using liquid silver chrome eyeliner pens.
- Coat high cheekbones with sticky glitter primer using a flat brush.
- Press geometric diamond-cut holographic glitters firmly into the tacky primer.
- Apply multi-chrome highlighter across the nose bridge, cupid’s bow, and chin.
- Coat lips with clear, ultra-reflective glass-finish lip gloss packed with holographic sparkle.
Materials and Embellishments List
- Metallic silver chrome liquid eyeshadow and matching eyeliner pen
- Geometric diamond-shaped holographic cosmetic glitter flakes
- Prismatic multi-chrome powder highlighter with silver-rainbow shift
- Strong-hold clear eyebrow grooming soap or wax
- Flat synthetic glitter application brush
- Strong-hold clear cosmetic glitter adhesive primer
- High-shine clear holographic glass-finish lip gloss topper